“Blushing Blocks” Square in a Square Quilt Pattern
Here’s one of my favorite classic quilt blocks that never goes out of style – the Square in a Square block. This versatile block is perfect for creating stunning quilt designs, and I’ll also include a free throw size quilt pattern to get you started. Skill level is confident beginner and finished size measures 65″ x 65″. Below is a simple tutorial on how to make the quilt blocks and free quilt pattern. Let’s get quilting!
In today’s blog post, I’ll be sharing my square quilt block pattern called “Blushing Blocks”. This quilt uses larger squares so it works up fast. I made these blocks with some wiggle room so no need to stress over accurate seam allowances either.
The hardest part is determining what size block you want to make. You will need a square in a square block calculator to make life easier. Check out either of these free square block calculators. Quilter’s Paradise Square Block Calculator and MyWebQuilter Square Block Calculator. Just plug in your inside square or outer square desired measurement for all the fabric measurements to make different size Square in a Square blocks. The best way to build a quilt pattern from scratch.
Economy Quilt Blocks
There are different ways to make a square in a square or economy quilt block. I’m pretty sure this is a simple square in a square, while the economy block has a 2 squares in a square. The double square is great for fussy cuts but this is a super basic block. Unfinished square size is 7.5″ x 7.5″, finished block size is 7″ x 7″. Great project for fat quarters and yardage.
Make sure you check this out!
After you read this post, make sure you also check out How To Learn How To Quilt: Beginner Quilting Guide. It’s jam packed with even more information, links and resources that are so helpful when you’re first learning. It also has a section with free quilt patterns that are great for beginners. So make sure you check this out, seriously don’t forget!
Grab a copy of my Quilt Planning Journal, filled with graph paper and some note pages to help you design at least 4 quilts or sewing projects! I have been using mine for a little while and already I am jotting down ideas as I see them and reminders about websites where I have seen some ‘must have’ fabric, so I think this can be so much more than just a design book. Pin in fabric swatches, photos of your finished quilts and enjoy your creative process!
Cutting Instructions
For each Square in a Square block, you’ll need: 1 – 4″ x 4″ center square and 2 – 4.5″ x 4.5″ squares cut in half diagonally for outer triangles.
For this throw size quilt (finished size 65″ x 65″) you’ll need:
- 41 Square in a Square blocks (7″ x 7″)
- 40 Background squares (7″ x 7″)
- 8 Border strips (3″ x width of fabric)
- Batting and backing fabric 70″ x 70″
- 2.5″ Binding strips

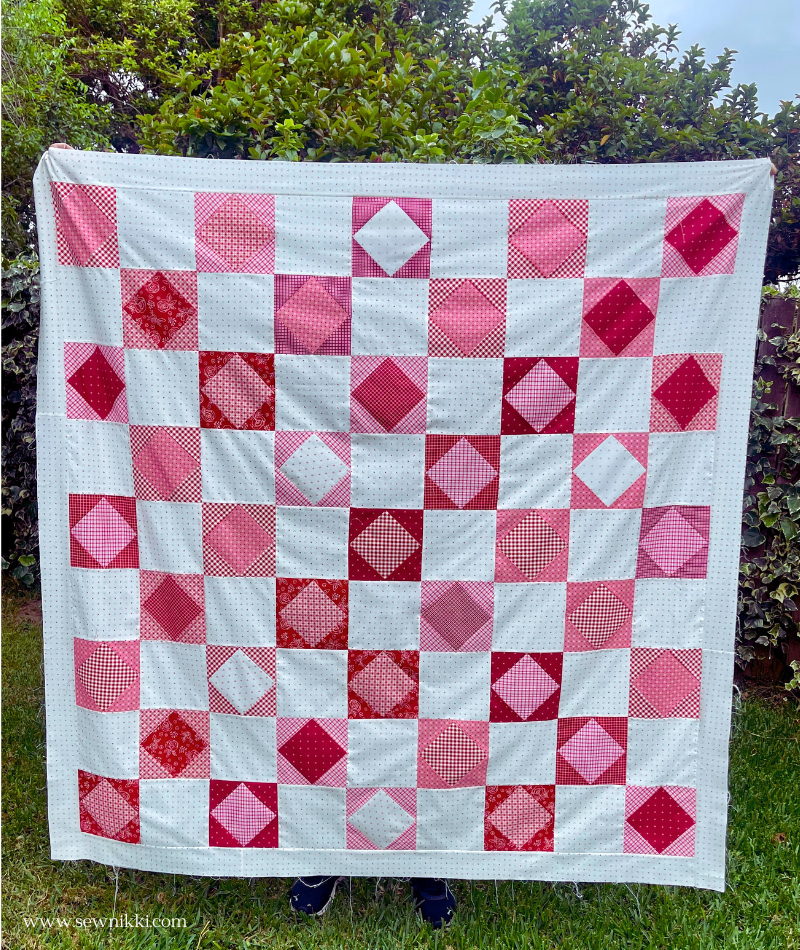
My free pattern “Blushing Blocks” has 9 rows with 9 blocks per row and a simple 3″ border. There aren’t a lot of seams to worry about when joining the block or rows together. Use any color combination you like for the blocks, my fabrics are red and pinks out of my fabric stash. My granddaughter really likes this one, I hope you do too!
Square in a Square Quilt Pattern – Blushing Blocks
Fabric Requirements
- Fabric for 41 Square in a Square blocks (choose a mix of fabrics for a scrappy look or a coordinated set for a more uniform design)
- Fabric for 40 background squares (same fabric for entire quilt)
- Border fabric (approximately .5 yard)
- Batting and backing fabric (70″ x 70″)
Cutting Guide
- For each Square in a Square block: 41 center squares (4″ x 4″) and 82 edge squares (4.5″ x 4.5″, then cut in half diagonally).
- 40 Background squares cut 7″ x 7″.
- Border strips: Cut 8 strips, 3″ x width of fabric.
Block Instructions
Take your center square and four corner triangles to the sewing machine. Lay the triangle with point facing the center of the square. Attach using 1/4 inch seam allowance, right sides of fabric facing each other.
Rotate the block and repeat for opposite side. Center as best you can and take to cutting matt when done.

Flip block over so it’s facing down. Use your straight line ruler and rotary cutter to trim off dog ears. Press with iron when done. Pro tip: Press from the back side of the block for nice seams on the front side.

Now repeat for the remaining two sides. It’s important to line your sewing needle where the two triangles overlap. This is also important when you sew to the bottom of the block, sew through the intersection of the triangles. Press when done.

Finished block measures 7″ x 7″. Square up with block ruler. Find the 7″ marks on both sides of the ruler. The center point is 3.5″. Line up the points on the block with about 1/4 inch from all the center block points and trim as usual.

Assembly Guide
Make all 41 Square in a Square blocks following the instructions above.
Assemble the blocks into rows, alternating between quilt blocks and background squares.

Join the rows, nest at the seams using pin to hold in place if needed.

Add the borders, starting with the sides, then the top and bottom.
Quilt and bind your throw quilt to complete the project.
Get the digital pattern.
Just download and print the pattern so you have it handy. Get your copy here.
BEGINNER SUPPLIES
Here are some quilting tools and supplies I recommend. I make a small commission if you purchase through the links, this helps to support this free content. For more info, check out Supplies for Beginners (Best Tools To Start).
Rotary Mat Cutting Mat (Self-Healing Mat)
28 mm Rotary Cutter Replacement Blades
45 mm Rotary Cutter with Sharp Blade (start with this one)
45 mm Rotary Cutter Replacement Blades (start with this one)
60 mm Rotary Cutter Replacement Blades
4.5″ Square Ruler for half square triangles
12.5″ Square Ruler for blocks
SAVE THIS PIN FOR LATER!

This post contains ads and affiliate links, which means I make a small commission at no extra cost to you. While the ads are annoying, it helps keep this blog going. See my full disclosure here.
ABOUT SEW NIKKI
If this is your first time stopping by, welcome! I’m Nikki, a maker obsessed with quilting, crochet, and all things fabric. Here, you’ll find easy-to-follow patterns, helpful tutorials, and plenty of inspiration for your next handmade project. Whether you’re stitching up a cozy quilt, crocheting a vintage-inspired blanket, or diving into upcycled sewing, I’m here to make the process fun and stress-free. Grab your fabric (or yarn), and let’s create something beautiful together!
Follow me on social media (Pinterest, Instagram, Facebook and Twitter) so you get notifications when new patterns and tutorials are posted.
Want to learn how to crochet? Check out this post, How to Learn How to Crochet – Guide for Beginners.


Such a beautiful quilt and what a lovely end result! Thank you for sharing!!
This is beautiful. I wish I knew was taught early on how to sew! I’m going to make an effort to learn 🙂
This quilt is so beautiful! Can’t wait to make this!
Beautiful!!!
This is such a gorgeous design!