Large Patchwork Tote Bag Sewing Pattern
In today’s blog post I’m sharing my new patchwork large tote bag sewing pattern. In this easy tote bag tutorial, I will show you a short cut to making the patchwork panels. If you’ve been collecting charm packs or have a pile of leftover 5-inch squares, this large patchwork tote bag sewing pattern is a great project for you. It is roomy and sturdy, a really fun sewing project to make.

This bag uses a nice heavy batting to give it structure and cuteness. Patchwork projects take a little longer to make but I think they are way cuter than a plain tote. This bag has the strap from the base of the bag all the way up with an outer pocket and raw edges. You could add a recessed zipper but I’ve kept it really simple and left it open. The inside of the bag is as cute as the outside of the bag thanks to a large interior pocket divided into two sections. This is a beginner friendly sewing pattern and you will love the final bag.
This bag would be great as a diaper bag for baby, grocery store bag for picking up a few items, gym trips or as a work bag for your computer and planner. It’s a durable bag thanks to the batting and interfacing sew into the straps. In this post, I’ll walk you through the general steps for making a big patchwork bag using 5“ squares, and the paid pattern includes measurements for my bag, so you’ll get a solid comprehension of how to sew it together.
MAKE SURE YOU CHECK THESE OUT!
After you read this post, make sure you also check out Learn How to Quilt for Absolute Beginners. It’s jam packed with information to make your first quilt. It also has links and resources that are so helpful when you’re first learning. There’s lots of free quilt patterns that are great for beginners and all skill levels too. So make sure you check this out, seriously don’t forget!
Make sure you grab a copy of my free Quilt Planning Journal. It’s filled with graph paper and note pages to help you design at least 4 quilt or sewing projects! Use it to jot down ideas, fabrics, patterns and inspiration all in one place. Or create your own patterns and share with others. Pin in fabric swatches, photos of your finished quilts and enjoy your creative process!
Large Tote Bag Sewing Pattern Instructions
This entire DIY tote bag project has 3 main pieces: 2 patchwork panels and one set of straps. The other pieces include the pockets for inside and outside the bag plus the bag lining. Prepare all your pieces before you assemble the bag. You will be using basic sewing skills plus basic quilting skills.
Here are the supplies used for this project:
Fusible Light Weight Interfacing
For a list of all my favorite sewing supplies, go to the handy Resource page with links to the products on Amazon.

Patchwork Panels (Make 2)
First step is to make the patchwork panels for the sides and bottom of the bag. You will need to sew your charm squares together, however you like, so they are 4 rows with 5 squares in each. Iron when done.
To make the patchwork panels faster, try this short cut. Start with fabric yardage and cut 5″ x WOF strips. My panels use 2 contrasting fabrics. You will need 2 strips from each fabric. Sew two strips together, one from each fabric. Repeat for the remaining strips.
Now sew the two sets of strips together alternating fabric. Press with iron then sub-cut into sections with each section having 4 squares. Then sew 5 sections together for each side of the outer panels. Press with iron when done.

Next step is to trim the batting so it’s 1/2″ larger on all four sides minimum. You will need two pieces for each patchwork panel. Sew the panels onto the batting by simply laying the pressed panel onto the batting and quilt as you like. I just followed the seam lines up and down and then across. I also added some cross hatch lines through the lighter charm squares but do whatever pattern you like. Repeat for the other panel and batting piece. Trim panels to the same size when done.
Inside and Outside Pockets
Trim your fusible fleece interfacing to the size of the pocket. Trim your pocket fabric the same size. Use your iron and fuse the fabric onto the interfacing. The bumpy side of the interfacing is the side with the glue. Make sure the glue side is under your fabric and press directly on top of your fabric. Repeat for the other pocket.

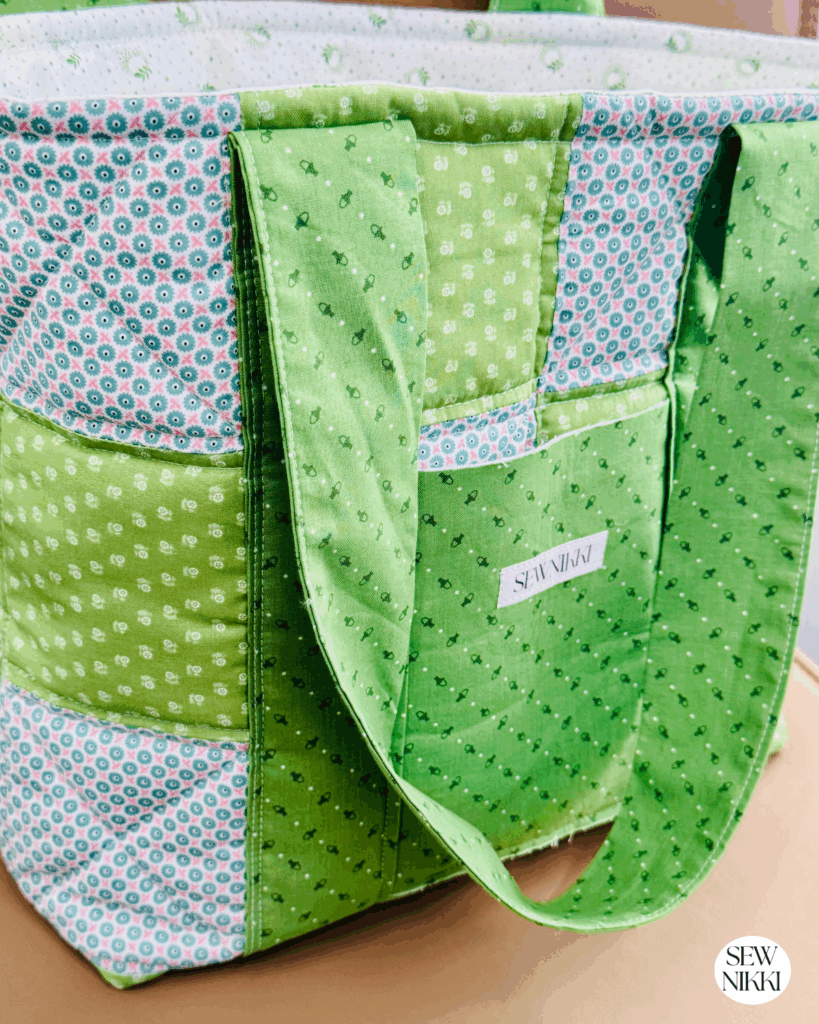
Bag Straps (Make 2)
Cut 3 strips of fabric, one for each strap. Now cut the fusible interfacing to iron onto the fabric to give them durability. You will need fabric yardage for this step so your handles are long enough. Refer to the digital download for fabric measurements. Follow the same process you used to fuse the pockets.
To make straps, fold the fabric in half and press with iron. Outside of fabric should be facing you when folded. Now fold fabric in 1/4″ along both sides of strap. I just fold and press, fold and press, fold and press until I’m done with one side of the strip. Then repeat for the other side of the strip.
Now fold the strip onto itself so it’s folded in half with fabric facing you. Press with iron for a neat finish. Take strips to the sewing machine and sew as close to the border as possible and give it a clean look. Do this on both sides of the strap. Repeat for second strap. Cut each strap to the dimensions on the digital pattern.
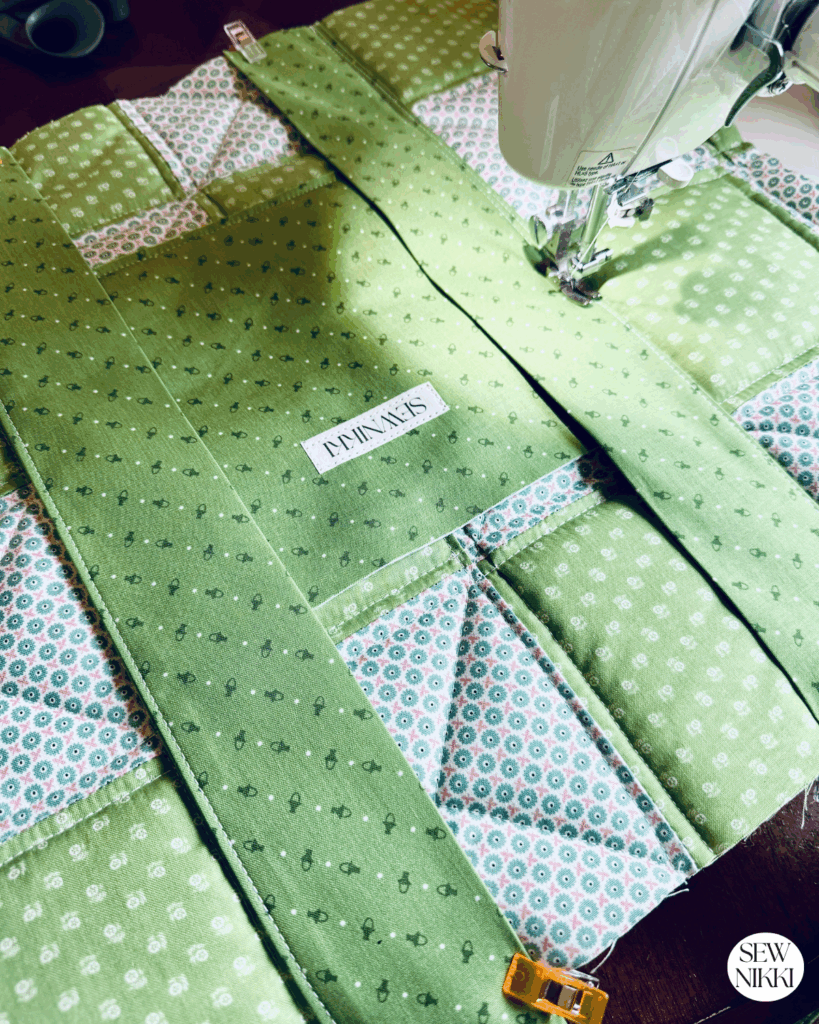
Sewing Label
If you have a sewing label, now is the time to attach it to the outside of the bag. Please refer to my how to make your own personalized sewing labels for more detailed information. I placed my sewing label on the outer pocket but you can skip this step or place a label where every you like. This step is mostly for those that will be selling this item.
Attach Outside Pocket
Place the outside pocket on one of the patchwork panels, use the instructions in the pattern for placement. Sew pocket onto panel starting at the top of the right side, down around the bottom and up the left side using a 1/4″ seam allowance. Repeat this process for the inside pocket.
Attach Straps
Place the bottom of the straps at the bottom of the panel on top of the outer pockets. The straps will overlap the pocket, that’s ok. Sew the straps onto the outer panels using the pattern instructions. Repeat on both patchwork panels.
Bag Lining
Attach the inner pocket to the right side of the fabric lining. Refer to the pattern for placement info. Follow the same steps for attaching the outer pocket. To divide the pocket into two sections, just sew a straight line from top to bottom the the pocket. Backstitch when you start and stop. Press with iron when done.
Sew Panels Together
Take your patchwork panels and pin together using sewing clips. Line up the corners and leave the top open. Box the corners before sewing panels together. Refer to pattern for corner measurement. Use a ruler and mark the cutting line with chalk, pencil or pen. Take fabric scissors and cut out the corners. Then take to your sewing machine and sew both sides and bottom of bag using a 1/2″ seam allowance.
Sew Lining Fabric Together
Repeat the same process for the tote bag lining. But this time leave a large space at the bottom open so you can turn the bag out when you are done. Backstitch when you start and stop sewing using a 1/2″ seam allowance.
Sew Boxed Corners
Take both of your patchwork panels and sew the boxed corners using a 1/2″ seam allowance and sewing clips. Sew one panel at a time, boxing both corners. Refer to my tutorial on how to make a flat bottom bag for detailed information using the cut-out boxed corners method.

Repeat this same step for the fabric lining. Remember to use a 1/2″ seam allowance.
Assemble Bag
Outside of bag should be inside out with batting facing outwards. Take a sewing pin and pin down the straps on both panels to keep them away from the top of the bag. We don’t want to accidentally sew over the strap when joining the bag together.
Next, place the tote bag lining inside the bag with the fabric facing you. So the right sides of fabric from the outer bag and the lining should be touching each other with an opening in the bottom of the inner lining. Pin in place with sewing clips starting at the side seams. Line up the outer panel side seams with the lining fabric side seams first. Then finish pining in place around the top of the bag.
Take project to your sewing machine. Place a 1/2″ top stitch all the way around the top of the bag, making sure you don’t sew over the top of the straps. Backstitch when you start and stop.
Turn Bag Right Side Out
Now find the opening in the tote bag lining and pull the bag right side out. Then sew a 1/2″ stop stitch all the way around the top of the bag to finish it. You may want to press the top of the tote with an iron before you stitch, adjusting the lining fabric so it’s inside the bag for a clean finish.
Get the digital pattern
Are you ready to make one for yourself? Grab the digital pattern with all the fabric measurements and even more detailed instructions. I’ve done all the math for you and figured out the best way to attach the full bag strap.
More sewing tutorials you may like:
How to Sew a Zipper with a Quilting Presser Foot
Thrifty Way to Make Your Own Personalized Sewing Labels
If you don’t like my bag exterior with the straps and outer pocket, you can change it. That’s the beauty of being a creator. Maybe you prefer a foam stabilizer instead of using high loft polyester batting for the side panels. You can change that too. But if this is your first time making a tote bag and you need help with getting started, I hope you were able to make yourself a bag using my tutorial and pattern. If you would like to help support my work, please consider buying the paid digital pattern from my shop with the fabric measurements.
You don’t need a walking foot in order to quilt the panels, just use a 1/4″ presser foot (also called a quilting foot) and your 1/2″ presser foot or the 10 line to the right of the needle on your sewing plate. You will feel so proud after this bag is done, she’s a real beauty. It’s the perfect project for using scrap fabrics. If you don’t have 5″ charm squares, just modify the pattern so the measurements are the same size as the printed pattern.
SAVE THIS PIN FOR LATER

ABOUT SEW NIKKI
If this is your first time stopping by, welcome! I’m Nikki, a maker obsessed with quilting, crochet, and all things fabric. Here, you’ll find easy-to-follow patterns, helpful tutorials, and plenty of inspiration for your next handmade project. Whether you’re stitching up a cozy quilt, crocheting a vintage-inspired blanket, or diving into upcycled sewing, I’m here to make the process fun and stress-free. Grab your fabric (or yarn), and let’s create something beautiful together!
Got questions or tips to share? Drop them in the comments below!
Follow me on social media (Pinterest, Instagram, Facebook and Twitter) so you get notifications when new patterns and tutorials are posted.
Want to learn how to crochet? Check out this post, How to Learn How to Crochet – Guide for Beginners.
This post contains ads and affiliate links, which means I make a small commission at no extra cost to you. While the ads may seem annoying, it helps keep this blog going. See my full disclosure here.


That bag is beautiful! The colors are awesome and it looks so well made. I’ll be saving this for later. Hoping to get back to sewing soon and this is one project I’d love to make.
What a cool beginner friendly project that is useful!
This is beautiful! It makes me want to take out my sewing machine that’s been hiding in the closet and start a project 🙂