How to Sew a Zipper With a Quilting Presser Foot
If you’ve ever skipped a sewing project due to a zipper then let’s fix that today. I will show to you how easy it is to sew a zipper with a quilting presser foot. No zipper foot needed. So if you are a quilter or always use a 1/4″ quilting foot when sewing, there is no need to change anything to attach zippers to your sewing projects.
Most of us here on this blog are quilters and that means the settings on our sewing machines are already set for quilting. The good news? Adding a zipper onto pouches, bags, or anything you’re making doesn’t require any change at all. I’ll show you how I attach a zipper with my quilting foot. This post will also show you how to add zipper ends, zipper pulls and a zipper tab too.
Never Be Afraid of Zippers Again!
Why do zippers intimidate us so? They don’t have to, it really is easy if you know some simple tricks. Zipper tabs are your friend and makes this process neat and easy to attach.
Zipper tabs are one more added step but pack a big punch. They make opening your items much easier for the user because they can grab onto the pull tab while opening or closing the zipper. It takes your sewing project to the next level.
Zipper feet are great but not the only way to attach zippers. A zipper can be handled just fine with a regular quilting foot. It’s the perfect width to sew on most zippers. A walking foot is too wide so save that foot for machine quilting.
This rings true especially if you sew a zipper into a flat project such as a makeup bag, pillow cover, or pouch. Precision is easier than you’d think, since you’re not going through curved fabric or bulky seams. Let me show you how to add zipper ends first.
How to Sew a Zipper – Add Zipper Ends
You will need 2 pieces of fabric that are 1.25″ x 3″. One for each end of the zipper. Your zipper should be slightly shorter that the width of the fabric you are attaching the zipper to. If you have a bag that is 12″, you will need an 10″ or 11″ zipper. You will have more of the zipper fabric end show when you use decrease the size of your zipper. Whatever your personal preference is.
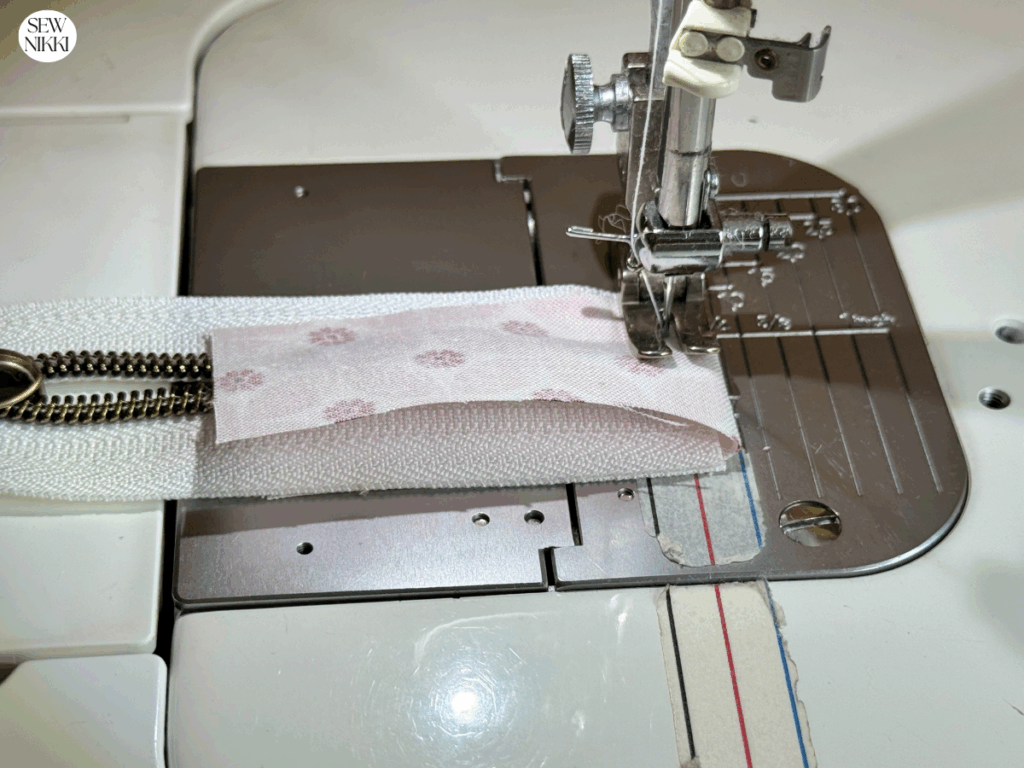
Lay one zipper tab strip face up on your sewing plate. Place the zipper half way down the fabric and fold the excess strip over the zipper. Sew slowly in place with a 1/4″ seam allowance. Repeat for both ends. Pull back the fabric and press.
How to Sew a Zipper – Make Zipper Tabs
Take a 5″ strip of fabric and fold in half, right side facing you. Press with iron or your fingers. Open the fabric up again, then fold in one side to the line your just created. Then fold the other side in to the middle and press with iron or fingers. Then fold that piece in half and sew a top stitch down both sides of your folded strip as close to the edge as possible.

Take fabric scissors and cut two zipper tabs the same length based on your preference. Fold the fabric in half to determine what size you prefer for these. Mine are around 3″ long by 1.25″ wide.
Now that the zipper has ends and the tabs are done, it’s time to sew the zipper onto your project. Instructions are below for how to sew a zipper with a quilting presser foot, no zipper foot needed!
MAKE SURE YOU CHECK THESE OUT!
After you read this post, make sure you also check out Learn How to Quilt for Absolute Beginners. It’s jam packed with information to make your first quilt. It also has links and resources that are so helpful when you’re first learning. There’s lots of free quilt patterns that are great for beginners and all skill levels too. So make sure you check this out, seriously don’t forget!
Make sure you grab a copy of my free Quilt Planning Journal. It’s filled with graph paper and note pages to help you design at least 4 quilt or sewing projects! Use it to jot down ideas, fabrics, patterns and inspiration all in one place. Or create your own patterns and share with others. Pin in fabric swatches, photos of your finished quilts and enjoy your creative process!
Check out my resource page
Need help with what sewing or quilting supplies to buy? Go to the Resource page for a list of all my favorite quilting products.
Want digital sewing, quilting or crochet patterns? Browse my full pattern shop here »

How to Sew a Zipper With a Quilting Presser Foot
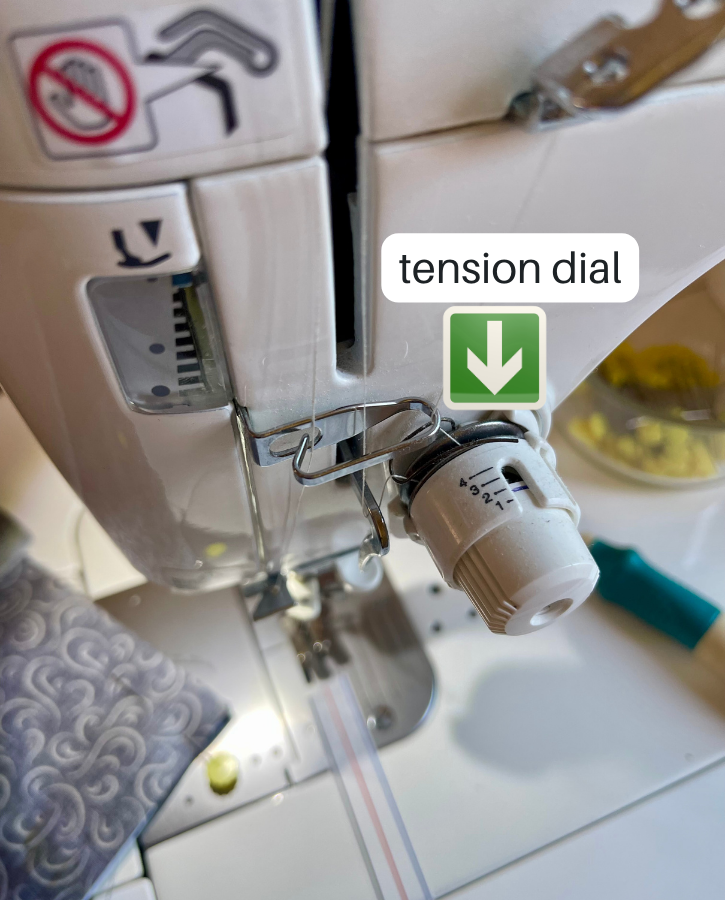
Using a quilting foot to attach a zipper is the easiest method for me because I don’t have to change my sewing machine foot or do anything else really. I will raise my presser foot slightly and increase my stitch length so I don’t break a sewing needed.
I use a stitch length of 3.5 but use what works best for your machine. I’ve heard the word zipper tape but not sure exactly what that is and don’t use it but feel free to research that if you want.
Now the fun part. With your project pieces lined, sew in the zipper — no zipper foot needed.
Let’s begin
Place your outer fabric with the right side facing up.

Center the zipper face down along the edge of it.
Add the lining piece on top, right side down and make a sandwich with the zipper in the middle. Use sewing clips or pins to keep everything in place.

With your regular quilting foot, sew along the edge using about a 1/4″ seam allowance. Make sure that the zipper is at the bottom when sewing. Go more slowly when you happen to be near to the zipper pull
Halt now, keeping your needle down, raise the presser foot, then jiggle the zipper back to move it out of the way. Place presser foot down, make sure everything is lined up properly and finish stitching. Back stitch at beginning and end.

If a makeup bag is what you’re making, like in my example, repeat on the other side. This step is for people creating a pouch, bag or pillow with a zipper closure.
Once both of the sides of the zipper are attached, you can flip the fabric pieces away from the zipper, and then you can press them well. I like to topstitch along each of the zipper’s sides on the front of my projects. On both sides, maintain the stitch around 1/4″ away from the zipper. This gives your project a clean finished look.
Last step is to attach the zipper tabs before finishing the project.
Attaching Zipper Tabs
Fold the whole tab lengthwise in half so you can attach easily before sandwiching your project. Secure the tabs using clips or pins. Do this at the zipper’s opposite sides.
Attach the tabs by folding in half with raw edges lined up to the edge of your project. Sew in place using a 1/4″ seam allowance. Trim the excess fabric from the zipper ends to clearn it up and so it’s flush with the outer edge.

It becomes easier to attach zippers the more you do it. Practice makes perfect. Using zippers with tabs really does make it easier to attach and sew together when your starting out. I hope you enjoyed this sewing tutorial.
Here’s a YouTube short on how to attach the zipper pull hardware using a fork if you ever need to do this.
If you want more tutorials on how to sew a zipper to a sewing project, you may like Rosie Caldwell. She has a YouTube channel and shows another way to add zippers.
Recommended Quilting Supplies
Here are some quilting tools and supplies I recommend. I make a small commission if you purchase through the links, this helps to support this free content. For more info, check out Supplies for Beginners (Best Tools To Start).
Rotary Mat Cutting Mat (Self-Healing Mat)
28 mm Rotary Cutter Replacement Blades
45 mm Rotary Cutter with Sharp Blade (start with this one)
45 mm Rotary Cutter Replacement Blades (start with this one)
60 mm Rotary Cutter Replacement Blades
4.5″ Square Ruler for half square triangles
12.5″ Square Ruler for blocks
This post contains ads and affiliate links, which means I make a small commission at no extra cost to you. While the ads may seem annoying, it helps keep this blog going. See my full disclosure here.
ABOUT SEW NIKKI
If this is your first time stopping by, welcome! I’m Nikki, a maker obsessed with quilting, crochet, and all things fabric. Here, you’ll find easy to follow patterns, helpful tutorials and plenty of inspiration for your next handmade project. Grab your fabric (or yarn) and let’s create something beautiful together! Read more about me here.
Follow me on social media (Pinterest, Instagram, Facebook and Twitter) so you get notifications when new patterns and tutorials are posted.
Want to learn how to crochet? Check out this post, How to Learn How to Crochet – Guide for Beginners.
My other sewing posts are now available for you. Check them out here. The shop also has digital downloads, crochet tutorials, with free quilt patterns that are beginner friendly and all ad-free.