Make Your Own Hockey Jersey T-Shirt Quilt: Fun DIY Project
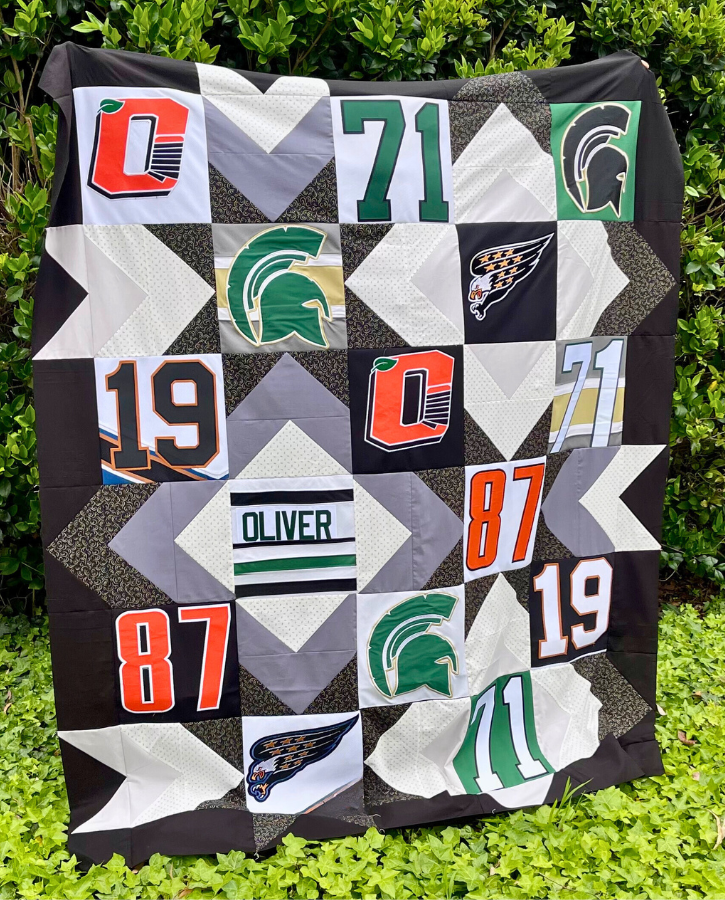
This tutorial will demonstrate how to make a T-shirt quilt with hockey jerseys. Hockey isn’t just a sport, it’s a passion that runs deep. Filled with memories of victories, defeats, and cherished moments on the ice. What better way to honor those memories than by transforming your collection of hockey jerseys into a fun t-shirt quilt? In this guide, I’ll walk you through the process of creating your very own t-shirt quilt infused with the spirit of the game. Finished quilt size will measure 85″ x 85″.
I’ve been asked to make a quilt out of old hockey jerseys by a family member. His son played hockey and they want a custom t-shirt quilt but made with hockey jerseys. In order to do this quilt, it required lots of research and figuring out the best way to tackle it. I’ll share it all with you so you can try this out for yourself.
Plus I found a cool quilt design by Angela Walters the Midnight Quilter to tie everything together and look like a really cool quilt. She has two older videos, 4 years and 3 years ago, but the link to the free pattern is not good. I’ll do my best to break down that pattern for you. The fabric requirements, cut instructions, block layout and interfacing instructions will be covered in this tutorial.
After you get done reading this, you will have a clear quilt pattern to use with your hockey jerseys. For best results, count the number of jersey blocks in my sample quilt and ensure you have enough to make your own.
MAKE SURE YOU CHECK THESE OUT!
After you read this post, make sure you also check out Learn How to Quilt for Absolute Beginners. It’s jam packed with information to make your first quilt. It also has links and resources that are so helpful when you’re first learning. There’s lots of free quilt patterns that are great for beginners and all skill levels too. So make sure you check this out, seriously don’t forget!
Make sure you grab a copy of my free Quilt Planning Journal. It’s filled with graph paper and note pages to help you design at least 4 quilt or sewing projects! Use it to jot down ideas, fabrics, patterns and inspiration all in one place. Or create your own patterns and share with others. Pin in fabric swatches, photos of your finished quilts and enjoy your creative process!
How to Make a T-Shirt Quilt
Obviously it starts with tee shirts, hockey jerseys or any other sports jerseys. This quilt requires 15 t-shirt blocks. There are 6 rows with 5 blocks in each, alternating between t-shirt block and flying geese blocks. This memory t-shirt quilt with hockey jerseys is made with finished 12.5 inch quilt blocks. All jersey blocks have interfacing attached to make them easier to work with. There is one border around the outer edge, this was the trickiest part to figure out. Patchwork flying geese blocks were all made with 100% Kona cotton fabric and one print fabric.
This is my first attempt at making a t-shirt quilt but the basic construction is the same as a block quilt. You will make 15 t-shirt blocks and 15 flying geese blocks for the body of this quilt. The number of t-shirt squares you need depends on the pattern or quilt block size. The larger the quilt block size, the less you will need and visa versa for a small quilt block.
Pick a Design Layout
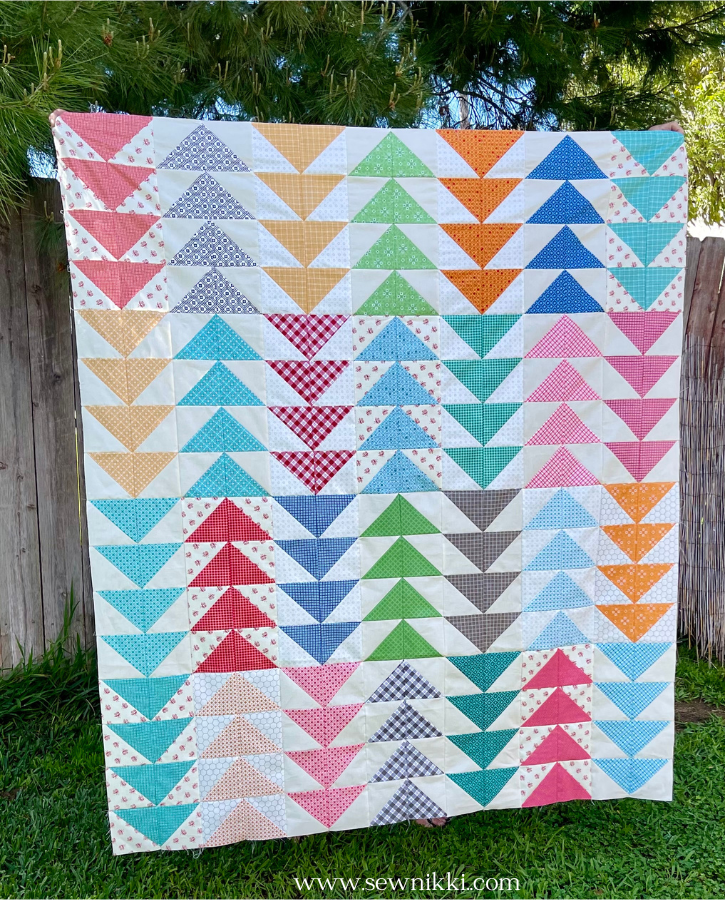
Next step, pick your design layout. You can make a t-shirt blanket with every block being a t-shirt block, sew blocks together to form rows, then connect rows and add optional border. Or you could add sashing in between the t-shirt blocks and around the outside to form a border. Or you can follow Angela’s clever layout with two quilt blocks made with flying geese units. These flying geese quilt blocks form a secondary pattern and take this quilt to a whole new level.
This tutorial is to give you ideas of t-shirt quilt designs and how to use hockey jerseys or any other sport jersey in this style quilt. You will need to play around with the flying geese quilt blocks. They form a chevron pattern and use 5 different shades or grey based fabric colors. Grey, black or white are the most recommended color choice for neutral sashing that compliment most colors.
DIY T-Shirt Quilt Supplies
For this hockey jersey quilt, you will need the following:
Favorite T-Shirts or Hockey Jerseys: Raid your closet or collection for hockey jerseys that hold special meaning to you. Whether they’re from your favorite team, memorable games, or personal achievements, each jersey will add a unique touch to your quilt. Supplement your jersey collection with t-shirts that complement the hockey theme. Look for shirts featuring team logos, slogans, or graphics that resonate with your love for the game.
Fabric for Pieced Quilt Blocks: 1.5 yards of light grey, dark grey, background white with small print, black with gold print. These fabrics will make up the flying geese blocks that form a secondary chevron and star pattern. Saw this ides on The Midnight Quilt Show with Angela Walters and fell in love with the idea. These neutral colors will tie the jerseys all together. Trust the process.
Pellon P44F Fusible Interfacing: You must stabilize the jersey or t-shirt material before you can sew on it.
Batting: Select a suitable batting to provide warmth and structure to your quilt. Opt for a medium-weight batting that will offer coziness without adding too much bulk.
Sewing Supplies: Straight Pins, Square Ruler 12.5″ x 12.5″, Straight Ruler, Fabric Scissors, rotary cutter and cutting mat.
DIY T-Shirt Quilt: Step-by-Step Procedure
Cutting the Jerseys
First step is to look through the jerseys and find the ones you can turn into 12.5″ quilt blocks. This means that when the square ruler is over the emblem, there is at least 1/2 inch seam allowance around all sides. You can use the back of the shirts, front of the shirts, or both. It all depends if they will fit into 12.5 inches when trimmed leaving the desired 1/2 inch seam allowance to be on the safe side.
Carefully cut out the front and back panels of each jersey, leaving a border of at least 1-2 inches around the design. Slide your fabric scissors up the sides of the shirts or jerseys, separating the front and back from the sleeves. Once the sleeves are removed, cut along the top of the jersey to form front and back panels. No need to trim away any excess fabric to create uniform squares. We will trim up later.

Pro tip: Don’t throw any of the jersey or t-shirt scraps away at this point. You may need some of that material later down the line. Also, sleeves can be turned into blocks but in the end my quilt didn’t contain any sleeves.

Stabilizing the Fabric
Since t-shirts and jerseys are not made out of 100% cotton fabric, it’s essential to stabilize them before quilting. If you don’t do this step, it will be miserable to work with and very hard to sew. Attach lightweight fusible interfacing to the back of each jersey square to prevent stretching and distortion during sewing.
You will need a stabilizer for your t shirts or jersey’s. The stabilizer is your friend and doesn’t take a long time to do. It makes sewing your t shirt blocks a lot easier on your machine. Based on my research, I went with the lightweight fusible Pellon P44F Interfacing and it was not hard to do. Each block took about 5 minutes for stabilizer to fuse to jersey.

You need a firm work surface when doing this step. An ironing board is not recommended, using a wood base is recommended and I saw several creative ways to do this.
Look around your house first, I saw a wooden cutting block in my kitchen and used that. Folded a bath towel and some left over fabric over it and tucked everything underneath. That saved time and money and was the easiest way to get a firm work surface.

Cut 14″ squared pieces of interfacing, enough for your 15 jersey blocks. Grab your 12.5″ square ruler and have it near your pressing station. Key tip is to make sure you have enough fabric on all sides of the jersey emblem. Use the ruler to test it works before fusing. Keep in mind that the interfacing is 1.5″ larger than your trimmed block.

Flying Geese Blocks
There are two main blocks you will be making. The border will require you to make several half block variations to round out the border strips. Here is a block chart and yardage needed, cutting instruction after that
Fabric Information:
Here is the fabric information for making these blocks but you can easily change out the black for another color. Please note that I purchased 2 yards of each but didn’t use that much for any of the fabrics.
Dark Print – 1.5 yards
Light Print – 1.5 yards
Dark Grey – 1 yard
Light Grey – 1 yard
Black – 1.5 yards
Block Information:
Here is the block information. Please note that blocks are in the main body of the quilt and 12.5″ x 12.5″. half blocks are for the borders, to bring the dual chevron pattern out to the edge of the quilt and are 12.5″ x 6.25″.

Block A – 6 (dark print, dark grey, light print)
Block B – 9 (dark print, light print, light grey)
Half Block A – 1 (dark print, black)
Half Block B – 2 (light print, black)
Half Block C – 2 (light grey, black)
Half Block D – 2 (black, light grey)
Half Block E – 12 (black)
Half Block F – 4 (black, dark print)
Half Block G – 1 (black, light grey)
Cutting Instructions:
Each flying geese unit requires a large triangle and two smaller triangles to make. Here are the cutting instructions for both size triangle.

To make the 14″ quarter triangles (large flying geese triangles), cut a 14″ strip, then sub-cut into 14″ blocks. Cut diagonally from each corner to opposing corner to create 4 quarter triangles.
To make the 8″ triangles (small flying geese triangles for the sides), cut an 8″ strip by WOF. Then sub-cut into 8″ blocks. Cut diagonally in half to create 2 triangles.
Assembly Instructions
Take one large triangle and one small triangle to sewing machine. Place right sides facing each other, lining up the bottom corner flush with the bottom of the large triangle. Sew smaller triangle onto larger triangle using a 1/4″ seam allowance.

Pro tip: Don’t pin in place, it actually makes it harder to work with this bias cut fabric. Instead, lower your sewing needle, place your stiletto on the fabric and slowly stitch one or two times making sure the fabric on the bottom doesn’t shift. Then sew down to the bottom, making sure the fabric is lined up properly. Press with iron but don’t stretch the fabric.
Next, take the next small triangle and attach to the opposite side, repeating the same process and making sure the small triangles overlap one another. Trim excess bulk, take to iron and press gently.

Trim Blocks
Square up with straight ruler first, lining up the 1/4″ seam line on your ruler with the tip of the point in the flying geese unit. Trim excess.

Then grad your 12.5″ square ruler. Line up the 6.25″ line with the point on the flying geese and trim both sides. Grab your straight ruler again and trim block to 12.5″ x 6.25″. Repeat for all units.
Make blocks A and B by sewing together the correct flying geese trimmed units to make the 12.5″ x 12.5″ trimmed blocks. Keep the remaining half block units for the block sides that will be the final border. If you get confused, refer to Angela’s videos or look at my quilt picture for how to arrange the quilt top.

Finishing the Quilt
For the quilting information, machine quilting and hand quilting, please click here. It contains how I quilted this unique quilt without free motion quilting.
If you liked this pattern and tutorial, check out my free patterns and tutorials in the free resources section below and make sure you sign up for my newsletter and follow me on social media. Links are located on my homepage.
Get the digital pattern.
Get the instant download pattern from my shop here.
Save this pin for later!

This post contains ads and affiliate links, which means I make a small commission at no extra cost to you. See my full disclosure here.
ABOUT SEW NIKKI
Welcome to Sew Nikki! Your place for free crochet, sewing and quilt patterns for beginner to intermediate skill levels. Want a digital pattern? We have those too! Plus tutorials to walk you through how to make each item from start to finish.
The most important thing about this quilt with hockey jerseys is not to iron the quilt blocks as you are sewing them together. You don’t want to melt your jerseys, not all jerseys are the same. When you do iron, use a piece of parchment paper between your iron and the jersey so you can see what you are ironing. You could use another piece of cotton fabric but it’s tough to iron when you can’t see what you are doing. You can see through parchment paper, the same is not true for fabric.
Also, don’t free motion over the large jersey emblems or some thick t–shirt graphics. Quilt around them instead. Refer to your batting information to see what the quilting requirements are for that brand and type. If you are having issues sewing the jersey blocks together, try to increase your stitch length or adjusting the presser foot up a little like you would when you machine quilt.
Follow me on social media (Pinterest, Instagram, Facebook and Twitter) so you get notifications when I post new patterns and tutorials.
Want to learn how to crochet? Then check out this post, How to Learn How to Crochet – Guide for Beginners.


This would be a fun project if my kids play sports!
This would be a hit where we live! Hockey is a big deal. I wonder about making a quilt using all of the boy’s different little league jersey’s! so cute!!
This is a beautiful quilt. Hopefully one day I’ll be able to make one this nice.
Such a wonderful keepsake and great tutorial, thank you!
I would like to get a hold of this pattern of The variable flying geese T-shirt quilt. And I have been trying to find the pattern everywhere and I’m not able to buy one. Would this be available through you?
Hi Glenda – I was not able to find a written pattern so I recreated it by watching The Midnight Quilting vlog over and over until I figured it out. I cover all the steps along with how to construct the geese blocks and cutting measurements. Sorry I don’t have a pattern.