How To Crochet an Easy Granny Square for Beginners
How to crochet an easy granny square for beginners. If you’re just starting out on your crochet journey and looking for a project that is both easy and rewarding, you’re in the right place. Today, we’re diving into the wonderful world of granny squares – a classic and versatile crochet pattern that every beginner should master. With just a few basic stitches and some colorful yarn, you’ll be creating beautiful granny squares in no time. So, grab your crochet hook and yarn, and follow these step-by-step instructions with free crochet pattern.
What is a granny square?
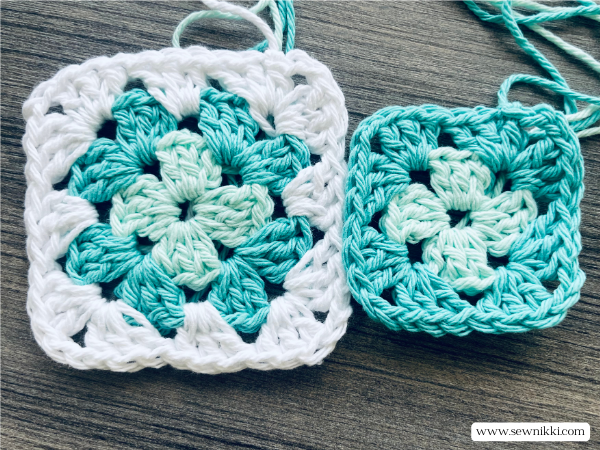
A granny square is a classic and versatile crochet pattern that forms the basis of many crochet projects. It is typically made by working in the round, starting from a small center and gradually expanding by adding rounds of stitches. Granny squares are characterized by their cluster-like stitches and are often used to create blankets, afghans, scarves, bags, and other decorative items.
What is the easiest type of granny square?
Classic crochet granny squares are the easiest to make, especially is you are a beginner crocheter. You will need to know some basic crochet stitches including slip knot, single crochet and double crochet. You can use a magic circle or a short foundation chain joined by a slip stitch to start. This is the most basic granny square out there and you can make all sorts of project by knowing how to make this square design.

What is a granny stitch?
Have you ever wondered what’s the difference between granny stitch and granny squares? Well I have, so let me explain what each are and how they are different (sort of). The classic granny square is made by building rounds (like a row) with double crochet cluster and a ch-2 space. This is known as the granny stitch. Now the granny stitch is used to make crochet blankets including baby blankets, cardigans and doesn’t have to be in square designs.
You can crochet the granny stitch row by row for that granny stitch pattern. It’s also important to know that this granny stitch only appears on the corners of a classic granny square. There are no ch-2 spaces on the side of the square, only on the corners. The ch-2 space creates the actual corner of the square. It’s important to note that there are granny square patterns that have a true granny stitch with the ch-2 spaces on the side of the square. But the easy granny square (classic version) does not.
Best Type of Yarn for Granny Squares
A granny square is often made with medium weight yarn (has the number 4 on package) in cotton or acrylic. Cotton is by far the most common choice for yarn in granny squares.
Try these popular cotton yarns: Paint Box DK Cotton Yarn, Lion Brand Cotton 24/7 Yarn, Cotton Kings Cotton Yarn 8/8, Rainbow Cotton Yarn 8/8, Lily Sugar’n Cream Cotton Yarn, and Crafter’s Secret Cotton Yarn.
My favorite acrylic medium weight yarn is Lion Brand Basic Stitch Anti-Pilling Yarn for project such as blankets and clothing. Red Heart Super Saver Yarn is great for items you won’t wear or wash a lot. They have a large selection of wonderful colors but this yarn is not the softest choice.

Beginner’s – Buy Yarn You Can Afford
Remember, the best type of medium weight yarn is the one you can afford. Some cotton yarns are not as soft as others. Lily and Crafter’s Secret are not soft, but depending on the project they don’t always need to be soft. Popular market bags, handbags and wall hangings work well with less expensive and not so soft yarn (that’s just my opinion, check them out for yourself and decide).
The best types of yarn are the ones labeled as a 4 or medium weight yarns. Check the yarn label for the size mm crochet hook to use and to determine the weight of the yarn. Look for the number 4, also known as medium weight yarn or worsted weight yarn. The number 4 should be on your cotton yarns or acrylic yarns. Pay close attention when shopping for the 100% cotton yarns, they have skeins that have lower numbers and are really thin to work with so grab one with the number 4.

Magic Circle vs. Foundation Chain
Whenever you crochet in the rounds of single crochet stitches, especially with a very short foundation chain of 3 or 4, it’s hard to see the center of the round. It’s important to find the center because you need to build up your first round by crocheting into the center of that foundation chain. The magic circle, once you get the hang of it, make it easy to crochet in the circle. At the end of the day, it doesn’t matter which method you use, just use the method that works best for you (or the one you can actually do correctly). Instructions are provided for both options below in the written pattern.
Make sure you check this out!
Are you an absolute beginner and you want to learn crochet? After you read this post, make sure you check out Learn To Crochet for Absolute Beginner’s. It’s jam packed with even more information, links and resources that are so helpful when you’re first learning. It also has a section with free patterns that are great for beginners. So make sure you check this out, seriously don’t forget!
Grab the Shell Stitch Afghan crochet pattern, my free gift to you when you subscribe to my newsletter. Click the link below for your copy.
Step-by-Step Instructions – How to Change Yarn For Each Round
Changing yarn at the end of each round in a granny square is a straightforward process. Here’s how to do it if you want different colors of yarn in each round:
- Complete the Last Stitch: Finish the final stitch of the round as per the pattern instructions. For example, if the last stitch is a double crochet, complete that stitch until you have two loops left on your hook.
- Yarn Over with New Color: Before completing the last step of the stitch, drop the current yarn and pick up the new yarn color. Yarn over with the new color.
- Complete the Stitch: Use the new color yarn to pull through the remaining loops on the hook. This secures the new color and completes the stitch.
- Weave in Ends: To prevent the yarn from unraveling, make sure to weave in the loose ends of both the old and new yarn colors using a yarn needle. Weaving the ends back into the stitches of the same color helps hide them effectively.
- Start the Next Round: Begin the next round using the new color, following the pattern instructions. Typically, you start the new round in a corner space or the next stitch, depending on the pattern you’re following.
By following these steps, you can seamlessly change yarn at the end of each round when making a granny square, allowing you to create vibrant and colorful designs in your crochet projects.
Material Needed – How To Crochet an Easy Granny Square
Materials You’ll Need:
- Yarn: Choose your favorite colors in the same weight category. Worsted weight yarn is a good choice for beginners.
- Crochet Hook: Select a hook size that matches the yarn weight you’ve chosen. Recommended size: G/6 or 4mm or I/9 5.5 mm crochet hook works best with worsted weight yarn.
- Scissors: For changing colors of yarn.
- Workspace: A comfortable, well-lit workspace.
- Yarn Needle: For weaving in ends.

Written Pattern – How to Crochet an Easy Granny Square
Abbreviations Used:
Ch: Chain
SL ST: Slip stitch
SC: Single crochet
DC: Double crochet
Step 1: Slip Knot and Chain OR Magic Circle
Here are two different ways you can begin your granny squares. I personally use the magic circle option but if that’s a struggle then use the foundation chain option. Both will get the job done.
Foundation Chain Option: To begin, make a slip knot and chain 4. Join the last chain with a slip stitch to form a ring.
Magic Circle Option: To begin, make a magic ring by looping the yarn around your fingers, crossing it over, and pulling one end through to create a circle. Secure the circle by making a slip knot. This will be the center of your granny square.
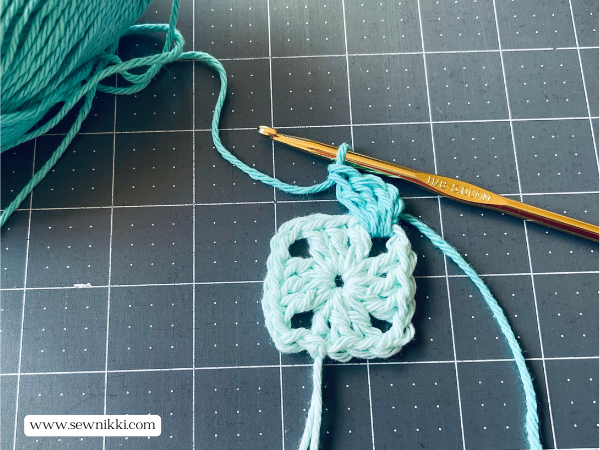
First Round

- Ch 3: This counts as your first double crochet (DC).
- 2 DC into the Ring: Make 2 double crochet stitches into the center of the ring.
- Ch 2: This creates the corner space of your granny square.
- 3 DC into the Ring: Make 3 double crochet stitches into the center of the ring.
- Ch 2: Another corner space.
- Repeat: Repeat the 3 DC, chain 2 pattern two more times, and then join with a slip stitch to the top of the beginning chain 3.
Second Round
- Ch 3: Cast on anywhere and chain three. This counts as your first DC in this round.
- 2 DC in the Same Chain Space: Make 2 double crochet stitches in the same space.
- Ch 2: Create the corner space.
- 3 DC in the Same Chain Space: Make 3 double crochet stitches in the same space. (3 dc, ch 2, 3 dc)
- 3 DC in the Next Space: Repeat this pattern (3 DC, chain 2, 3 DC) in each chain space around the square. Join with a slip stitch to the top of the beginning chain 3.
Third and Subsequent Rounds
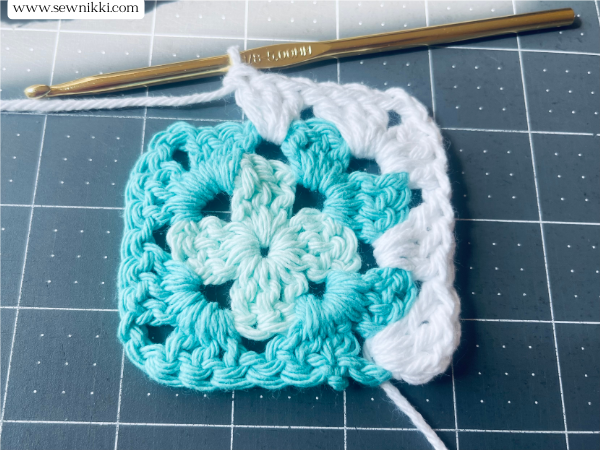
Cast on anywhere and chain three. Make 2 double crochet stitches in the same space to create the corner. Make another 3 double crochet stitches to finish the corner. Repeat this pattern (3 DC, chain 2, 3 DC) in each corner chain space around the square. Make 3 double crochet stitches in all side chain spaces. Join each round with a slip stitch to the top of the beginning chain 3. Feel free to change colors after completing a round for a vibrant, multicolored granny square.

Finishing Touches
Once your granny square reaches the desired size, fasten off the yarn and weave in the loose ends using a yarn needle. Trim any excess yarn with scissors. Some folks like to weave in the tails after each round or do them all at the end.

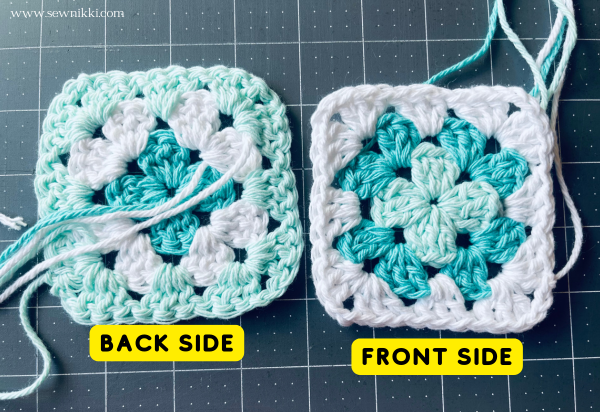
Front Side vs. Back Side of Granny Square
Weave tails on the back side of your granny squares. You can tell the back side because that’s where all the tails should be. You can also tell the back side of the crochet project by looking at the way your stitches lay. If your stitches lay downward, that’s the back side. If your stitches lay upwards, that’s the front side (see picture below).
SAVE THIS PIN FOR LATER!

This post contains ads and affiliate links, which means I make a small commission at no extra cost to you. While the ads are annoying, it helps keep this blog going. See my full disclosure here.
ABOUT SEW NIKKI
If this is your first time stopping by, welcome! I’m Nikki, a maker obsessed with quilting, crochet, and all things fabric. Here, you’ll find easy-to-follow patterns, helpful tutorials, and plenty of inspiration for your next handmade project. Whether you’re stitching up a cozy quilt, crocheting a vintage-inspired blanket, or diving into upcycled sewing, I’m here to make the process fun and stress-free. Grab your fabric (or yarn), and let’s create something beautiful together!
Follow me on social media (Pinterest, Instagram, Facebook and Twitter) so you get notifications when I post new patterns and tutorials.
Want to learn how to quilt? Then check out this post, Learn How to Quilt for Absolute Beginner’s.


Hi Nikki,
I love making Granny Squares. I like how you showed each step for beginners and what a yarn needle looks like.