Sunburst Granny Square Blanket (JAYG)
Learn how to create a pretty crochet granny square blanket using the Join-As-You-Go method. This step-by-step guide includes a detailed sunburst granny square pattern and easy instructions for seamlessly connecting squares.
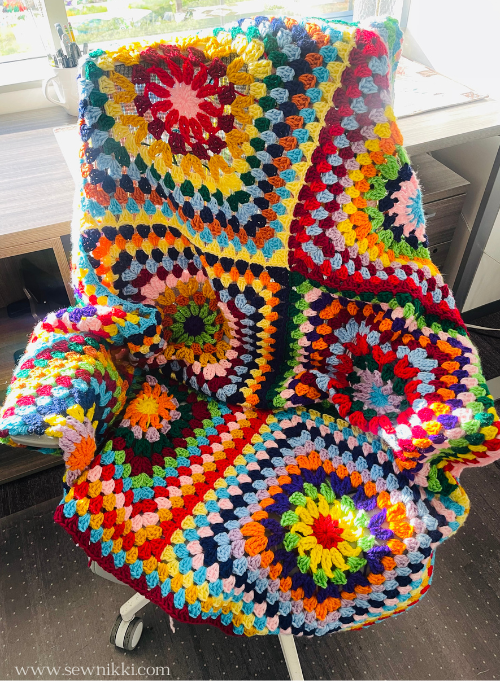
Crocheting a granny square blanket is a timeless and rewarding project that allows you to create cozy and beautiful pieces of art. If you’re looking to make your blanket creation process even more efficient and enjoyable, the Join-As-You-Go (JAYG) method is a fantastic technique to learn. In this tutorial, I’ll guide you through creating a stunning sunburst granny square and show you how to seamlessly join these squares together using the JAYG method.
MAKE SURE YOU CHECK THIS OUT!
Are you an absolute beginner and you want to learn crochet? After you read this post, make sure you check out Learn To Crochet for Absolute Beginner’s. It’s jam packed with even more information, links and resources that are so helpful when you’re first learning. It also has a section with free patterns that are great for beginners. So make sure you check this out, seriously don’t forget!
Grab the Shell Stitch Afghan crochet pattern, my free gift to you when you subscribe to my newsletter. Click the link below for your copy.
Granny Square Blanket – Materials You’ll Need
- Worsted weight yarn in various colors (for the sunburst effect and joining). I’m using Red Heart yarn in these colors below.
- Crochet hook suitable for your chosen yarn weight
- Yarn Scissors
- Yarn needle for weaving in ends
SAVE THIS PIN FOR LATER!

Granny Square Blanket – Sunburst Granny Square Pattern
Note: For this granny square blanket, the pattern uses US crochet terminology.
Abbreviations:
- SS= Slip Stitch
- CH= Chain
- SC= Single Crochet
- DC= Double Crochet
- TRC= Triple Crochet
- TRC2TOG= Triple Crochet 2 Together
Magic Circle:
Here are some great tutorials if you need to learn how to do a magic ring: TL Yarn Crafts, Sigoni Macaroni, or Hooked by Robin.

Sunburst Rounds:
First Round (Turqua)
- Start with a magic ring (or CH 4 and and SS into the first stitch to form a ring). CH 4 (counts as first TRC).
- 11 TRC into magic circle for a total of 12 TRC.
- SS into top of CH 4.
- Tie off with CH 1 and pull yarn through. Cut yarn to end round.
Second Round (Baby Pink)
- Join Baby Pink yarn in between any TRC from first round. CH 2 + 1 TRC in same space (counts as a TRC2TOG) and CH 3.
- Repeat (TRC2TOG + CH 3) 11 times in remaining spaces between TRC from first round.
- SS into top stitch of first TRC2TOG.
- Tie off with CH 1 and pull yarn through. Cut yarn to end round.
Third Round (Soft Navy)
- Join Soft Navy yarn into any CH 3 space from second round. CH 2 + 2 DC in same space (counts as 3 DC total) and CH 2.
- 3 DC into each of the next 11 CH 3 spaces from second round (12 clusters of 3 DC + CH 2 total).
- SS into top stitch of first DC.
- Tie off with CH 1 and pull yarn through. Cut yarn to end round.
Fourth Round (Spring Green)
- Join Spring Green into any CH 2 space from third round. CH 3 + 1 TRC (counts as 1 TRC2TOG). CH 2 + 1 TRC2TOG all in same space, and CH 2.
- Repeat (1 TRC2TOG + CH 2 + 1 TRC2TOG with CH 2) 11 times in each CH 2 space from third round, (12 total clusters).
- SS into to stitch of first TRC2TOG.
- Tie off with CH 1 and pull yarn through. Cut yarn to end round.
Fifth Round (Pumpkin)
- Join Pumpkin yarn into the center of any V (TRC2TOG + CH 2 + TRC2TOG) from fourth round. CH 3 + 2 TRC into same space (counts as 3 TRC)
- 3 DC into each of the next 5 CH 2 space from fourth round (Five 3 DC clusters total).
- 3 TRC + CH2 + 3 TRC into next CH 2 space. 3 DC into each of the next 5 CH 2 spaces. Repeat two more times.
- 3 TRC + CH 2 into same V you started in (with the original 3 TRC to finish off the corner).
- SS into top of the first CH 3.
- Tie off with CH 1 and pull yarn through. Cut yarn to end round.

Traditional Granny Square Rounds:
Rounds 6 – 11 Same steps for all remaining rounds (Bright Yellow (Round 6), Pale Plum (Round 7), Burgundy (Round 8), Light Blue (Round 9), Cherry Red (Round 10), Burgundy (Round 11))
- The remaining rounds are worked as traditional granny square, changing colors for each round.
- Join Bright Yellow yarn into any corner space from fifth round.
- CH 2 + 2 DC into same corner space (this is half of the corner, finishing the corner on last step for this round).
- 3 DC into each space along row.
- 3 DC + CH 2 + 3 DC into the corner CH 2 space.
- 3 DC + CH 2 into unfinished corner (same corner where you started the round).
- SS into top of the first stitch of DC.
- Tie off with CH 1 and pull yarn through. Cut yarn to end round.
You’ve now created a beautiful sunburst granny square that’s ready to be joined into a stunning granny square blanket.

Granny Square Blanket: Join-As-You-Go (JAYG) Method
The Join-As-You-Go (JAYG) method is a technique in crocheting where you connect your granny squares together as you work on their final rounds. This approach creates a neat and seamless join, eliminating the need to sew the squares together later. This method makes it easy and stress free to join the blocks and complete your granny square blanket. Let’s go over the steps to finish your granny square blanket using the JAYG method to connect granny squares by slip stitching into the open spaces:

1: Prepare Your Granny Squares
Before you begin, you’ll need to crochet several granny squares following the sunburst pattern above (or any granny square pattern. Typically, you’ll create the squares until you’re ready to work on the final round. It’s best to complete one block with all 11 rounds (or the total number of rounds you want), then take another granny square that has 10 rounds and join. All the remaining granny squares will need the final round completed. You will complete that final round and you join to the granny square blanket.
2: Choose a Joining Color
Select the yarn color you want to use for joining the squares. Round 11 in our first block is using Bright Yellow yarn. This color will be used for the final round of this square and for connecting the two squares together.
3: Work the Final Round
- Begin working the final round of a granny square just as you normally would, following the instructions in the pattern above for round 11.
- Crochet the first side of the square until you reach the corner where you want to join another square.
4: Slip Stitch to Join
- When you reach the corner where you want to connect another square, instead of completing the corner stitch as you normally would, work a slip stitch in that corner space. This slip stitch will anchor the squares together.
- Finish the slip stitch securely.

5: Attaching the Second Square
- Now, take the next granny square that you want to attach and position it so that the corner you want to join is aligned with the corner of the first square.
- Insert your hook into the corner space of the second square.
- Yarn over and pull through the corner space, creating a slip stitch. This slip stitch attaches the second square to the first square, then CH 1 to secure.
6: Continue the Round
- Once the squares are attached, continue working the stitches of the final round on the second square as if you were working on a single square. In other words, follow the pattern instructions for that round but slip stitch to join in every space.
- When you reach the next space where you want to attach, repeat the process of slip stitching into the space of the first square and then slip stitching into the space of the next square you’re attaching.

7: Repeat for All Sides
- Continue this process of slip stitching into the corner spaces of both squares and then working the stitches of the final round as you move around each square. This will effectively join the squares together.
- Repeat the slip stitch and stitch completion process for all the sides of each square you’re joining.

8: How to Join Corners When 4 Square Intersect
- Continue this process of slip stitching into the corner spaces of both squares and then working the stitches of the final round as you move around each square. This will effectively join the squares together.
- Repeat the slip stitch and stitch completion process for all the sides of each square you’re joining.


9: Finish the Last Square
- When you’re down to the last square, work the final round as usual until you’ve completed all sides.
- Once the last square is finished, fasten off the yarn and weave in any loose ends. Or, add an optional border. See instructions below.
10: Add a Border to Make It Fancy (Optional)
- Join any color yarn and work a traditional granny square blanket border but placing 3 DC + CH 2 + 3 DC in all corners and 3 DC in each space with no CH in between the 3 DC clusters.
- When adding the border over square corners that are in the middle of the blanket, add a CH 1 in between the 3 DC clusters. This will give you room for your granny stitch on the next round of your border. Our granny square blanket has 3 rounds in the border but you can opt for no border or as many rounds as you want.
- Once the border is finished, tie off with CH 1 and pull yarn through. Cut yarn.
- Weave in the tails (the loose ends) with yarn needle.


Get the digital pattern.
Get the instant download pattern from my shop here.
With the Join-As-You-Go method, you’ll see your blanket come together seamlessly, square by square, creating a cohesive and eye-catching design. This technique not only saves time but also results in a polished, professional-looking finish. Looking for your next crochet project? Browse around and check out my how to’s, pattern reviews and free crochet patterns (some are linked below).
SAVE THIS PIN FOR LATER!
This post contains ads and affiliate links, which means I make a small commission at no extra cost to you. See my full disclosure here.
About Sew Nikki
Welcome to Sew Nikki! Your place for free crochet, sewing and quilt patterns for beginner to intermediate skill levels. Want a digital pattern? We have those too! Plus tutorials to walk you through how to make each item from start to finish.
Creating a granny square blanket using the Join-As-You-Go method adds an extra layer of satisfaction to your crochet journey. The sunburst granny square’s vibrant colors and intricate design, combined with the JAYG technique, result in a blanket that’s both visually appealing and a testament to your crochet skills. So, gather your yarn and hook, follow the steps provided, and embark on a delightful adventure of crafting your very own granny square masterpiece!
Follow me on social media (Pinterest, Instagram, Facebook and Twitter) so you get notifications when I post new patterns and tutorials.
Want to learn how to quilt? Then check out this post, Learn How to Quilt for Absolute Beginner’s.


Charlotte is here with me & said this about your blanket… “It’s terrific!!”
And… I think it’s very bright & beautiful!! ♥️
Hi Charlotte,
I’m glad you like my bright blanket. Happy belated birthday! I am making you a present but have to find a sewing pattern first. Hope you and Grandy are having a nice time together. Love you,
Auntie Nikki
That blanket is unbelievably beautiful! Thanks for a great guide!
This blanket reminds me of my grandparents and Afgans they had! Thank you for the great guide with pictures on how to make it!