On Point Disappearing Nine Patch Quilt Pattern
Looking for a quilt pattern that’s simple to sew but looks way more complicated than it really is? This free and easy Disappearing Nine Patch quilt pattern is a beginner-friendly project that uses basic sewing skills and a simple block layout to create a design that looks advanced. Plus my version is set on point to give it an updated look. The finished quilt size is a queen, 86″ x 86″ but can be modified to a different size.
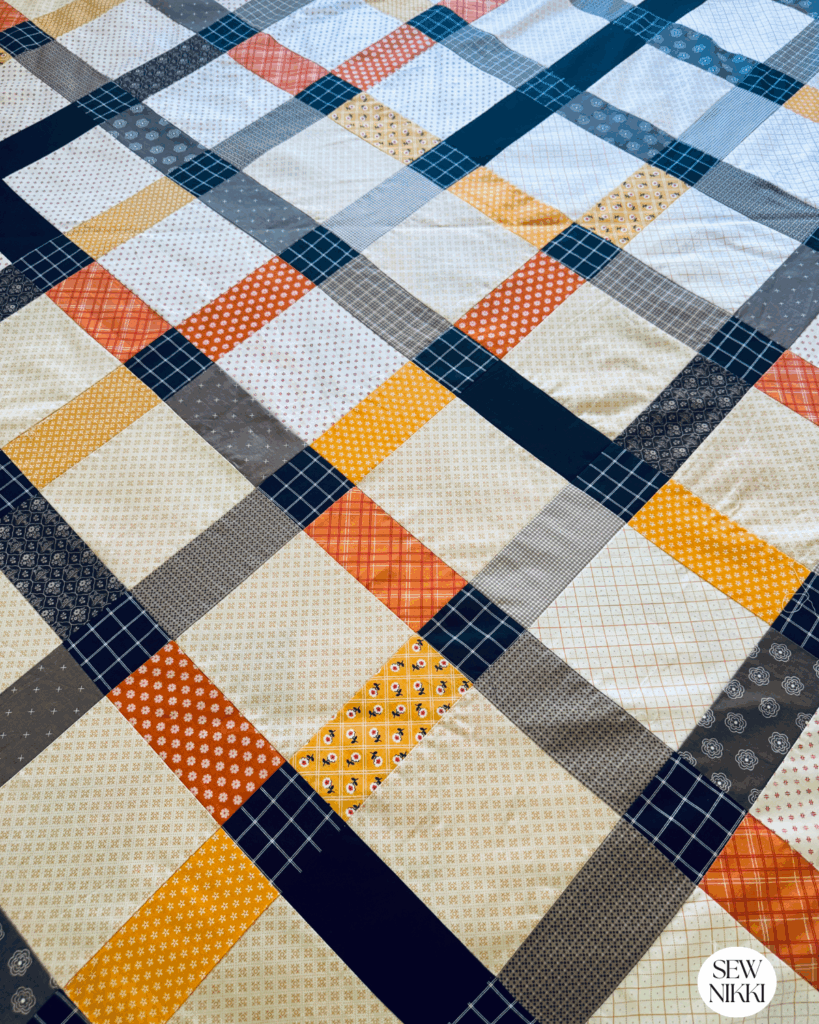
It’s been a while but in today’s blog post I have a new quilt pattern to share with you. It’s done in Fall colored fabrics from my yardage stash. I’m waiting for the batting to arrive and then may need to buy backing fabric. This is just simple sewing to get a finished quilt. Even if you are a new quilter, I will show you how easy it is to set a quilt on point. It’s a little more work but easy to do, I promise.
So if you’re like me and have never done a disappearing nine patch block, you must give this a try. I love this quilt and hope you will too. My first disappearing quilt block and I’m just sad i waited so long to try this simple quilt block. I made this quilt with 6″ squares but you can use any size square, I give you the quilt math at the end for the on point setting triangles and corners. Let’s dive right into this free pattern.
What is a Disappearing Nine Patch?
For this disappearing 9-patch block, you sew up a simple 9-patch block, then cut in half horizontally, then cut in half again vertically. Each block is now four smaller blocks (quarter blocks) and you can rearrange to your hearts desire. My quilt uses 16 different fabrics but you don’t have to use that many.
It’s a clever trick that turns a beginner block into a design that looks much more detailed without adding extra seams or advanced techniques. There are different ways to rotate the blocks to get a different look. All from 9 squares of fabric sewn together and cut into new blocks.

You can use a layer cake or charm squares to make this block, but my quilt uses 6″ squares cut from fabric yardage. Finished block size is 17″ untrimmed. This is a scrappy quilt made with fall fabric colors. Even though it’s scrappy, I made sure to use the same fabric for the center squares of all the 9-patch blocks. Why? So the cornerstone would be the same for all and tie everything together.
You also want to use darker fabrics for the center squares and low volume for the background. You need contract when you sub-cut the nine-patch blocks. I tried to use the same background fabric in all the corner squares but didn’t have enough so added two more fabrics that worked.
Disappearing 9-Patch Quilt Block Pattern
For this queen size quilt, you will need to make 22 – 17″ x 17″ nine patch blocks using 6″ squares. Then cut each block into four quarter blocks. You will have 3 quarter blocks leftover, use in another project or as part of the backing. You will also need 12 – 8.75″ x 8.75″ background blocks which you will cut in half diagonally to form 24 setting triangles for the sides of the quilt. You will need 1 – 9″ x 9″ background block cut in half twice diagonally on each side to form 4 corner triangles. Finished quilt measures 86″ x 86″.
There is a section below that has cutting information for setting triangles and corner triangles using 5″ squares for those that want to use a layer cake or charm squares too. It’s under “Quilt Math” at the bottom of the post.
Step 1: Make a Classic Nine Patch Block
- Take 9 – 6″ x 6″ square and sew them together in a 3×3 layout.
- Use a 1/4″ seam allowance.
- Press seams flat. Finished square size measures 17″ untrimmed.
- Make 22 – 17″ nine patch blocks total.
- Tip: Nest the seams in opposite directions and pin in place. Nest in the same direction for all blocks.
Step 2: Cut Into Four
- Cut the block in half vertically and horizontally.
- You now have 4 smaller blocks (quarter blocks).
- You will need 85 quarter blocks for this quilt, which means you will have 3 left over.
- Finished quarter size block will measure 8.5″ x 8.5″.
Step 3: Cut Setting Triangles
- For the sides, cut background blocks that are 1/4″ larger than your new quilt blocks (the new quarter blocks). Cut those blocks in half diagonally. Our blocks are 8.5″ x 8.5″, so make setting block slightly larger to give you a little wiggle room, 8.75″ x 8.75″ and cut in half diagonally.
- You will have 2 setting triangles per background block. Make 12 blocks and cut in half diagonally for a total of 24 setting triangles. (see photo below)

Step 4: Set Blocks On Point
- Lay blocks diagonally to form an on-point setting (as shown below), but use your bed or quilt wall so you have enough room.
- Next, add setting triangles at the beginning and the end of each row, including the rows with only 1 block. The triangles will square up your quilt.

Step 5: Sew Blocks Together
- Sew the blocks together to form a row using 1/4″ seam allowance.
- Sew one row at a time until all rows are done.

Step 6: Sew Rows Together
- Sew the rows together to form the quilt top, always using 1/4″ seam allowance. See row chart in digital pattern.
- This queen size quilt has 7 points on all sides but will have 13 rows for the top and bottom section. The top section will increase blocks for each row until it reaches the middle. The bottom section will decrease blocks for each row until you reach the end.
- Add setting triangles on the four corners. Cut 1 – 9″ x 9″ background square. Cut in half diagonally in both directions, you will have 4 corner triangles.
Step 7: Add Border (Optional)
- Cut 3″ strips of background fabric and attach all the way around quilt for a simple border.
- Quilt as desired. Here are my 3 favorite straight line machine quilt designs for beginners if you aren’t sure how to quilt this. And this is a great spray basting tutorial too.
- Finish with binding. Lots of binding tutorials on my blog but here’s a nice video by Art Gallery Fabrics on binding. Another great one by Connecting Threads, a place I like to buy fabrics now since they made me a brand ambassador.
Get the digital pattern.
Get the instant download pattern with row information here.

Shop the Sample Fabrics
Here’s a list of some of the fabrics used in this quilt. If the fabric isn’t listed, that’s only because my yardage didn’t have selvage with the fabric name on it.
Lori Holt and Riley Blanket Fabrics: Hometown Holiday (Main Background Fabric Latte but looks like Orange and secondary pink background), Bee Backgrounds Orange (another background fabric), Prairie Yellow Rose, Besties, Midnight Meadow by My Minds Eye (center square), Bee Basics and Backgrounds, A Gentler Time, Prim Brown Plaid, Bee Cross Stich Brown.
You may be able to get all of these fabrics on Connecting Threads too now, they are having sales on select items. Make sure you check them out if you don’t have a local fabric store. Or if the local store has the same old fabric and you are looking for new lines or new designers.
Tips for Success
- Press once – This helps your seams match up neatly. Only press when the 9-patch blocks are done. Then press when quilt top is done.
- Seam lines – Be consistent and don’t rush. This is simple quilting at it’s finest.
- Nesting seams – Important when forming 9 patch block but seams will be off when joining quilt top and that’s ok.
- Center block – If you use the same fabric for the center of each 9 block, your cornerstones will be the same and tie the quilt all together.
- Color scheme – Any color scheme will work but it’s best to have low volume fabric for the four background squares and dark/print fabric for the inside squares.
The Disappearing Nine Patch quilt pattern is one of the easiest beginner quilt projects out there. With simple sewing, clever cutting, and an on point setting, you’ll get a quilt that looks advanced but is actually stress free to make.
If you’re new to quilting or just want a fast and fun project, this free pattern is the perfect place to start.

Quilt Math for On Point Layout
To do an on point quilt, you need to use quilt blocks. Turn the block so it’s pointed and lay out your rows diagonally, filling in the side and corner gaps with setting pieces.
The blocks for each row will increase by 2 until you get to the middle and then the will decrease by 2 blocks until you get to the opposite corner. For example, row 1 has one quarter block, row 2 has 3 quarter blocks, row 3 has 5 quarter blocks, etc. Each row will always have setting triangles on both ends.
Quilt Math for Setting Triangles
If you use charm squares to make your disappearing nine patch, your background square for the setting triangles should be 7.25″ x 7.25″, then cut in half diagonally. The corner triangle background square should be 7.5″ x 7.5″, then cut in half both ways diagonally.
If you use a layer cake to make your disappearing nine patch block, your should sub-cut the layer cake into charm squares and follow the charm square measurements.
Use grid paper and a calculator to come up with different quilt sizes for your on point quilt. This grid paper really helps you calculate how many rows and how many quarter square blocks you will need to make on point quilt in different sizes. I was trying to make this quilt for my new mattress but didn’t have enough fabric to pull it off. I need a king size quilt but ended up getting a queen size quilt which is really good.
ABOUT SEW NIKKI
If this is your first time stopping by, welcome! Your place for free crochet, sewing and quilt patterns for beginner to intermediate skill levels. Want a digital pattern? We have those too! Plus tutorials to walk you through how to make each item from start to finish.
Again, I hope you enjoy making this free quilt pattern. I didn’t trim my quilt blocks but some were off and I was careful sewing them. This didn’t effect the final outcome but I don’t recommend this if you are new to quilting. This is a great scrap quilt as you can see all the different fabric used, even 3 different but close background fabrics.
This post contains ads and affiliate links, which means I make a small commission at no extra cost to you. While the ads may seem annoying, it helps keep this blog going. See my full disclosure here.