Best Fusible Interfacing T-Shirt or Jersey Quilt
Creating a t-shirt quilt is an awesome way to turn your favorite tees into a cozy, memory packed blanket. However, working with t-shirt fabric or sport jerseys can be tricky since it’s stretchy and prone to warping. That’s where fusible interfacing comes in! In this post, I’ll guide you through choosing the best fusible interfacing for your t-shirt quilt and give you a step-by-step on how to apply it—even if you’ve never touched interfacing before.

So the stretch of the t-shirt fabric makes it difficult to sew with. T-shirt material is not suitable in most cases for quilting. It will move too much when you try sewing two blocks together and distort the block size. That’s no good when making a t shirt quilt. I’ll show you how to correct this by using interfacing. It sounds a lot harder than it actual is.
Making your own t-shirt quilt is really fun, so today I’ll show you the best fusible interfacing for a t-shirt quilt and how to apply it. You cannot quilt regular t-shirts together without distorting their shape. It’s very hard to sew a straight line through t-shirt fabric. If you don’t believe me, try it for yourself. Same goes for sports jerseys, very tough to work with. Fusible interfacing is the secret weapon you need to use, allowing you to sew up that quilt. Interfacing will stabilize the t-shirt or sports jerseys and allow you to sew blocks together and for those blocks to retain their shape. This tutorial will walk you through different types of interfacing and how to apply so you can make your first t-shirt quilt.
Memory T-Shirt Quilt
A tee shirt quilt is usually made with quilt blocks all sewn into rows and then the rows are sewn together to form your quilt top. Your pile of t-shirts are most likely from the same person but may be in different sizes. So take your square quilting ruler in the finished block size you are going for and make sure each t-shirt can be cut into your desired block size with an extra inch or two on all sizes added. This extra fabric allows you to secure your fusible interfacing and then trim to size once it’s done. Some may add sashing, sashing and cornerstones and even a border. The size of the quilt most likely will be determined based on your t-shirt quilt layout and the number of t-shirts you have or have been given.
If you don’t have a ton of t-shirts, you can add wide sashing to make the quilt larger. You could also use a quilt design that does not include t-shirts for every block. A good example of this is my Hockey Jersey Quilt Pattern. It’s actually a pattern created by Angle at The Midnight Quilter and it’s super cool. I had to watch her YouTube video a million times to get the pattern and still had to fill in missing parts.

First T-Shirt Quilt
If this is your first t-shirt quilt, I suggest making the blocks the largest size you can but also have the square quilting ruler for. Having the exact square ruler size is a lifesaver. So much easier than using the lines on your straight ruler and cutting mat. Most of us have a 12.5″ square ruler but I bought a 15″ square ruler for the hockey jersey quilts before I landed on Angela’s quilt pattern. Just food for thought.
When making a t-shirt quilt, fusible interfacing stabilizes the stretchy t-shirt fabric so that it behaves more like quilting cotton, helping you get straighter seams and preventing fabric distortion. So how do you use fusible interfacing? More on this below, but check this out first.
MAKE SURE YOU CHECK THESE OUT!
After you read this post, make sure you also check out Learn How to Quilt for Absolute Beginners. It’s jam packed with information to make your first quilt. It also has links and resources that are so helpful when you’re first learning. There’s lots of free quilt patterns that are great for beginners and all skill levels too. So make sure you check this out, seriously don’t forget!
Make sure you grab a copy of my free Quilt Planning Journal. It’s filled with graph paper and note pages to help you design at least 4 quilt or sewing projects! Use it to jot down ideas, fabrics, patterns and inspiration all in one place. Or create your own patterns and share with others. Pin in fabric swatches, photos of your finished quilts and enjoy your creative process!
Best Interfacing for T-Shirt Quilt (or Jersey Quilt)
What Is Fusible Interfacing?
Fusible interfacing is a fabric with an adhesive that bonds to your fabric when heat is applied. It’s commonly used to add structure to lightweight or stretchy fabrics, making them easier to sew on your sewing machine and still keep it’s shape. Interfacing adds stability in different weights or thickness and can have the fusible bond on one side or both sides. Make sure you get the kind that has fusible adhesive only on one side. There are a few that quilters recommend, in the end it boils down to personal preference.

I did a lot of research before using interfacing and got three different Pellon numbers from different quilters. I ended up using Pellon 906. It worked pretty good for most of my jersey blocks but some had a lot of wiggle to them. That tells me I should have had a thicker interfacing. These YouTubers were also stating that it was best to use the thinnest interfacing you could get away with using because that meant less weight you are adding to your quilt top. My hockey jersey quilt is really heavy, a little extra weight due to my interfacing would not have made a difference but it did work well for all my jersey blocks with the exception of 2 but I made it work.
The Best Fusible Interfacing for a T-Shirt Quilt
There are different types of fusible interfacing out there, but for a t-shirt quilt, you’ll want something that provides stability without making your quilt feel stiff. There are a few options you can try, all by Pellon for this post. This brand is available at Joann’s or on Amazon. Now Joann’s only had small packages of this so I ended up ordering a bolt from Amazon for under $15.
Fusible interfacing means it requires a hot iron or heat press to apply it to your fabric, t-shirt or sports jersey. It can be fusible on one side or double sided. You want to grab interfacing for apparel and there are several options depending on how stiff you want your blocks to be, the drape of the quilt, and the weight it will add to the overall quilt.
Save this pin for later!

Here are three solid choices:
- Pellon 906F Fusible Sheerweight
- Weight: Ultra-lightweight
- Feel: Flexible and soft
- Why It’s Great: This is a great option if your t-shirt fabric is very lightweight or delicate. It provides a nice amount of stability without adding much bulk.
- Pellon P44F Fusible Interfacing
- Weight: Lightweight
- Feel: Soft with a smooth finish
- Why It’s Great: This lightweight interfacing is ideal for t-shirt quilts that need a bit of stabilization without sacrificing softness. It’s easy to work with and won’t add unnecessary bulk to your quilt.
- Pellon 950F ShirTailor® Interfacing
- Weight: Medium-weight
- Feel: Crisp and supportive
- Why It’s Great: This interfacing offers a bit more structure, making it perfect for t-shirts that need extra stabilization, especially if they’re made from a heavier knit. It’s great for creating sharp, clean lines in your quilt blocks.
How to Prepare Your T-Shirts
Cutting the t-shirts
First step is to look through the pile of t-shirts or jerseys and find the ones you can turn into you quilt block size. This means that when the square ruler is over the emblem or picture, there is at least 1/2 inch seam allowance around all sides. This is needed when you join the blocks together. You don’t want your design to get caught up in your seam allowance.
You can use the back of the shirts, front of the shirts, or both. It really depends on your t-shirt or jersey. It also depends if they will fit into your finished block size when trimmed leaving the desired 1/2 inch seam allowance so your t-shirt print doesn’t get sewn up in the seam allowance.
Carefully cut out the front and back panels of each shirt, leaving a border of at least 1-2 inches around the design. Slide your fabric scissors up the sides of the shirts or jerseys, separating the front and back from the sleeves. Once the sleeves are removed, cut along the top of the shirt to form front and back panels. No need to trim away any excess fabric to create uniform squares. You will trim that up later.
Pro tip: Don’t throw any of the t-shirt scraps away at this point. You may need some of that material later down the line. Also, sleeves can be turned into blocks but in the end my quilt didn’t contain any sleeves.
How to Apply Fusible Interfacing for a T-Shirt Quilt
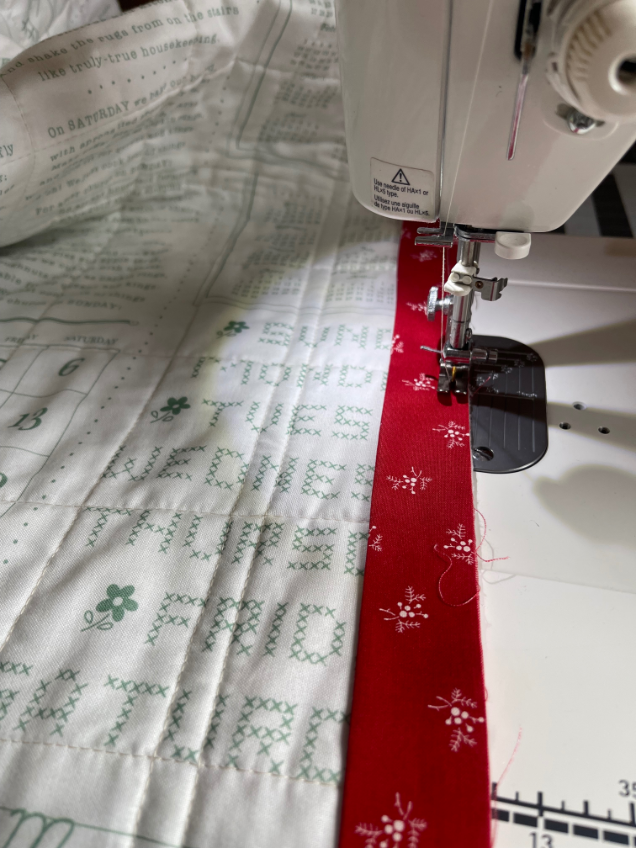
Since t-shirts and jerseys are not made out of 100% cotton fabric, it’s essential to stabilize them before quilting. If you don’t do this step, it will be miserable to work with and very hard to sew. Attach lightweight fusible interfacing to the back of each jersey square to prevent stretching and distortion during sewing. The stabilizer is your friend and doesn’t take a long time to do. It makes sewing your t-shirt blocks a lot easier on your machine.

Based on my research, I went with the lightweight fusible Pellon P44F Interfacing and it was not hard to do. Each block took about 5 minutes for stabilizer to fuse to the shirt. It’s important to note that I wanted to use Pellon 906F but needed a larger size than what I could find at Joann or on Amazon. Pellon P44F is a comparable interfacing and was available on a bolt so that’s why I used this in case you are wondering.
Use Firm Work Surface
You need a firm work surface when doing this step. An ironing board is not recommended, using a wood base is recommended and I saw several creative ways to do this. Look around your house first, I saw a wooden cutting block in my kitchen and used that. Folded a bath towel and some left over fabric over it and tucked everything underneath. That saved time and money and was the easiest way to get a firm work surface.

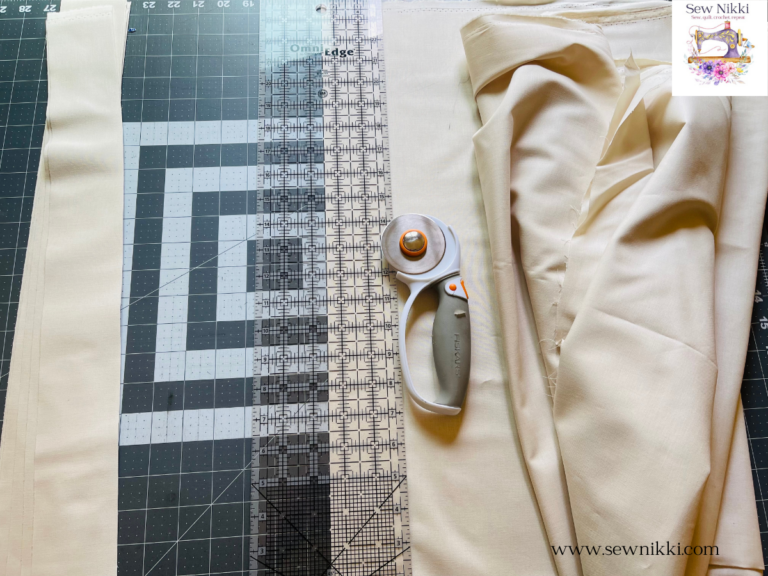
Cut your interfacing to the same size as your untrimmed oversized blocks. Grab your square block ruler and have it near your pressing station. Key tip is to make sure you have enough fabric on all sides of the t-shirt design. Use the ruler to test it works before fusing. Keep in mind that the interfacing is 1.5″ larger than your trimmed block.
If you’ve never used fusible interfacing before, don’t worry—here’s a step-by-step guide:
Supplies You’ll Need:
Ironing board or another heat-safe surface
Fusible interfacing (cut to the size of your t-shirt pieces)
Your t-shirts (pre-washed and cut into blocks)
A hot iron (without steam)
Pressing cloth or parchment paper (optional but recommended as a pressing sheet)

Step 1: Prepare Your T-Shirts
Before applying the interfacing, make sure your pile of t-shirts are pre-washed. This removes any sizing or chemicals that could interfere with the adhesive. Then, take the first shirt and chop it up with fabric scissors or a rotary cutter. cut your t-shirt fabric into the desired size for your quilt blocks.
Step 2: Cut the Interfacing
Cut the fusible interfacing to the same size as your oversized t-shirt blocks. Make sure the glue side (usually the rougher side) will be facing the wrong side of the t-shirt fabric.
Step 3: Position the Interfacing
Most of us will be using the front of the t-shirt for our blocks. Some may be using the back of the shirt or both. Place your t-shirt block right side down on your ironing board. Align the fusible interfacing, glue side down, onto the back of the t-shirt fabric.

Step 4: Fuse the Interfacing to the T-Shirt
With your iron preheated to the high setting (follow the instructions on your interfacing for exact temperature), gently press the iron over the interfacing. Use a pressing cloth to protect your fabric from any potential heat damage and your iron from the glue.
Hold the iron in place for about 10-15 seconds on each section, making sure to cover the entire piece of interfacing. Avoid using a back-and-forth motion—just press and lift.

Step 5: Let It Cool
After you’ve fused the entire piece of interfacing to your t-shirt, let it cool for a minute or two. This gives the adhesive time to set properly.
Step 6: Sew Your Blocks
Once the interfacing is cool and set, your t-shirt fabric should feel more stable and be ready for sewing. From here, you can treat it like regular quilting fabric—cut, piece, and sew your blocks together!
Other T-Shirt Quilt Projects
if you don’t have enough t-shirts to make a lap quilt or twin size quilt, consider making one of these sewing projects: T-shirt tote bags, wall hangings, pillows, table runners, duffle bag or seat cover. If you want a queen size quilt or even a king size quilt but don’t have enough t-shirts, try filling in the quilt pattern with patchwork quilt blocks and consider using sashing fabric in between each block. To make the over quilt even larger, add wide border strips around the entire quilt top.
More related posts you may enjoy:
Beginner Supplies
Here are some quilting tools and supplies I recommend. Check out the resource section for more info.
Rotary Mat Cutting Mat (Self-Healing Mat)
28 mm Rotary Cutter Replacement Blades
45 mm Rotary Cutter with Sharp Blade (start with this one)
45 mm Rotary Cutter Replacement Blades (start with this one)
60 mm Rotary Cutter Replacement Blades
4.5″ Square Ruler for half square triangles
12.5″ Square Ruler for blocks
This post contains ads and affiliate links, which means I make a small commission at no extra cost to you. While the ads are annoying, it helps keep this blog going. See my full disclosure here.
ABOUT SEW NIKKI
If this is your first time stopping by, welcome! I’m Nikki, a maker obsessed with quilting, crochet, and all things fabric. Here, you’ll find easy-to-follow patterns, helpful tutorials, and plenty of inspiration for your next handmade project. Whether you’re stitching up a cozy quilt, crocheting a vintage-inspired blanket, or diving into upcycled sewing, I’m here to make the process fun and stress-free. Grab your fabric (or yarn), and let’s create something beautiful together!
Adding fusible interfacing to your t-shirt quilt is a simple way to ensure your quilt turns out smooth and professional-looking. Pellon 906F, Pellon 950F, and Pellon P44F are three excellent choices that will give your t-shirt fabric the stabilization it needs without sacrificing softness. Whether you’re a seasoned quilter or new to the craft, this step will take your t-shirt quilt to the next level.
Follow me on social media (Pinterest, Instagram, Facebook and Twitter) so you get notifications when I post new patterns and tutorials.
Want to learn how to crochet? Then check out this post, How to Learn How to Crochet – Guide for Beginners.


I really appreciate this article because I’ve never done a T-shirt quilt and a friend in the women’s group. I’m in lost her husband in December and asked me if I would do one for her. I said I would, knowing I have no clue what to do, but I am a quilter so I knew I could do this.. So I really appreciate the details that you’ve given and we’ll definitely be using this as my guide.
What interfacing works best when sewing with silks or taffeta in a quilt?
Pellon SF101 Shape-Flex (woven) provides stability for silk and taffeta. Here’s the link to buy on Amazon. https://amzn.to/4tzKSuA