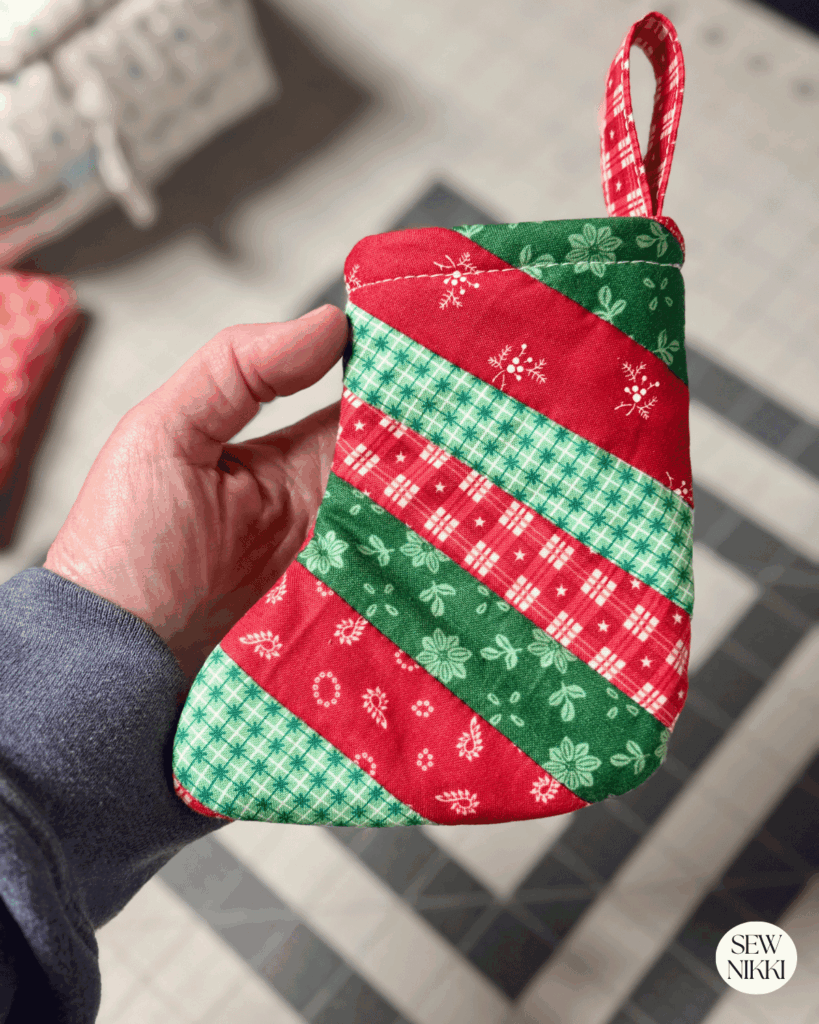
Tiny Quilted Christmas Stocking Sewing Pattern and Tutorial
Today I’m going to make my own tiny Christmas stocking sewing pattern and show you how to do it too. Sewing your own quilted Christmas stocking is a great scrap project, a low pressure way to try new techniques, and a chance to make something personal without following a strict pattern. Finished size measures 6″ L x 3.75″ W (top) x 5″ W (bottom) x .5″ D.

This tutorial walks you through how to make your own handmade Christmas stocking sewing pattern using your own free form template and fabric you most likely have in your stash. Instead of relying on a printed pattern, you will draw directly onto interfacing scraps, tracing paper or use an existing stocking as a template. You will quilt fabric strips onto batting using the quilt as you go method with a backing fabric and no lining. Folding top of stocking inside and attaching hanging hook.
This method works for any skill level and the entire project should take less than an hour. Just have fun and turn on some holiday music to help get you in the mood. The longest part is deciding what fabric strips to use, it’s that easy.
Why Free Form Stockings Work So Well
Free form projects are forgiving. Christmas stockings are especially good for this style because they do not need to be exact. A slightly taller cuff or a wider toe does not change how the stocking works. It still hangs on the mantel and holds treats just fine.
Drawing your own shape means you can adjust the size easily. You can make it tiny or oversized, slim modern ones, or chunky scrappy versions that feel cozy and handmade. If drawing feels intimidating, you can absolutely trace a store bought or your existing Christmas stockings and build from there.
This approach also lets you use up stash fabric. Small strips, odd shapes, and leftover batting pieces all work well here. If you enjoy scrap quilting or quilt as you go projects, this stocking tutorial fits right in.
MAKE SURE YOU CHECK THIS OUT!
After you read this post, make sure you also check out Learn How to Quilt for Absolute Beginners. It’s jam packed with information to make your first quilt. It also has links and resources that are so helpful when you’re first learning. There’s lots of free quilt patterns that are great for beginners and all skill levels too. So make sure you check this out, seriously don’t forget!
.Make sure you grab a copy of my free Quilt Planning Journal. It’s filled with graph paper and note pages to help you design at least four quilt or sewing projects! Use it to jot down ideas, fabrics, patterns and inspiration all in one place. Or create your own patterns and share with others. Pin fabric swatches, photos of your finished quilts and enjoy your creative process!
Supplies You Will Need
For this basic stocking tutorial, you will need the following but try to use what you have if possible. I love thrifty sewing projects and I know you do too. You can adjust amounts depending on the size of your stocking, but this list works for a standard stocking size. This will be a lined Christmas stocking.
Fusible interfacing scraps or tracing paper large enough for your stocking shape
Cotton batting
Scrap fabric strips or pieces (fat quarters can be cut too)
Fabric for the lining
Fabric for the hanging loop
Thread
Rotary cutter or scissors
Fabric marking pen or pencil
Pins or clips
Sewing machine
Iron and ironing surface
My Resources page has links to all my favorite products if you need to buy anything.
This post contains ads and affiliate links, which means I make a small commission at no extra cost to you. See my full disclosure here.
Tiny Christmas Stocking Sewing Pattern Tutorial
For this project I’m just using fabric strips in different widths from my fabric stash for the exterior fabric. I have lots of different fabrics so will just pick through what I want the main fabric color to be and use a solid for the cuff fabric. Detailed instructions below to make your own DIY Christmas stocking.
Step One – Create Your Stocking Shape
You have two options here. Draw free form or trace an existing stocking.
Drawing Free Form on Interfacing
Lay your interfacing flat on your work surface. Using a pencil or fabric marker, sketch the shape of your stocking directly onto the interfacing to make your stocking template. Then flip the template over for the back of the stocking and the lining. Keep the lines smooth and simple. A gentle curve at the heel and toe is easier to sew than sharp angles.

Once you are happy with the shape, add a one half inch seam allowance all the way around. This is important since the original drawn line becomes your finished stocking size.
Cut out the interfacing along the outer seam allowance line.
Using an Existing Stocking as a Template
If drawing from scratch feels uncomfortable, grab a stocking you already own. Lay it flat on interfacing and trace around it. Smooth out any bumps and clean up the shape with a ruler or curved edge.
Add a one half inch seam allowance around the traced shape and cut it out. This gives you a reliable base while still allowing you to customize the quilting and fabric choices.
This method is especially helpful if you want to make multiple stockings that are similar in size for a coordinated look.
Step Two – Prepare the Quilt as You Go Base
Cut two pieces of batting slightly larger than your interfacing shape. Fold you batting in half and lay the template on the batting, make sure you have 1/2″ extra batting than the size of the template. This is for your seam allowance.

Use a tape measure and pen to mark the 1/2″ around the template and directly onto your batting. Then use some scissors or rotary cutter to trim the batting. You will no longer need the template when this step is done.
You will use the two batting pieces, with some backing fabric underneath both as your foundation for your quilt as you go strips. It’s so easy and quick.
Step Three – Quilt Fabric Strips Onto the Batting
This is where the stocking gets its personality.
Start by selecting fabric strips from your stash. They do not need to be uniform. A mix of widths and colors gives a relaxed scrappy look. In my sample, I trimmed some strips into 1.5″ in width so I could get a lot of strips on this tiny stocking.
Place the first strip right side up across the batting and interfacing. Sew straight lines through all layers to secure it. This can be vertical, diagonal, or horizontal depending on the look you want.

Add the next strip right sides together with the first strip. Sew along the edge, then flip it open and finger press. Continue adding strips one at a time, sewing and finger pressing as you go.
Pro Tip: As you work, keep the strips extending past the edges of the interfacing shape. This ensures full coverage once trimmed.
You can quilt straight lines after each strip or wait until the entire piece is covered and quilt over everything. Simple straight line quilting works best here and keeps the project beginner friendly. Or you can leave as is and not add any quilting lines, your choice.
If you want more ideas for easy quilting styles, you can reference my post on straight line quilting designs for home sewing machines.
Step Four – Trim to Shape
Once the entire batting area is covered with quilted fabric, flip the piece over so the batting side is facing up.
Using the batting as your guide, trim away the excess fabric and batting so the quilted piece matches the stocking shape exactly.

At this point you should have one quilted stocking front and back piece with trimmed edges.
Step Five – Make the Hanging Loop
Cut a strip of fabric about three inches wide and eight inches long. You can adjust the length if you prefer a longer or shorter loop.
Fold the strip in by one third and iron, then fold the remaining one third over and press with iron. The right side of fabric should be showing. Then sew along the long edge on both sides to secure, sewing as close to the edge as possible while still sewing through all layers.

Step Six – Assemble the Stocking
Place the quilted stocking pieces right sides together and sewing from the top of one side, around the bottom and back up the second side using a .5″ seam allowance. Carefully turn the tiny Christmas stocking sewing pattern right side out through the opening at the top. Push out curves gently with your fingers or a chop stick.

Fold the top of the stocking into the stocking about .5″. The fold should point inward toward the center of the stocking to hide the raw edges. Position the hanging loop near the top back edge with raw edges aligned inside the stocking. The loop should point outward away from the center of the stocking. Pin or clip in place.

This tiny Christmas stocking sewing pattern does not have lining, but does have the backing fabric only. Place one lining piece right side down on top of the quilted piece. Align all edges and pin around the perimeter.
Sew around the inside edge of the stocking using a 1/4″ seam allowance.
At this point the stocking is complete and ready to hang.
Inspiration From Other Makers
If you are like me, you love video tutorials for sewing and quilting projects. Here are just a few that you can look at to give you inspiration in making your own Christmas stocking to keep or give this year.
This video by Homemade on our Homestead has a great video tutorial for making a full size stocking with clear step by step visuals.
Jessica Dayon – Quilting and More has another video tutorial for a quilted patchwork square stocking.
Beth Shibley of my sewing room has the best fabric scrap projects. Check out her video on how she made her scrappy fabric Christmas stocking. No stress or fuss, just a beautiful stocking.
Each of these creators uses a slightly different approach, which shows how flexible this project can be.
Save This Pin for Later

Making a Set of Stockings
Once you make one stocking, the process gets faster and you can adjust your template until it’s just perfect. Many people like to batch sew several at once. Cut all your batting and fabric strips, quilt multiple fronts and backs in one session, and then assemble them assembly line style.
Using a similar color palette or repeating a few fabrics ties the set together while still letting each stocking feel unique. Or don’t overthink it and just use whatever color strips you have, even if they aren’t green or red. Stockings can be any color you want.
If you are making stockings as gifts, you will love how quick these can be made because we used backing as the lining and didn’t cover the inside seams.
Why This Tutorial Skips a Pattern
Patterns are helpful, but they are not always necessary. This tutorial is meant to show you how to create your own stocking shape and construction method so you can adapt it to your style and use what you have.
My grandma Leyerle was the one who taught me everything I share on this blog. She did it all and grew up during the great depression in Missouri. Life was hard and money was scarce so people made things and used what they had.
Don’t be afraid to do the same and make do with what you have and make your own patterns. Once you understand the process, you can make stockings any size, adjust the cuff height, or switch up the quilting style without needing a new pattern every time.
This same free form approach works for other holiday projects too. Tree skirts, table runners, and wall hangings all benefit from this flexible mindset.
For another beginner friendly holiday project, you may enjoy my Christmas tree quilt block or the ornament quilt block tutorials and free block patterns. You could make some handmade potholders using one block. Use an old towel for the batting to make it heat resistant and bind like you would a quilt. Here are resources to help with each step if you aren’t sure how to complete.
Denim Potholders with Pockets Tutorial
Christmas Tree Modern Quilt Block
How to Sew Binding on a Quilt Project
Christmas Tree Table Runner Free Pattern
About Sew Nikki
Welcome to Sew Nikki. Your place for free crochet, sewing and quilt patterns for beginner to intermediate skill levels. Want a digital pattern? We have those too! Plus tutorials to walk you through how to make each item from start to finish.
Sewing your own quilted Christmas stocking sewing pattern is fun and you will have a beautiful stocking to show off or gift to others. Whether you draw your shape from scratch or trace an existing stocking, quilt with scraps or planned colors, this method gives you a solid foundation to make something meaningful and reusable year after year.
If this is your first time here and you are new to quilting, start by checking out my Quilting 101 page. Then move onto the Quilting Tutorial page with full tutorials for each step in the quilt process. Finally, find a free quilt pattern or quilt project in The Pattern Index.
Follow me on social media (Pinterest, Instagram, Facebook and Twitter) so you get notifications when I post new patterns and tutorials.


These are so stinkin’ cute! Your guide is awesome & super easy to follow even for this professed “glue gun” sewer!
What a cute pattern Nikki! Sharing with my daughter, who is the seamstress around here. I’m sure she will be whipping these up right away!
I love this, teaching the younger generation to sew is the best.
I am definitely a beginner, but the instructions to this are so well written that I would feel totally comfortable trying this!
Thank you!
These are adorable, definitely need to make one before Christmas!