How to Cut Fabric for Quilting (Easy and Accurate)
How to Cut Fabric For Quilting (Easy and Accurate). Instructions for new quilters on straight line and square block fabric cutting with rotary cutter, cutting mat and quilting ruler.
Today is all about quilting fabric and how to cut fabric for quilting your first quilt. Let’s be honest, if you are new to sewing like I was, then cutting fabric for your quilt patterns is very important. If you already know how to sew, then you are familiar with fabric so cutting quilting fabric will be a whole lot easier to grasp. Most people that sew use sewing scissors but for quilting you need to use a rotary cutter, cutting mat and quilting rulers.
Handling a rotary cutter with a sharp blade is a must but it’s also tricky if you’ve never used it before. More about the tools needed down below. These instructions are good for accurate cuts of the following: fabric strips, fat quarters, charm pack, layers of fabric, one piece of fabric, smaller pieces, large pieces and pre-cut fabrics. Either way, let’s dig in and start with the supplies you will need to cut fabric for quilting.
Make sure you check this out!
After you read this post, make sure you also check out How To Learn How To Quilt: Beginner Quilting Guide. It’s jam packed with even more information, links and resources that are so helpful when you’re first learning. It also has a section with free quilt patterns that are great for beginners. So make sure you check this out, seriously don’t forget!
Grab the Learn to Quilt for Absolute Beginner’s Guide, filled with helpful information to make your first quilt. Click the link below for the free download.
How To Cut Fabric For Quilting – Beginner Supplies
Here are some quilting tools and supplies I recommend. I make a small commission if you purchase through the links, this helps to support this free content. For more info, check out Supplies for Beginners (Best Tools To Start).
Rotary Mat Cutting Mat (Self-Healing Mat)
28 mm Rotary Cutter Replacement Blades
45 mm Rotary Cutter with Sharp Blade (start with this one)
45 mm Rotary Cutter Replacement Blades (start with this one)
60 mm Rotary Cutter Replacement Blades
4.5″ Square Ruler for half square triangles
12.5″ Square Ruler for blocks
Save this pin for later!

This post contains ads and affiliate links, which means I make a small commission at no extra cost to you. While the ads are annoying, it helps keep this blog going. See my full disclosure here.
Supplies to Cut Fabric Accurately
Fabric Cutters
You can cut fabric with sewing scissors or rotary blade, cutting mat and acrylic ruler. Save your scissors for sewing garments, you don’t want to use scissors for cutting fabric for quilting. Quilting projects from baby quilt to any size quilt top require accurate measurements that you just can’t get with scissors. You will end up with an uneven cut and your quilt blocks will not fit together in completed patchwork patterns.
Rotary Blades Are Sharp So Be Careful
Handling a rotary cutter with a sharp blade is a must but it’s also tricky if you’ve never used it before. I sliced my fingers a couple of times in the beginning of my quilting journey, I always had a bandage on one of my fingers. To prevent this, I recommend getting gloves to protect your hands while using your rotary cutter.
Keep your hand and all your fingers on the quilting ruler and away from the edges so you don’t accidentally hurt yourself. Always remember that your a using sharp objects and not to rush. Cut one layer of fabric at a time until you know what you are doing.
Different Size Rotary Cutters
Rotary cutters come in different sizes: 18mm, 28mm, 45mm and 60mm. It’s a good idea to get the 45mm rotary cutter and a pack of replacement blades to as a starting point. The blade size determines how many layers of fabric you can cut through at one time.
The larger the blade, the more layers of fabric. The smaller blades are great for trimming around square quilting rulers and less dangerous. The smaller blades last a long time before you need to change. Larger blades tend to need changing more often because the blade gets dull cutting through all that fabric.
You can tell when the blade is dull, the fabric you are trying to cut starts to bunch up against the ruler. While a sharp blade will slice through the layer of fabric like butter. You do need to apply some pressure with your right hand, your dominant hand. They have rotary cutters made specifically for left hand users.
Use Both Side of the Rotary Blade Before You Change It
Make sure you use both sides of the blade before you change it out for a fresh one. Rotary blades are not cheap, make it last longer by flipping it over. Before you screw the blade back on, wipe cotton lint off the blade with your sewing brush that you use to clean under the throat plate. You can use both sides of the blade before safely discarding.
Quilting Rulers – Straight Line
Every quilter needs a good straight line acrylic quilting ruler. Grab one that is 5″ x 24′ because you will be sewing a lot of charm square quilts in the beginning and they will be 5″ charm squares. I also have one that is 6″ x 24″ and hardly ever use that except for when I trim the quilt sandwich before adding binding.
Quilting Rulers – Square Block
Grab a 4.5″ square block quilting ruler. New quilters will take 5″ charm squares and make half square triangles. These half square triangles once trimmed will finish at 4.5″ squares. That’s why this square ruler is a must! Grab a 12.5″ ruler for when you square up your 12″ blocks. Most quilt books and patterns use finished 12″ blocks.
Rotary Mat
Rotary mats or cutting mats come in all shapes and sizes. The bigger the mat, the easier it is to cut on but the price tag is more. I started out with a small matt and quickly upgraded to a much larger mat about 6 months later.
They also have mats that you can turn which makes trimming patchwork easier but you can’t use these turn table cutting mats for cutting fabric yardage because the fabric is much larger than your mat. You could fold the fabric a few times but then you would get an uneven cut and get turned around. When you get turned around while cutting fabric, your start cutting in the wrong direction and may end up with the wrong size pieces. I can’t tell you how many times I did that and had to get more fabric. Lean from my mistakes.
Cutting Process
A quilt pattern will have a cutting chart or have written instructions on the amount of fabric needed and the cutting measurements. First step is to iron your fabric to get the wrinkles out. Don’t worry about ironing the fold of the fabric, we will cover that more a little later.
You can cut on either side of the fabric but generally the right side will be facing up and folded in half from selvage edge to raw edge. Quilt fabric cutting instructions typically have you start by cutting wof strips of fabric and then sub-cutting (cutting WOF strips) into smaller pieces. WOF means “width of fabric” and is used a lot in quilting, so make sure you understand what it is.
Quilt pieces should be cut straight and accurate. Let’s move on to the cutting instructions for fabric quilting below.
How To Cut Fabric For Quilting – Instructions
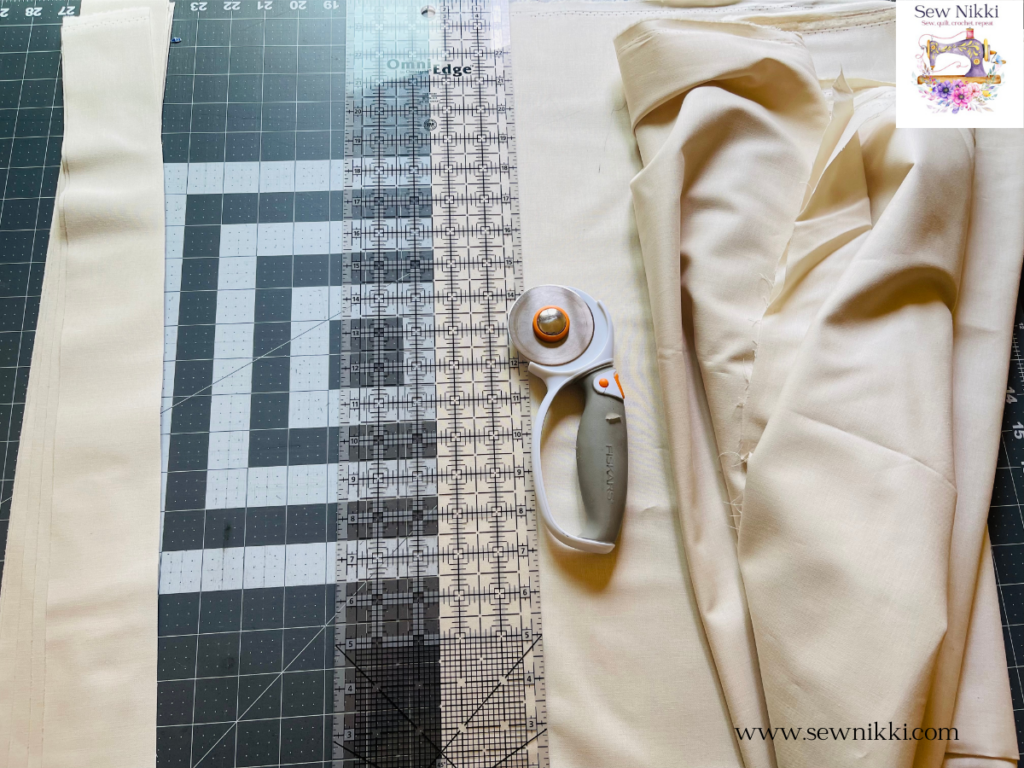
How to cut fabric by the yard
This is a picture of a few yards of fabric from the fabric store. It comes from the stores folded in half from selvedge edges. Always lay your fabric by the yard down on mat with the uneven edges facing outwards to the right and left. Uneven edges of fabric are typically where they make their cut when you are buying it off the bolt at the fabric store. Use the lines on the cutting mat and line up the folded edge of fabric or the selvedge edge on a lower horizonal line cut.

Clean Up Uneven Edge
Next, take your quilting straight line ruler and clean up the uneven edge. Always cut on the right side. Once you do you clean up cut and have a straight edge, twist your rotary mat around. Keep your fabric on the horizontal line and the straight cut on the far right vertical line.
You can either use the lines on the rotary mat to line up the fabric, then take your ruler and make the cut. Either use the vertical lines and horizontal lines on the mat to line up the fabric before you cut or use the lines on your ruler and then cut.
Clean Up Selvedge Edge
Photo above is me trimming the selvedge edge, but trimming it on the left side of fabric instead of the right. This was an exception but notice in the pic how the strip of fabric is lined up to the vertical and horizontal lines on the mat.
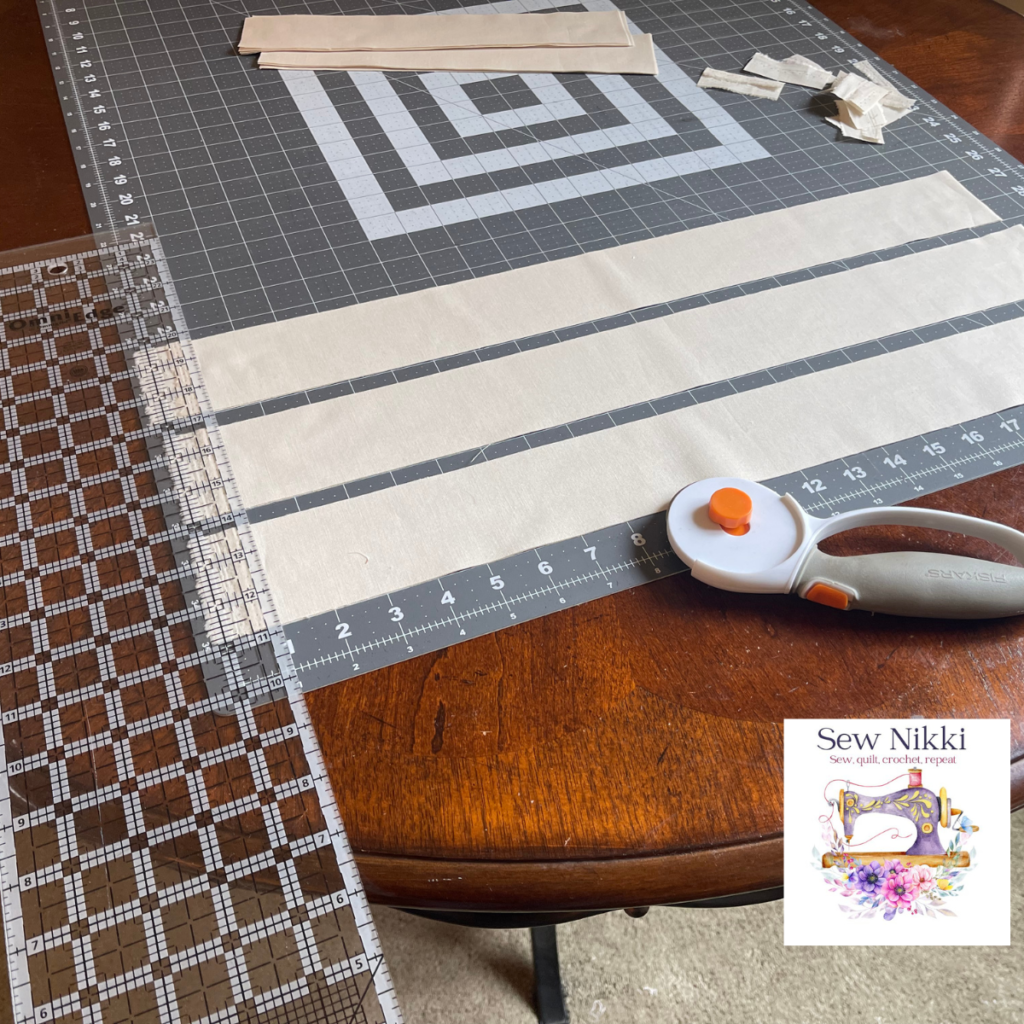
Cutting Layers of Fabric
Picture above is me cutting a few strips of fabric at one time but not stacked. I use the mat to line up the rows of fabric strips. After they are lined up on the vertical and horizontal lines, cut edge of fabric to clean up the uneven edges if needed. These rows only needed a little trimming. I always use my ruler above facing upwards, when the logo is facing downwards then my ruler doesn’t grip as well. Bottom of the ruler is always facing down, that’s my preference.
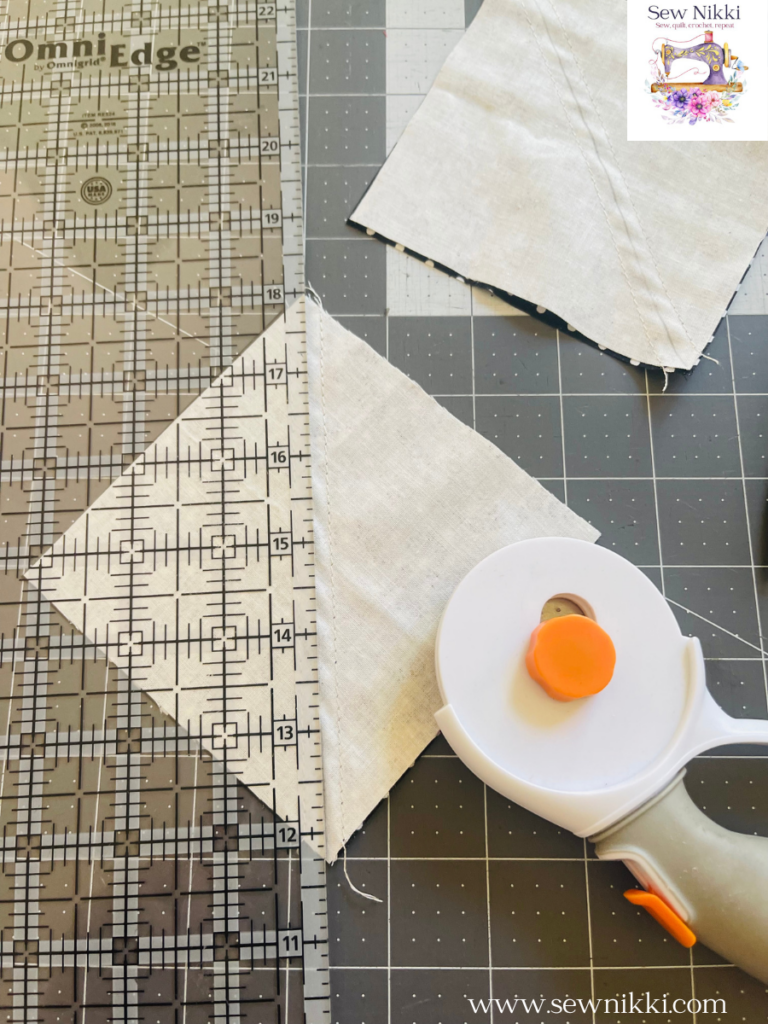
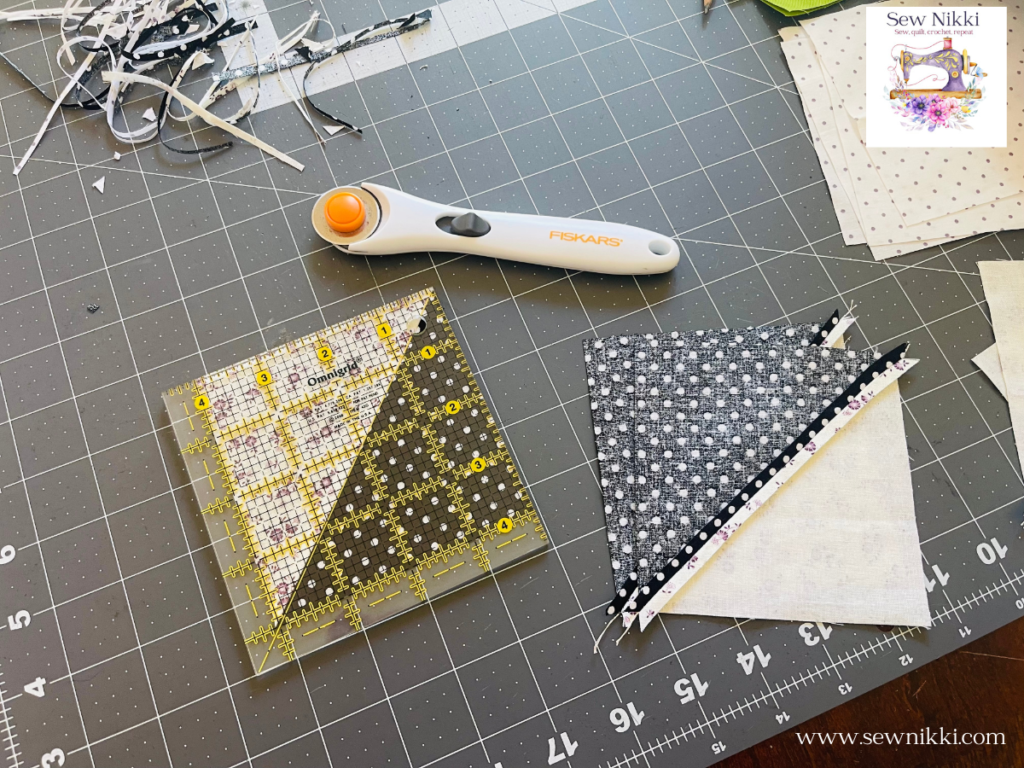
Two Cuts for Half Square Triangles
This photo above is showing how to use the quilting ruler to cut patch work pieces. Half square triangles are cut two times after you sew two squares together in the middle. I’m using a 60 mm rotary cutter and any size straight line ruler. Next, cut the square in half, directly on the line you and checking the 1/4″ line on the ruler to make sure your seam was 1/4″ from the line.
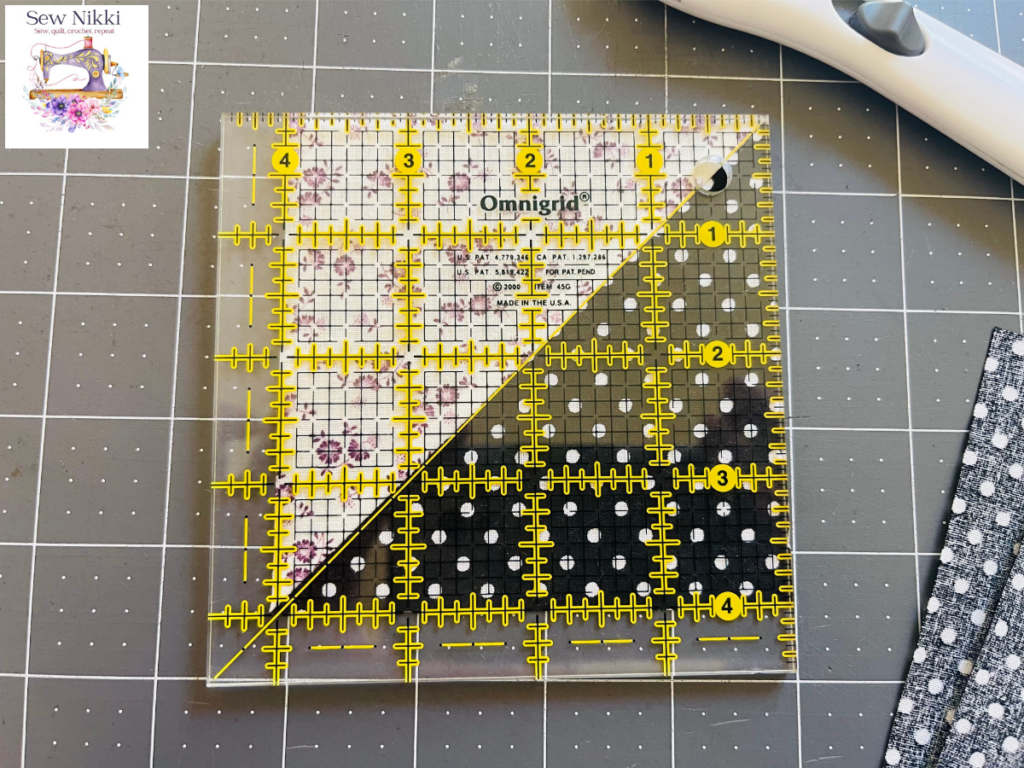
After the half square triangles are cut in half, you need to square them up. Grab your 4.5″ square ruler or whatever size ruler you need to cover your block. This is where I change to the smaller 28 mm rotary cutter because it’s easier to cut the fabric around those squared corners.
Find the center of the block and the diagonal line the line that up to the seam where the fabrics meet. Slide the square ruler up and down that diagonal line to trim away excess fabric on the right and top sides.
Then take the square and twist it around so that the top right corner is now in the bottom left corner. Repeat the process and trim the right and top of the block. It should now be trimmed on all sides.
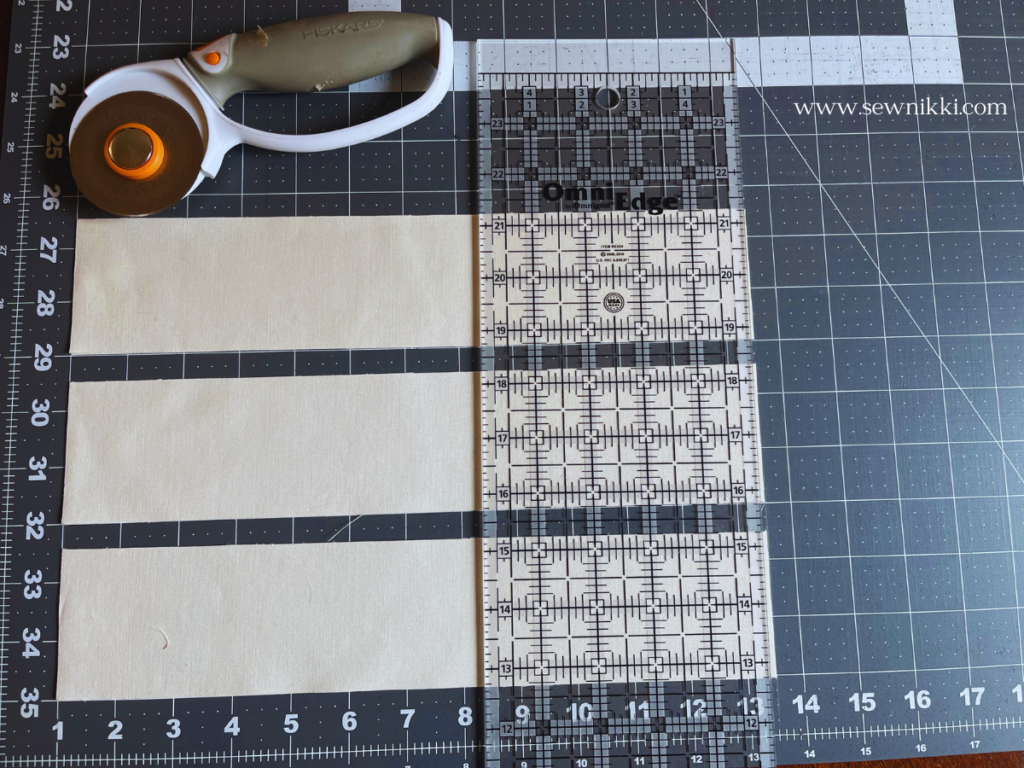
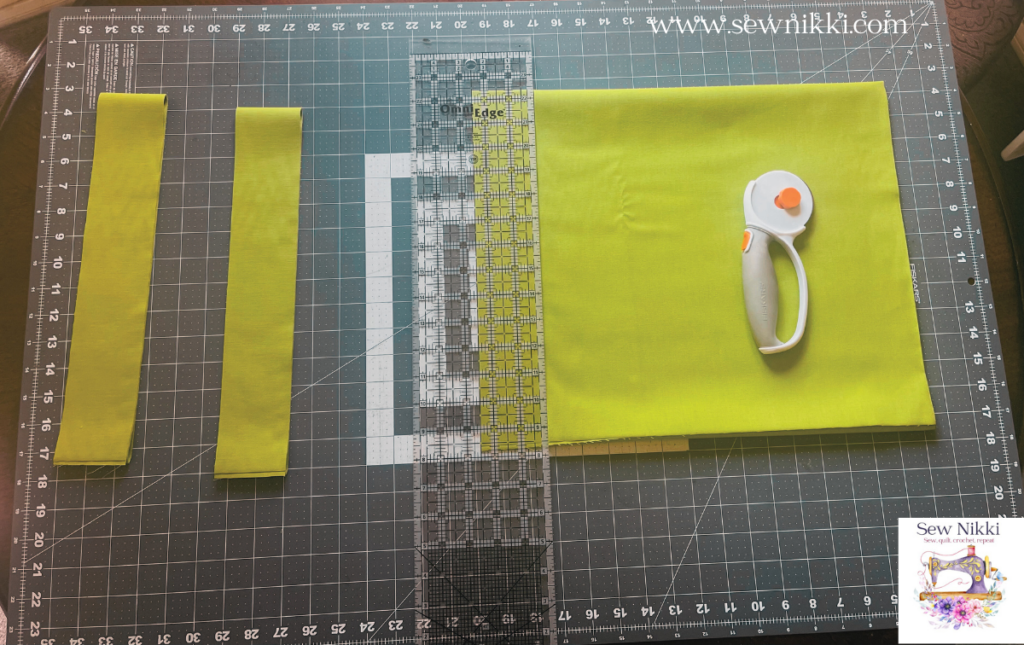
Cutting Binding and Border Strips
The photo below is me cutting fabric strips for a border or to make binding. You can see that I’m using a 5″ x 24″ straight quilt ruler. The logo is facing up and bottom of the ruler is at the bottom. Cutting 2.5″ x WOF strips of fabric. Take the quilt ruler and find the 2.5″ mark and the solid black line. Line it up to the left side of the clean fabric edge and cut.
Safety Tips
Turn off the sewing machine when you are not actively sewing. Turn off and unplug from the wall when you are done sewing. Cover your machine to protect it from dust.
All rotary cutters had a slide to cover or uncover the rotary blade. You slide it down to expose the blade when in use. Slide it up to cover the blade, preventing it from working, when not in use.
Buy gloves to protect your fingers and hand when you first learn how to cut with rotary cutter. I think I used cotton mittens but they aren’t the same.
ABOUT SEW NIKKI
If this is your first time stopping by, welcome! I’m Nikki, a maker obsessed with quilting, crochet, and all things fabric. Here, you’ll find easy-to-follow patterns, helpful tutorials, and plenty of inspiration for your next handmade project. Grab your fabric (or yarn), and let’s create something beautiful together!
Follow me on social media (Pinterest, Instagram, Facebook and Twitter) so you get notifications when I post new patterns and tutorials.
Want to learn how to crochet? Then check out this post, How to Learn How to Crochet – Guide for Beginners.


Excellent tutorial & the pictures make it perfect!!
Thank you Patti!
This is great info
Thanks for your time
Thanks Pamela!
Wow- great tutorials! You are really talented, Nikki!
Thank you Debbie, that’s very sweet.