Log Cabin Quilt Block Layouts & Four Free Patterns
Log Cabin quilts are a cornerstone of quilting, offering versatility and endless design possibilities. Whether you want a traditional look or something more modern, Log Cabin blocks can be arranged in many ways to create unique patterns.
In this post, I’ll guide you through four popular Log Cabin quilt layouts and show you how to adapt these layouts for your next project. I’ve also included links to my Log Cabin quilt patterns for inspiration!

All of these patterns start with a traditional log cabin quilt block. The starting point for a traditional block is the center square (a red center is the traditional color). Red representing the heart or hearth of the home. Then strips of fabric will be sewn around the center square to form the log cabin design. The width of the strips can vary but my quilts all use 1.5″ wide strips.
How to Make a Basic Log Cabin Quilt Block
To make a log cabin block with a 3″ center square and 1.5″ strips, start with your center square, then sew on strips of fabric, alternating colors, one at a time, around the center, adding each new strip to the previous one, gradually building out the block from the center outwards, ensuring to press seams flat after each addition; with a 1.5″ strip, you will need to cut each subsequent strip slightly longer to match the growing edge of your block as you sew.
If you need more instruction, check out my full tutorial with pictures here.

Strips of Fabric: What to Use for Your Log Cabin Quilts
When it comes to piecing Log Cabin quilts, fabric strips are key. In all of my patterns, I use 1.5″ wide strips cut to size, which creates a detailed and crisp look. However, you can easily experiment with wider strips for a bolder and more modern appearance.
- 1.5″ strips: Perfect for intricate designs and smaller-scale blocks.
- 2″ or wider strips: Great for a larger-scale, quicker-to-finish quilt with fewer seams.
Cut your strips accurately to ensure your blocks align properly when sewn together. Depending on your desired look, try using a mix of widths to give your quilt a dynamic, textured feel.

Fabric Selection: How to Choose the Right Fabrics for Your Log Cabin Quilt
Fabric selection plays a big role in how your Log Cabin quilt turns out. Whether you’re going for a traditional or modern look, the colors and prints you choose can make a huge difference. Here are a few tips:
- Contrasting Colors: For a traditional Log Cabin design, use light and dark fabrics to create contrast. This helps highlight the “log” effect in the blocks.
- Monochrome: If you prefer a more modern, cohesive look, choose a range of shades from the same color family.
- Prints vs. Solids: Mix prints and solids for added texture and visual interest. Using solids can make the block patterns stand out more, while prints can soften the overall look.
Keep in mind the scale of the print relative to the width of the fabric strips. Larger prints may get lost in smaller strips, while smaller prints and solids work well in intricate designs.
Make sure you check this out!
After you read this post, make sure you also check out How To Learn How To Quilt: Beginner Quilting Guide. It’s jam packed with even more information, links and resources that are so helpful when you’re first learning. It also has a section with free quilt patterns that are great for beginners. So make sure you check this out, seriously don’t forget!
Grab a copy of my Quilt Planning Journal, filled with graph paper and note pages to help you design 4 quilts or sewing projects! You can jot down ideas as I see them, draw mock ups of quilts and write your cutting dimensions and finished quilt size for future reference. Pin in fabric swatches, photos of your finished quilts and enjoy your creative process!
Log Cabin Quilt Layouts
There are so many different ways to make a log cabin quilt. There is the classic log cabin block with a center square and strips going around it. The traditional log cabin block with two tiny squares for the center and then strips going around it. And there’s also a half log cabin block or a quarter log cabin block. Don’t forget the log cabin courthouse steps block. For today’s tutorial, we will stick to the traditional design using a full log cabin block.
So here are four log cabin quilt designs, all use 1/4 inch seam allowance, sewing in straight lines, pressed after each strip and squared up when done. One tip: the center of the block, the center square needs to be a dark or bright color. That was my only regret when I made these, my first log cabin blocks. I would choose a red square for the center hands down but you pick your own color scheme. Also, the block size depends on how wide your fabric strips are and how many rounds you use.
1. Blocks Sewn Side by Side
For a clean and classic look, you can sew your Log Cabin blocks directly side by side without any sashing. This method lets the patterns within the blocks stand out, creating a visually strong quilt without any distractions.
One great way to use this layout is in smaller projects like table runners. You can arrange the blocks for a traditional feel or mix them up for a modern twist.
Check out my Log Cabin Table Runner, which uses blocks sewn side by side for a simple, eye-catching design.

2. Blocks Sewn Side by Side with a Border
If you love the simplicity of side-by-side blocks but want to add a bit more structure, sewing the blocks together with a border is a great option. Borders help to frame your quilt and give it a finished look. You can play around with different fabric colors and widths to make the border pop.
My Cozy Cabin Quilt is a great example of side-by-side blocks with a double border, perfect for adding a bit of contrast and extra flair.

3. Blocks with Sashing and Cornerstones
For a traditional and structured look, sew Log Cabin blocks together with sashing and cornerstones. The sashing separates each block, giving the quilt a polished, grid-like appearance. This layout works well for large quilts where you want the individual blocks to stand out.
Take a look at my King Size Log Cabin Quilt for a classic example of how sashing and cornerstones can give your quilt a refined and balanced feel.

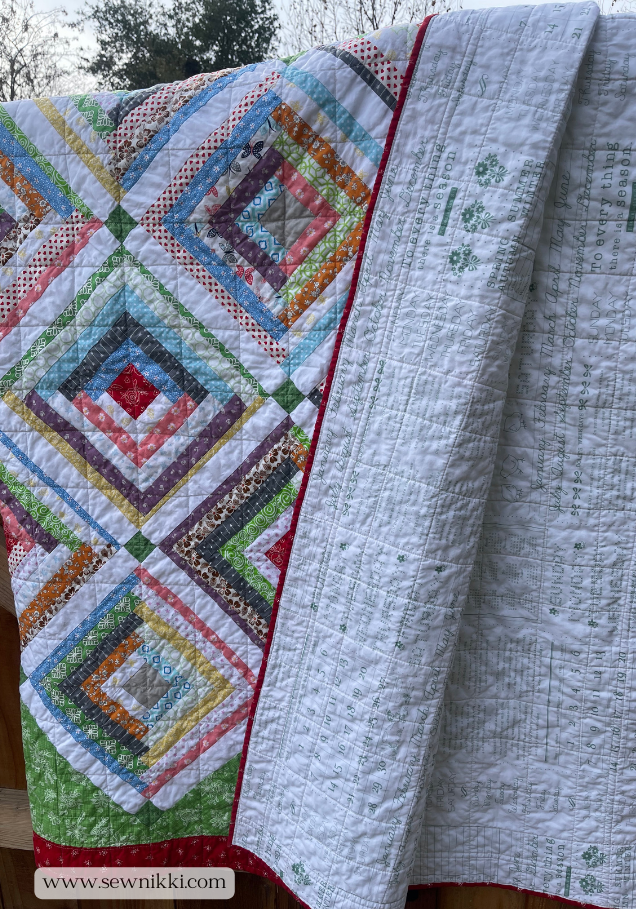
4. Blocks On Point with Sashing and Cornerstones
For a more dramatic and modern layout, place your Log Cabin blocks on point, meaning they are rotated at a 45-degree angle. Adding sashing between the blocks enhances the design and helps create clean lines, while cornerstones (small squares at the intersections of the sashing) add a fun pop of color. If you like a scrappy log cabin block, this quilt has them in spades. It’s scrappy because I used used light fabrics and dark fabrics whenever I wanted and didn’t keep one half of the block dark and one half light.
My Twin Size Log Cabin Quilt On Point is a fresh take on this layout, with sashing and cornerstones adding depth and dimension to the design.

Log Cabin Quilt Layouts – BEGINNER SUPPLIES
Here are some quilting tools and supplies I recommend. I make a small commission if you purchase through the links, this helps to support this free content. For more info, check out Supplies for Beginners (Best Tools To Start).
Rotary Mat Cutting Mat (Self-Healing Mat)
28 mm Rotary Cutter Replacement Blades
45 mm Rotary Cutter with Sharp Blade (start with this one)
45 mm Rotary Cutter Replacement Blades (start with this one)
60 mm Rotary Cutter Replacement Blades
4.5″ Square Ruler for half square triangles
12.5″ Square Ruler for blocks
SAVE THIS PIN FOR LATER!

This post contains ads and affiliate links, which means I make a small commission at no extra cost to you. While the ads are annoying, it helps keep this blog going. See my full disclosure here.
ABOUT SEW NIKKI
If this is your first time stopping by, welcome! I’m Nikki, a maker obsessed with quilting, crochet, and all things fabric. Here, you’ll find easy-to-follow patterns, helpful tutorials, and plenty of inspiration for your next handmade project. Whether you’re stitching up a cozy quilt, crocheting a vintage-inspired blanket, or diving into upcycled sewing, I’m here to make the process fun and stress-free. Grab your fabric (or yarn), and let’s create something beautiful together!

Whether you’re piecing blocks side by side, adding borders, or going bold with an on-point layout, Log Cabin quilts offer endless creative possibilities. With the right fabric selection and strip width, you can personalize any design to fit your style. Explore one of the patterns linked above to start your next project! You can do these layouts, even if you are a beginner quilter. The only one you may want to hold off on until you have more experience is the on point design. Happy quilting!
Follow me on social media (Pinterest, Instagram, Facebook and Twitter) so you get notifications when new patterns and tutorials are posted.
Want to learn how to crochet? Check out this post, How to Learn How to Crochet – Guide for Beginners.