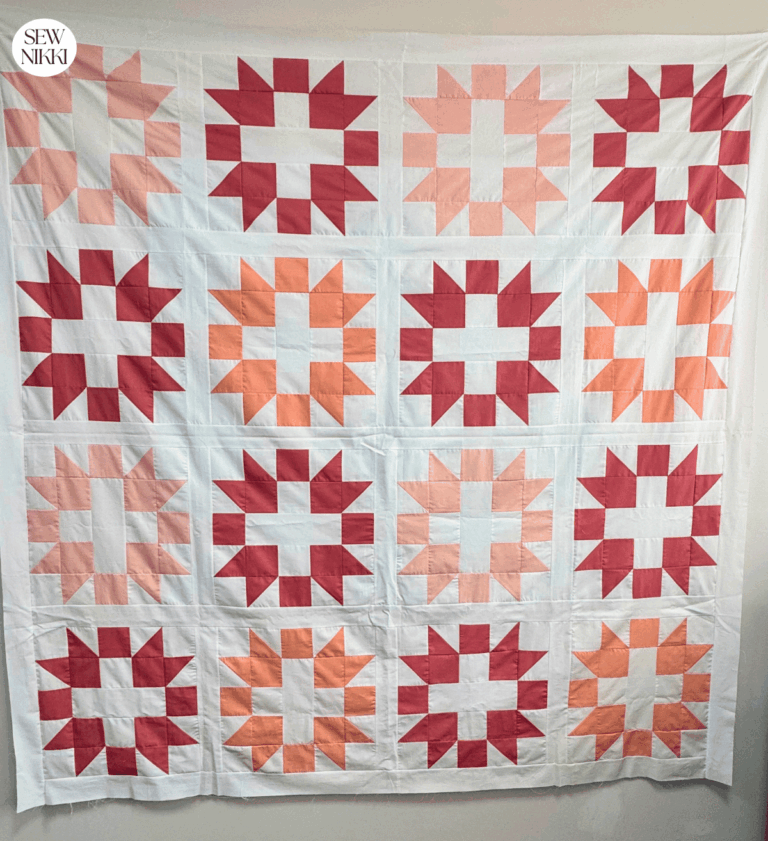
“Big Stars” Eight Point Star Quilt Pattern
This beautiful eight point star quilt pattern is called Big Stars and she’s a real beauty. In today’s tutorial, I’ll show you the free pattern using this traditional quilt block. The sample shown was made for my niece Luca, she’s heading off to college. You can easily adjust the blocks up or down to make a smaller or larger quilt. I hope you enjoy this free tutorial and free quilt pattern. Finished size measures 75″ x 90.5″.

Now you can make star blocks using several methods, each is a little different but easy to do with the correct fabric measurements. You can get an 8-point star block using flying geese units, half-square triangles or quarter-square triangles. This pattern uses background squares and smaller star point squares. While you have some fabric waste, the squares are easier to work with than the triangles for me so that’s how I wrote this tutorial. Pro tip: if you have difficulty with the star blocks, you can make wonky stars to get a slightly different looking quilt.
This 8 point star quilt block has a dual pattern on the quilt top due to a snowball effect in each block corner. It will create a secondary pattern and is easy to work up on your sewing machine. A great project for confident beginners. The square blocks are large and gives it the quilt a modern look.
This entire quilt is a traditional look but can be changed out with a different color for the snowball corners. The focal point is the star so chose your color for that carefully. Play around with different colors and pieces of fabric until you like the block. My blocks are scrappy fabrics that I curated at my local fabric store to match the colors of the college my niece is attending.

Have you ever created your own fabric before? Me either until I made this quilt. Check out how I designed my own fabric for this backing using Spoonflower.
Make sure you check this out!
After you read this post, make sure you also check out How To Learn How To Quilt: Beginner Quilting Guide. It’s jam packed with even more information, links and resources that are so helpful when you’re first learning. It also has a section with free quilt patterns that are great for beginners. So make sure you check this out, seriously don’t forget!
Grab a copy of my Quilt Planning Journal, filled with graph paper and note pages to help you design 4 quilts or sewing projects! You can jot down ideas as I see them, draw mock ups of quilts and write your cutting dimensions and finished quilt size for future reference. Pin in fabric swatches, photos of your finished quilts and enjoy your creative process!
Big Stars Quilt – Free 8 Point Star Pattern
Block Instructions
It all starts with an eight point star quilt block. For this twin size quilt, you will need 30 quilt blocks. So hand cut your fabric from a fat quarter or from yardage. Charm packs, jelly rolls, a layer cake or other precut fabrics won’t work for this project. This takes about 30 fat quarters or 7.5 yards of fabric for the background squares. But this is a great way to use up scrap fabrics.
You will need about a 4.5 yards of black fabric for the stars, snowballs and binding. Lastly, you will need about 6 yards of backing fabric.
Cutting instructions for one block: 1 – 5.5″ x 5.5″ black star square, 8 – 5.5″ x 5.5″ background squares and 12 – 3.5″ x 3.5′ black squares (star and corners).

Piecing the Star Blocks
Now, onto the fun part – piecing together the star blocks for this beautiful quilt. We will start by adding the small squares to the larger blocks. Four background squares will get one corner star. Use your diagonal seam tape to help you with sewing the diagonal lines on all the small squares. It’s hard to see a line on the black fabric but if you use a chalk pen it does show up. Make sure you have good lighting too when sewing on black fabric.
Sewing Process
For each block, you will sew a corner square on all 8 background squares. Take your fabric pieces to the sewing machine. Lay the background square on your table and place a small black square in the upper left corner. The diagonal line should be sewn from the center of the background square to the middle of the left side of the background square. Do this for all 8 background square.
Take to your cutting matt and trim off the excess fabric. Line your ruler’s 1/4″ line directly on your stich line and trim with your rotary cutter. Press open with iron.
Place 4 of those low volume white background squares with the corners off to the side. Now let’s make the star points.
With your 4 remaining background squares with the left corner on, take to your sewing machine. Lay the background square down and place one more small square in the right upper corner. It should be laying on a portion of the other small square.

This time you are going to sew a diagonal line from the upper center of background square to the middle right side of the background square. Trim off excess fabric using the 1/4″ line on your ruler and press open with iron. These are your star point background blocks.
Assemble Star Blocks
Place your black center square down on your matt or table. Then assemble it using the picture below. Once you have the squares laid out as shown, sew the squares into rows. Then sew the rows together to complete the block. Repeat this until you have a total of 9 star blocks.

Assemble Quilt
Once you’ve finished piecing together the star blocks, it’s time to assemble your quilt top. Lay out your blocks in 6 rows with 5 blocks each. Once you’re happy with the layout, sew the blocks together to create rows, then sew the rows together to complete the quilt top.

Get the digital pattern.
Just download and print the pattern so you have it handy. Get your copy here.
Finishing Touches
With your quilt top complete, it’s time to assemble the quilt sandwich and start quilting! Layer your quilt top, batting, and backing, then baste the layers together using quilt basting spray or pins. I used Quilter’s Dream batting for the first time and loved it. It gave my quilt a puffy look with cotton.

Now, it’s time to quilt as desired – whether you prefer simple straight-line quilting or intricate free-motion designs, the choice is yours! Finally, finish with binding and your done.
This sample was done with diagonal straight line machine quilting on my home sewing machine. If you are a new quilter and need to machine quilt with straight lines, check out these straight line machine quilting designs for ideas and inspiration.
Beginner Supplies
Here are some quilting tools and supplies I recommend. I make a small commission if you purchase through the links, this helps to support this free content. For more info, check out Supplies for Beginners (Best Tools To Start).
Rotary Mat Cutting Mat (Self-Healing Mat)
28 mm Rotary Cutter Replacement Blades
45 mm Rotary Cutter with Sharp Blade (start with this one)
45 mm Rotary Cutter Replacement Blades (start with this one)
60 mm Rotary Cutter Replacement Blades
4.5″ Square Ruler for half square triangles
12.5″ Square Ruler for blocks
SAVE THIS PIN FOR LATER!

This post contains ads and affiliate links, which means I make a small commission at no extra cost to you. While the ads are annoying, it helps keep this blog going. See my full disclosure here.
More Quilt Blocks You May Like
Here are some other quilt blocks you may like. All have free patterns and tutorials to go with them. Most have a digital pattern too in my shop.
ABOUT SEW NIKKI
If this is your first time stopping by, welcome! I’m Nikki, a maker obsessed with quilting, crochet, and all things fabric. Here, you’ll find easy-to-follow patterns, helpful tutorials, and plenty of inspiration for your next handmade project. Whether you’re stitching up a cozy quilt, crocheting a vintage-inspired blanket, or diving into upcycled sewing, I’m here to make the process fun and stress-free. Grab your fabric (or yarn), and let’s create something beautiful together!

Homemade quilts are literally the best thing ever! With these step-by-step instructions and free pattern, you can make this modern quilt pattern too!
For best results, audition your fabric before sewing the quilt top. This quilt looked better in darker fabrics, that’s how the Big Stars Baby Quilt was created. With sample blocks originally made to use in this college quilt. I’ve been making lots of sawtooth star block quilts, just trying another way to make a star and there are so many options.
Doing this 8 point star with the smaller squares and trimming was easier to sew the rows and quilt top together because there is no seam line. Only the seam line from attaching the background blocks together. So easy! Play with different fabric and make a unique patchwork quilt of your very own or make it for a loved one.
Follow me on social media (Pinterest, Instagram, Facebook and Twitter) so you get notifications when new patterns and tutorials are posted.
Want to learn how to crochet? Check out this post, How to Learn How to Crochet – Guide for Beginners.


Beautiful design and I love the colors!
THIS quilt is gorgeous! Love your tutorials!
Hi Nikki
Do you remember that I was going to use your big stars tutorial to make a quilt earlier this year?
It was for the Chairman’s challenge at the quilt group I belong to, where partaking members had to put some fabrics from their stash into a bag and then we were given someone else’s bag of fabric. We had to make something with the given fabrics and then at our quilt show, the results would be displayed. The Chairman judged the work and awarded rosettes. I won the rosette for first place, using your big star pattern! Can I send you a photo?
That’s wonderful, so happy for you. Please share the photo, would love to see it. Thanks!