5 Yard Quilt Pattern Free – Chevron Throw Quilt
5 yard quilt pattern free, Chevron Throw Quilt by Sew Nikki. This is a 12 fat quarter quilt pattern but you can use any fabric you like. Playing with half square triangles in a chevron pattern. This pattern also has a secondary design which is gorgeous. Not only is this pattern visually striking, but it’s also surprisingly beginner-friendly.
Today, I’ll walk you through making your very own Chevron Quilt using just five yards of fabric. Plus, there is a fantastic free pattern utilizing fat quarters, making the process even simpler for beginners. So, let’s dive right in!
Fat Quarter Quilt Patterns
If you are looking for 12 fat quarter quilt patterns, that’s exactly how many I used for this great quilt but must admit I did have a lot of left over units. 12 fat quarters was the perfect amount of prints to get good variety and color distribution in my quilt. It’s easy to use 4.5″ finished HST units for other quilt project. Here are projects you can make with any extra half square triangle units: table runners, tote bags, tree skirt, table toppers or a lap throw.
Throw quilts are the perfect size for straight line quilting on a domestic sewing machine. Throw quilts are different from lap quilts and here’s why. Lap quilts don’t cover your body, they just cover your lap while sitting in a chair or on the sofa. Throw quilts make a great blanket for curling up in a recliner or kicking back on the couch while you watch television. Throw quilts are smaller than a bedspread quilt but will cover your entire body in most cases.
MAKE SURE YOU CHECK THESE OUT!
After you read this post, make sure you also check out Learn How to Quilt for Absolute Beginners. It’s jam packed with information to make your first quilt. It also has links and resources that are so helpful when you’re first learning. There’s lots of free quilt patterns that are great for beginners and all skill levels too. So make sure you check this out, seriously don’t forget!
Make sure you grab a copy of my free Quilt Planning Journal. It’s filled with graph paper and note pages to help you design at least 4 quilt or sewing projects! Use it to jot down ideas, fabrics, patterns and inspiration all in one place. Or create your own patterns and share with others. Pin in fabric swatches, photos of your finished quilts and enjoy your creative process!
Fabric Options – 5 Yard Quilt Pattern Free
Fat Quarters
Now just because I used fat quarters does not mean that you have to use them. Some of the most beautiful quilt patterns only use a few colored fabrics or prints and generally with a background fabric for half square triangles. But you can use whatever fabric you like in whatever color combinations you choose. It’s probably best though to save your large scale print fabric for the backing.
The fat quarters that I used were not my most beautiful prints, they were actually left over fat quarters from a half yard bundle fabric collection by Lori Holt Prim by Riley Blake Designs. These left over fat quarters weren’t my favorite colors so they were collecting dust. But when these dust collectors were mixed together in a scrappy style they really do make a fabulous quilts. It was time to use them in a scrappy project and lately I have really enjoyed making throw quilts.
One-Yard Cuts of Fabric
It may be faster and cheaper to go out and buy your own fabric by the yard, half yard or quarters depending on how many prints you want and cut yourself. If you are unsure, check out Best Fabric for Quilting – How to Shop Like a Pro! This cover the four main places to shop for fabric and what to buy at each to save you money but get the best fabrics.
Precut Fabrics
This project works well with precut fabrics like 5″ charm square or 10″ layer cakes. By far the easiest fabric to use would be 5″ charm packs because there is no cutting to do. Charm packs normally have 40 square so look at the fabric requirements below and make sure you have enough charm packs to meet the fabric requirements.
Layer cakes are another great option for fabric variety if you want lots of colors that all match. You would need to sub cut the layer cakes in half both horizontally and vertically to make 4 – 5″ squares from the 10 inch square, but that’s easy when you use rotary cutters and creative grids rulers (or any other brand of rulers). Fabric manufacturers have really great layer cakes.
Check out your local quilt shop first, then try online if you can’t find what you like in the quilt shop. Jelly rolls will not work for this pattern.
Fabric Stash:
Great way to use up some of your stash. This is a perfect stash buster project as long as your fabric scraps are 5″ squares. Scrappy fabrics make for a fabulous quilt!
You will need the following quilting skills to complete this pattern successfully: half square triangles, nesting seams, free motion quilting OR can straight line stitch on a domestic sewing machine. So basically quilters of all skill levels should be able to complete this beautiful pattern with ease. Detailed instructions below.
If you are brand new to quilting and don’t know how to make half square triangles or HSTs, check out my tutorial How to Make Half Square Triangles (HSTs) – Easy Formula Chart.
Free 5-Yard Chevron Quilt Pattern
This five yard pattern is for quilt top only, you will need more fabric for backing and binding. This new pattern of mine can be sized up or down by removing or adding additional HSTs. It’s an easy pattern to look at, but pay attention to make sure your units are facing the right direction.
Materials You’ll Need:
- 5 yards of fabric: Choose a variety of colors and patterns that complement each other. Fat quarters are a great option for a diverse selection without buying large cuts. Precut charm packs or layer cakes are another excellent choice. Great stash buster for 5″ squares.
- See fabric requirements below for 5″ square quantities.
- Cutting mat, rotary cutter, and quilting ruler: These tools will help you cut your fabric pieces accurately.
- Sewing machine and coordinating thread: A basic sewing machine will do wonders for your quilting journey.
- Iron and ironing board: Essential for achieving crisp, polished seams.
- Pins and safety pins: These will help keep your fabric pieces in place during sewing and quilting.
See the full list of beginner quilting supplies I use and highly recommend below.
Finished quilt measures 65.5″ by 65.5″, it’s the perfect size throw quilt.
Fabric Measurements:
128 – 5″ background squares
128 – 5″ print squares
Backing and binding fabric
Make Half Square Triangles (HSTs)
From your 5″ squares, create half square triangles (HSTs) by pairing up one print and one background squares. Place the 5″ squares right sides together, draw a diagonal line from one corner to the opposite corner, and sew a quarter-inch seam on both sides of the diagonal line. Cut along the marked line and you have two HSTs. Square up to 4.5″.
If you are brand new to quilting and don’t know how to make these, check out my full tutorial on How to Make Half Square Triangles (HSTs) – Easy Formula Chart.
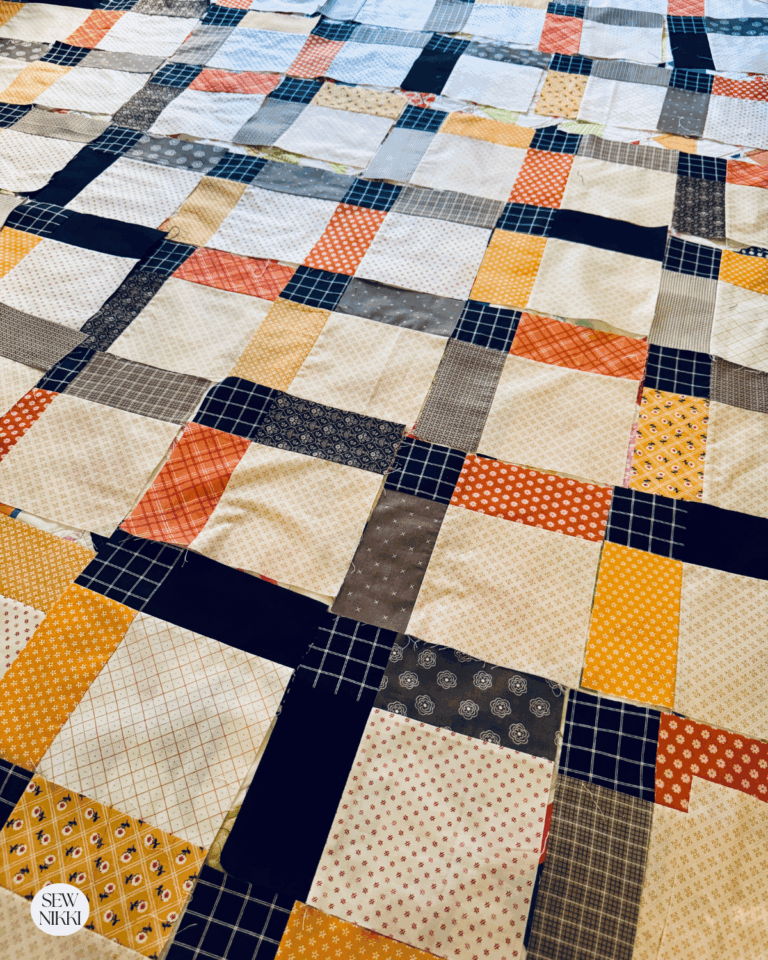
Arrange Chevron Pattern
Play around with your HSTs to create the chevron pattern as shown in the photo below. You can arrange them in color gradients, random order, or any other pattern that catches your eye. Lay them out on your work surface until you’re happy with the design. Use the photo below to layout the quilt. You can also make the quilt larger or smaller by adding or removing 2 HSTs per row.
Sew Chevron Rows
Once you’ve settled on your layout, start sewing your HSTs into rows.
Be mindful of matching the seams to keep the chevron pattern.
Press your seams open or to the side, whichever you prefer, to reduce bulk.
Assemble Quilt Top
Sew the rows together to create your quilt top. Press the seams to make sure everything lays flat and neat. At this point, your quilt top is ready!
Sashing and Border (Optional)
My sample does not have sashing or an outside border but this would look lovely with either or both. For a modern look, add a 2 inch white background sashing after each even numbered row. There are 16 rows, you would need 8 – 2 inch sashing strips and a 2″ or 3″ white background border. This is optional and just suggestions.
Note: It takes two rows to form the chevron pattern. Keep that in mind when adding sashing. For more information on sashing, check out How to Make Quilt With Sashing and Cornerstones.
Baste Quilt
Time to make a quilt sandwich with your quilt top, batting and backing fabric. Baste the layers together with 505 Adhesive Spray Baste or curved quilting safety pins. For more info, check out How to Sandwich a Quilt Step-By-Step Tutorial.
Quilting On Domestic Sewing Machine
You can opt for straight line quilting, free motion quilting, or any other quilting design that inspires you. Once quilting is complete, bind the edges of your quilt to give it a polished look. For more info, check out How to Machine Quilt With Walking Foot for Beginners.
Attach Binding
Make double fold binding using 2.5″ x WOF strips until it’s long enough to fit around entire quilt. You should need 4 to 5 strips, sewn together to form one long continuous strip. For more info, check out How Wide to Cut Quilt Binding and Make Easy Strips and How to Join Quilt Binding Ends, Beginner Series.
Beginner Quilting Supplies
Here are some quilting tools and supplies I recommend. I make a small commission if you buy through the links, this helps to support this free content. For more info, check out Supplies for Beginners (Best Tools To Start).
Rotary Mat Cutting Mat (Self-Healing Mat)
28 mm Rotary Cutter Replacement Blades
45 mm Rotary Cutter with Sharp Blade (start with this one)
45 mm Rotary Cutter Replacement Blades (start with this one)
60 mm Rotary Cutter Replacement Blades
4.5″ Square Ruler for half square triangles
12.5″ Square Ruler for blocks
SAVE THIS PIN FOR LATER!
This post contains ads and affiliate links, which means I make a small commission at no extra cost to you. While the ads are annoying, it helps keep this blog going. See my full disclosure here.
ABOUT SEW NIKKI
If this is your first time stopping by, welcome! I’m Nikki, a maker obsessed with quilting, crochet, and all things fabric. Here, you’ll find easy-to-follow patterns, helpful tutorials, and plenty of inspiration for your next handmade project. Grab your fabric (or yarn), and let’s create something beautiful together!
I hope you try this easy quilt for your next quilting project! The chevron pattern is pretty because it creates a secondary design which adds more interest. You can have so much fun with HSTs. Play around with them and see how many different designs you can create.
Follow me on social media (Pinterest, Instagram, Facebook and Twitter) so you get notifications when I post new patterns and tutorials.
Want to learn how to crochet? Then check out this post, How to Learn How to Crochet – Guide for Beginners.


This looks like such a simpler way for a chevron pattern! I love the chevron look, but it often looks intimidating. I will have to try this for my next quilt project – thank you!
Definitely going to try this! This is one of my favorite types of quilts my grandmother use to make. She use to make ones that were coordinated colors or just leftover scraps…and now the ones I’ve gotten are “well loved”.
Love this, thanks Meghan.