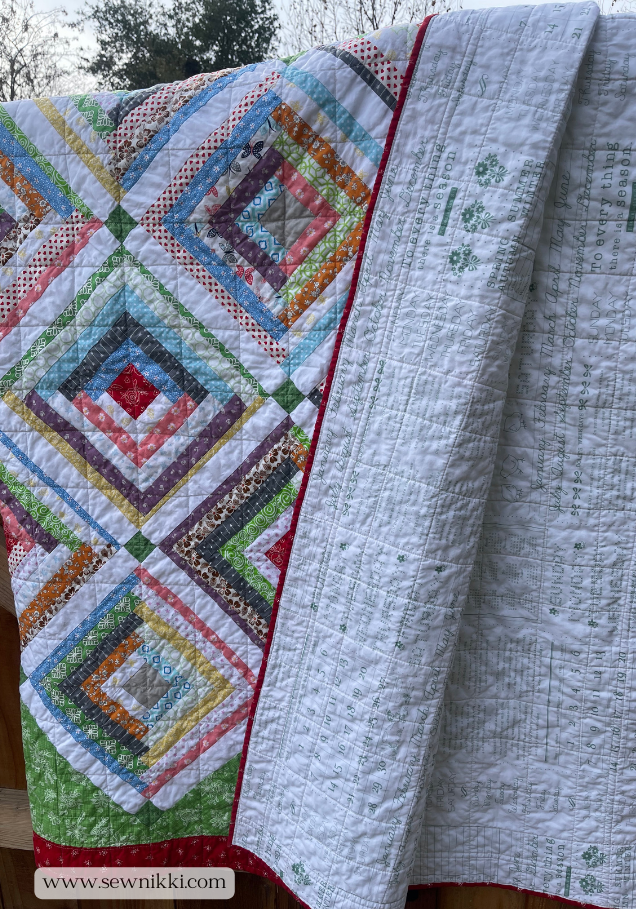
“Cozy Cabin” Log Cabin Quilt Pattern for Beginners
Looking for a beginner-friendly quilt pattern that’s perfect for adding a cozy touch to any room? The Cozy Cabin Quilt is a classic Log Cabin design made with simple 1.5″ strips, making it easy to sew and perfect for quilters of all skill levels.
In this tutorial, I’ll walk you through the steps to create this timeless log cabin quilt, complete with a free pattern and tips for sewing perfect blocks. Whether you’re new to quilting or looking for a relaxing project, the Cozy Cabin Quilt is a great choice. Finished size measures 62″ x 71.5″.

The beginner quilter will find this to be a great project for using your rotary cutter, sewing straight lines, working with strips of fabric and piecing on your sewing machine. You can use different fabrics for a scrappy look and not worry about having light fabric on two sides of the block and dark strips on the other two sides of the block. There are many ways to do cabin quilts as you have probably seen. The finished block can have more rounds if you desire, that’s a great way to make your quilt larger if desired. You will not chain piece for this quilt design. You need to keep adding strips of fabric to a single block, one at a time while working your way around the center of the block.
Fabrics
Charm pack, layer cake, fat quarters, jelly roll strips and fabric scraps will not work for this quilt. You can trim down the jelly roll strips to 1.5″ but that defeats the whole purpose of using pre cut fabrics. If you want to use a jelly roll, I suggest you keep them 2.5″ x WOF strips and make the blocks bigger. The overall look of the quilt will be different and your fabric requirements will need to be self adjusted as well, especially for the border and backing fabric. I also don’t suggest using fat quarter either, it’s best to get half yard of fabric at your local fabric store and get a good selection of fabric. Look in the discount section of your local fabric store to shop like a pro and save money.

I also suggest using a dark color for your center square. A red square is the traditional color for the center of the block. The red represented the heart of the home. You can use any color you prefer for the center. My personal preference after making 3 log cabin quilts is to use a dark fabric for the center of the block and red really is cozy and warm. So go with a red center square.
The color scheme will change the overall look of the quilt. It’s so cool how you can get a different look just with the fabric you choose. That’s why cabin quilts are so popular. I’ve also made a table runner with log cabin blocks and it’s beautiful. You also won’t need any background fabrics for this quilt, just fabric for the traditional log cabin block. Let’s move onto the free log cabin pattern below, you’re going to love this easy quilt!
Make sure you check this out!
After you read this post, make sure you also check out Learn How To Quilt for Absolute Beginners. It’s jam packed with even more information, links and resources that are so helpful when you’re first learning. It also has a section with free quilt patterns that are great for beginners. So make sure you check this out, seriously don’t forget!
Grab a copy of my Quilt Planning Journal, filled with graph paper and some note pages to help you design at least 4 quilts or sewing projects! I have been using mine for a little while and already jotting down ideas, reminders about websites, and fabric options. I think this can be so much more than just a design book. Pin in fabric swatches, photos of your finished quilts and enjoy your creative process!
Free Log Cabin Quilt Pattern – Cozy Cabin Quilt
Cozy Cabin Quilt Details
Block Design: Log Cabin
Block Size: 9.5″ unfinished (9″ finished)
Center Square: 3″ x 3″ finished
Strip Width: 1.5″ (cut width)
Number of Blocks: 30 blocks (5 rows of 6)
Quilt Size: 62″ x 71.5″ (with borders)
Borders: Two 3″ borders in different colors
To get started, you’ll need fabric for the center squares, strips for each round, and fabric for the borders. Below is the step-by-step guide to making the log cabin blocks and assembling the quilt top.
Materials Needed
Center Squares: 1/4 yard or 30 pre-cut 3.5″ squares
Log Cabin Strips: 1/2 yard of various fabrics (but may vary depending on how many colors you use)
Borders: 1/2 yard for each border color
Backing: 5 yards
Batting: Twin size package
Binding: 1/2 yard
How to Make a Basic Log Cabin Quilt Block
To make a log cabin block with a 3″ center square and 1.5″ strips, start with your center square, then sew on strips of fabric, alternating colors, one at a time, around the center, adding each new strip to the previous one, gradually building out the block from the center outwards, ensuring to press seams flat after each addition; with a 1.5″ strip, you will need to cut each subsequent strip slightly longer to match the growing edge of your block as you sew.
Key steps:
- Cut your pieces:
- Cut a center square measuring 3″ x 3″.
- Cut fabric strips 1.5″ wide in your desired colors.
- Start piecing:
- Place your center square right sides together with one fabric strip, aligning one edge of the strip with one side of the square.
- Sew along the edge, using a 1/4″ seam allowance.
- Press the seam allowance towards the strip.
- Add subsequent strips:
- Attach the next strip of fabric to the newly created edge of the block, ensuring right sides are together.
- Continue adding strips, alternating colors, always sewing to the previous strip’s raw edge.
- As you add each strip, the block will gradually grow larger.
- Adjust strip length:
- Because you are adding strips to an increasingly larger edge, each new strip should be slightly longer than the previous one to maintain a consistent seam line.
- Finish the block:
- Once you have reached your desired size, trim the block to square up the edges. Each block should have 4 rounds.
Important considerations:
- Color selection: Choose colors that complement each other for a visually appealing block.
- Seam allowance: Always use a consistent seam allowance throughout the process, typically 1/4″.
- Pressing: Pressing seams flat after each addition is crucial for a neat and well-constructed block.
Sew the Blocks Together
- Once you’ve completed all 30 blocks, lay them out in 5 rows of 6 blocks. Sew the blocks together row by row, using a 1/4″ seam allowance.
If you need more instruction, check out my full tutorial with pictures here.
Adding the Borders
To give your quilt a polished finish, add two 3″ borders in different colors. Here’s how:

First Border: Cut 3.5″ strips from your first border fabric. Sew these to the sides of the quilt, trimming any excess, and then sew to the top and bottom.
Second Border: Repeat the process with the second border fabric, attaching it in the same order.
Get the digital pattern.
Just download and print the pattern so you have it handy. Get your copy here.
Finishing Touches
After adding the borders, your quilt top is ready to be finished. With your quilt top complete, it’s time to assemble the quilt sandwich and start quilting! Layer your quilt top, batting, and backing, then baste the layers together using quilt basting spray or pins.
Now, it’s time to quilt as desired – whether you prefer simple straight-line quilting or intricate free-motion designs, the choice is yours! Finally, finish with binding and your done.

This sample was done with diagonal straight line machine quilting on my home sewing machine. If you are a new quilter and need to machine quilt with straight lines, check out these straight line machine quilting designs for ideas and inspiration.
Last step is to attach the binding. Not sure how to join the binding ends? Click that link for the full tutorial.

FAQs
What size is the Cozy Cabin Quilt?
The quilt finishes at approximately 61″ x 72″ after adding the borders.
Can I use larger strips for this pattern?
Absolutely! For a larger log cabin block, try using 2″ or 2.5″ strips instead.
Is this a good beginner pattern?
Yes! The log cabin block is easy to construct, and with no sashing required, this quilt comes together quickly.

More Log Cabin Patterns
SAVE THIS PIN FOR LATER!

This post contains ads and affiliate links, which means I make a small commission at no extra cost to you. While the ads are annoying, it helps keep this blog going. See my full disclosure here.
ABOUT SEW NIKKI
Welcome to Sew Nikki. Your place for free crochet, sewing and quilt patterns for beginner to intermediate skill levels. Want a digital pattern? We have those too! Plus tutorials to walk you through how to make each item from start to finish.
If you’re ready to start, grab your fabrics, download the free pattern, and enjoy making your own Cozy Cabin Quilt! Happy quilting!
Follow me on social media (Pinterest, Instagram, Facebook and Twitter) so you get notifications when new patterns and tutorials are posted.


These are beautiful! Thanks for sharing!
So cute!! Great post