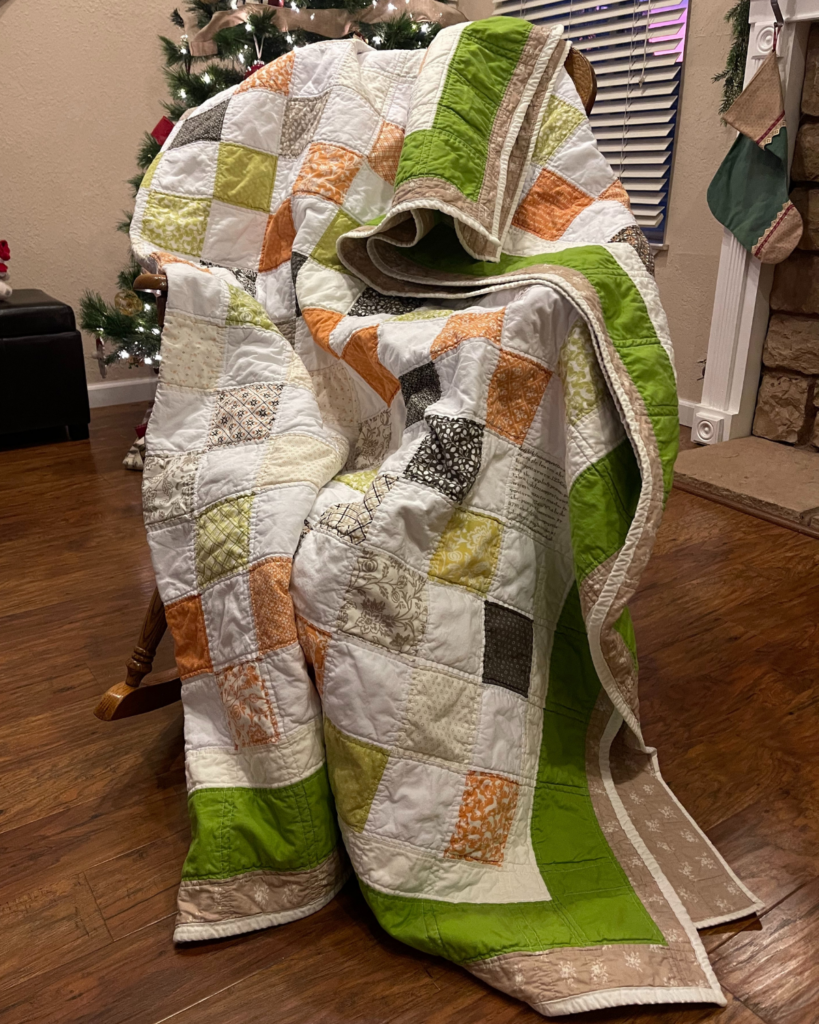
Easy Quilt Patterns – How to Make Charm Square Quilt
Looking for an easy quilt pattern that’s beginner friendly? Then try this classic charm square quilt! Stick with me and I will show you how to make a classic charm square quilt.
Why This Quilt is Perfect for Beginners
If you’re just starting out, this charm square quilt is a great choice. It skips the complicated blocks and tricky piecing methods, so you can focus on the fun part — sewing! With simple squares and easy-to-follow steps, you’ll build confidence without feeling overwhelmed.
I originally made this quilt for my nephew Nick as a housewarming gift, but life got busy, and now it’s turning into a Christmas present. Better late than never! The best part? This quilt always turns out beautifully, whether it’s on a bed or draped over a couch. Let’s get started!
Beginner Quilters
This is a simple quilt that is so much fun and easy to make. It’s perfect for beginner’s. Just follow my tutorial from start to finish. You can modify this pattern by only using 2 – 5″ Charm Square Precut packs with no border. Just lay out your charm squares on the floor or your bed in a square shape. Arrange the charm squares until you like the color placement. If you have extra charm squares, add to your new fabric stash for another project. You can still follow the tutorial for step-by-step instructions to complete your first quilt.
Always place the fabric right sides together when piecing this quilt. Once you are done you will have your first quilt that you made yourself. Just remember that this is for practice and to make a quilt. You have to start somewhere.
If you are a beginner quilter, please check out my tutorials that cover the entire quilting process from spray basting to how to sew binding on a quilt. These easy to follow tutorials provide all the info and photos you need to make your first quilt.
MAKE SURE YOU CHECK THESE OUT!
After you read this post, make sure you also check out Learn How to Quilt for Absolute Beginners. It’s jam packed with information to make your first quilt. It also has links and resources that are so helpful when you’re first learning. There’s lots of free quilt patterns that are great for beginners and all skill levels too. So make sure you check this out, seriously don’t forget!
Make sure you grab a copy of my free Quilt Planning Journal. It’s filled with graph paper and note pages to help you design at least 4 quilt or sewing projects! Use it to jot down ideas, fabrics, patterns and inspiration all in one place. Or create your own patterns and share with others. Pin in fabric swatches, photos of your finished quilts and enjoy your creative process!
Charm Square Quilt Instructions
Materials
1 Layer Cakes – Pumpkins & Blossoms Layer Cakes by Fig Tree Quilt
2 yards white cotton fabric (for background squares, border and binding)
1/2 yard bone cotton fabric (for border)
1/2 yard Kona Chartreuse Green cotton fabric for border
3 yards 108″ width backing fabric – buy at your local fabric store, see what the selection is and chose a fabric that will go with the layer cake prints.
Cutting Instructions
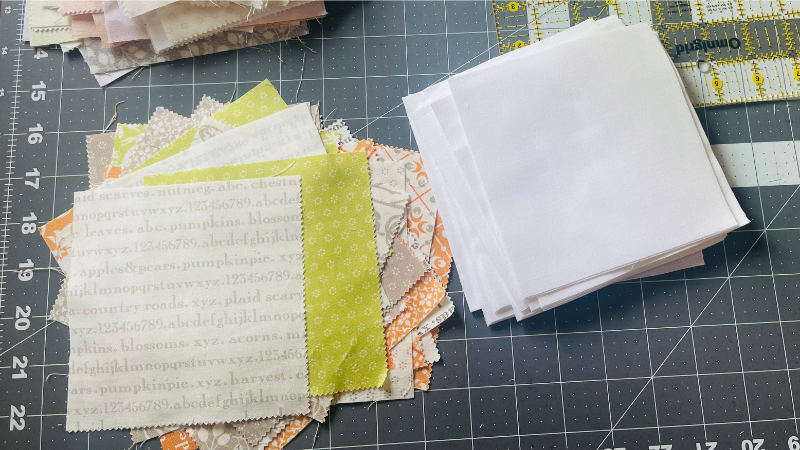
For charm squares, cut your layer cake into 5″ squares. (If you’re using charm packs, skip this step.) Remove any fabrics that are too light or close to white.
For the white background fabric, cut into 5″ strips, then sub-cut into 5″ squares. You can use off-white, cream, or natural if you prefer. White really makes the charm squares pop.
Squares
For this easy quilt pattern charm square quilt, you will need to use 5″ squares of fabric. Cut your layer cake into 4 – 5″ squares, remove any fabrics that are too light or close to white and save for another project. If you can’t find a layer cake, then buy eight 8 charm packs and leave at 5″.
Cut your white fabric into 5″ strips, then sub cut into 5″ squares. For the background squares you could use any light neutral color such as off white, cream, bone or natural. White background squares are my go to color because I really think they brighten the quilt and makes it pop.
Create Piles
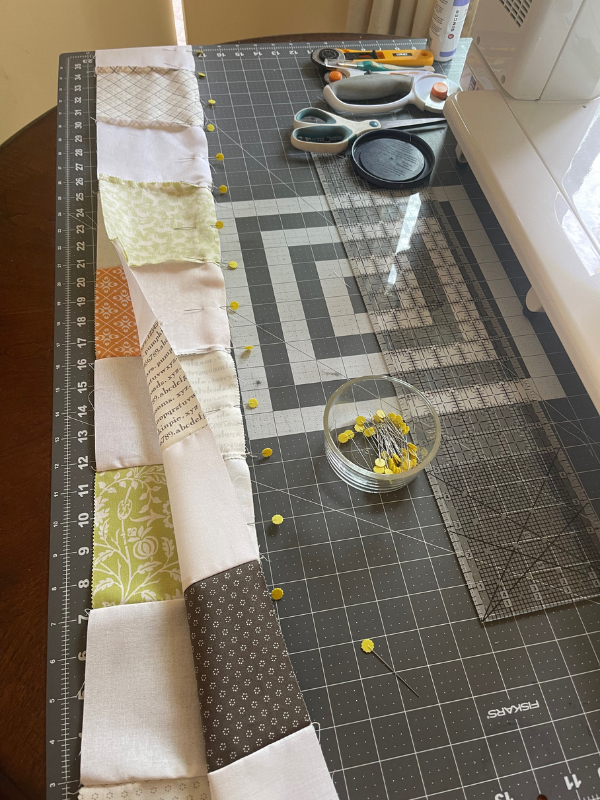
Start by making one pile of charm squares and one pile of background squares.
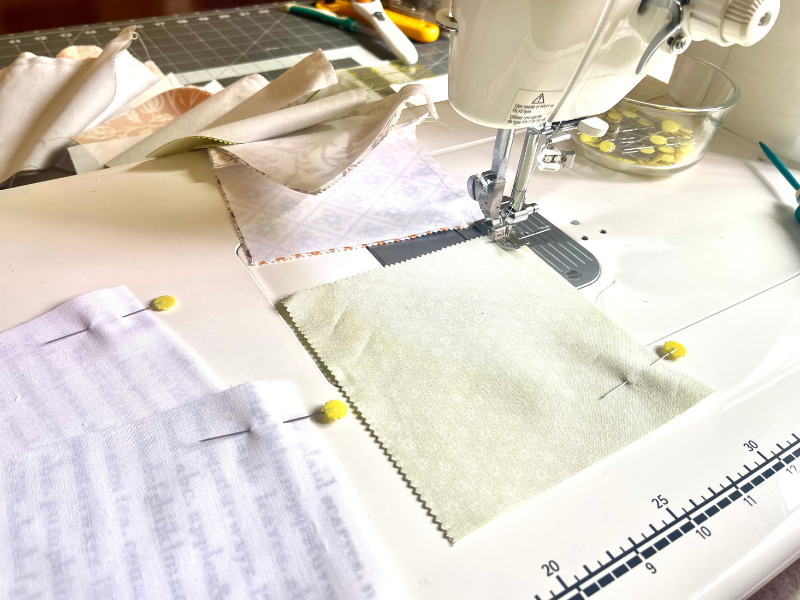
Take one white square and one layer cake square.

Pin one background square and one charm square on one side, then sew a 1/4″ seam to connect them together.

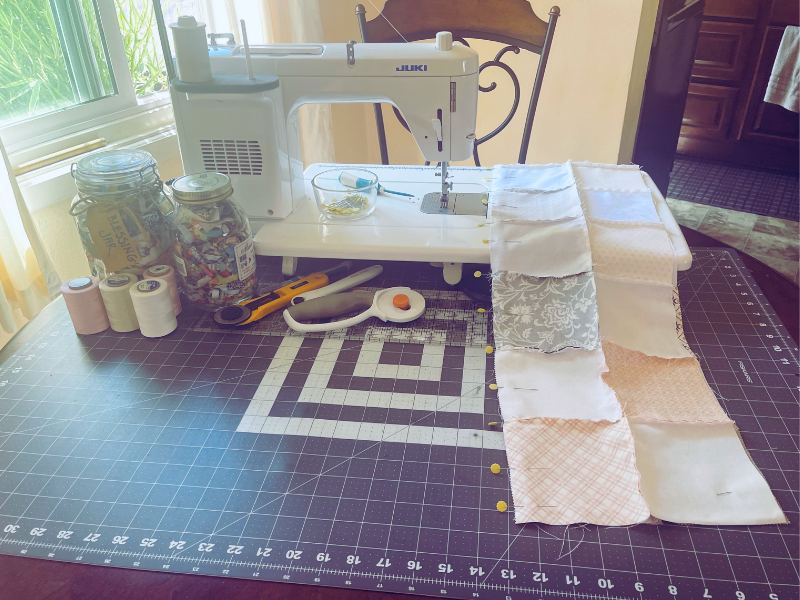
Create Rows
Create rows by sewing the pieces together, make sure you have a background square always touching a charm square.
Create rows by alternating charm squares and background squares. Rows 1, 3, 5, etc. will start with a charm square. Rows 2, 4, 6, etc. will start with a background square. Each row should have 20 squares, and you’ll need to make 16 rows in total.
Lay out the rows on your bed. Row 1 should be placed starting at the left side of your bed/head board. Take a pin and stick it into the first square to mark the top left corn of your quilt top.
Take row one and flip it over onto row 2. Nest each seam and use a sewing pin to hold in place. Take to sewing machine and sew together using a 1/4″ seam allowance. Press seams flat as you go.
Lay back down on the bed, the square with the pin stuck in it is your row one and should be in located at the upper left side of your bed.
Repeat this process with the remaining rows: Sew row 3 and 4 together, row 5 and 6 together, row 7 and 8 together, row 9 and 10 together, row 11 and 12 together, row 13 and 14 together, and finally row 15 and 16 together. Then sew all the rows together to form your quilt top.
Connect Rows
Lay out the rows on your bed. Row 1 should be placed starting at the left side of your bed/head board. Take a pin and stick it into the first square to mark the top left corn of your quilt top.
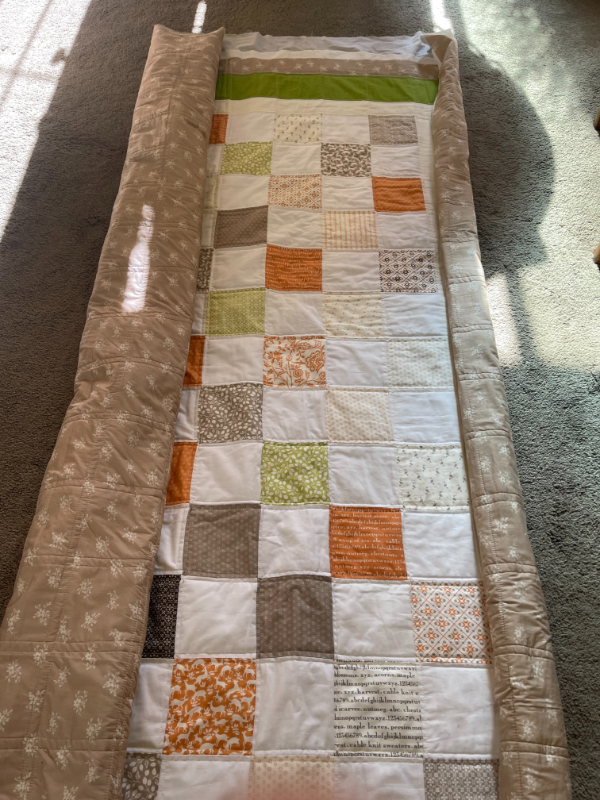
Once you have all the rows sewn together, take to the ironing board and press. See instructions below for adding the borders.
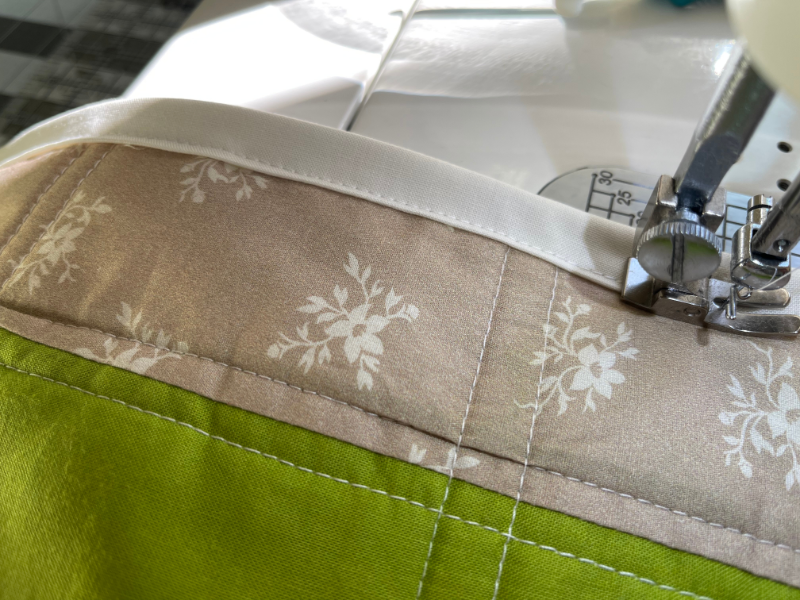
Add Borders
For the first border, cut bone fabric into 2 1/2″ strips. Attach to the sides first, then top and bottom using a 1/4″ seam allowance.
For the second border, cut green fabric into 5″ strips and repeat the same process.
For the final border, cut backing fabric into 3″ strips and attach to the quilt in the same way.

Sewing first border onto quilt top.
Get the digital pattern.
Get the instant download pattern from my shop here.
Make Binding
Make your binding with the bone fabric cut into 2 1/2″ by WOF (width of fabric) strips. Sew strips together using a 1/4″ seam until the binding is long enough to attach to all sides of the quilt.
Measure Quilt Backing Fabric
Fabric comes in two sizes off the bolt: standard is approximately 54″ and wide is 108″. Make your life easier and try to find fabric for your quilt back that is 108″. Fabric stores should always carry this wider fabric but the selection is limited. You can always find a solid fabric in 108″ but if you use a print fabric it will make your life easier because it will help hide any quilting mistakes.
If you use a solid fabric then every stitch is visible. Lay your completed quilt top on your bed then lay your backing fabric over it to make sure the backing covers the quilt top and is about 3″ wider on all sides. If backing doesn’t cover the top, you will need to cut your backing fabric and sew sections together to make it cover the top or possibly get more fabric if you don’t have enough.
Make Quilt Sandwich
Make sure that you have pressed the quilt top and backing with your iron before you make your quilt sandwich. Lay your quilt top with wrong side facing up, then lay the batting on top and attach using fabric spray. Make sure your batting covers the quilt top and is about 3″ wider on all sides.
Next, attach your backing to the batting with wrong side facing down. Spray with fabric spray to attach. Now it’s time to start quilting, see instructions below.
Machine Quilting
To quilt on your home sewing machine, the easiest design is to follow the seam lines and sew 1/4″ away from them on both sides and in both directions. For machine quilting, start in the center and quilt outward using a 1/4″ seam along all charm square edges.
Lay your quilt on the floor and find the center of the quilt. You do this by counting the squares and finding the middle. Roll up the quilt on both sides and take to your sewing machine.
If you are a new quilter and need to machine quilt with straight lines, check out these straight line machine quilting designs for ideas and inspiration. Start in the middle and continue sewing to the right. Then flip it and continue sewing that way until all four sides are quilted.
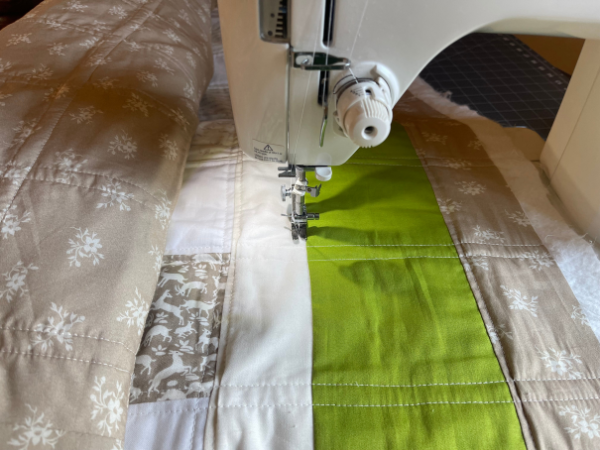
Line up your presser foot to the edge of the charm square and sew all the way down. Sew 1/4″ seam down all sides of charm squares. You will need to eye ball the sewing line across the borders. You can use a quilt ruler and chalk or invisible marker to mark out your sewing line if you like.

Trimming Quilt
Square up the sides by taking your long straight quilting ruler and rotary cutter and trim around all four sides of your quilt on your cutting mat. Then make and add binding to complete.
Lay your quilt on the sewing table and trim all sides using your quilt ruler and rotary cutter. Square up the corners by using a square quilt ruler. Press the quilt on ironing board before adding binding, see instructions for binding below.

Machine Binding
For binding, cut bone fabric into 2 1/2″ strips for binding. Sew strips together, attach to the quilt back first, then fold over and sew to the front.
Line the binding up to the edge of the quilt and attach with a 1/4″ seam. Sew the binding onto the quilt top keeping your needle as close to the left side of the binding edge as possible. Take to ironing board and press.
Washing Your Quilt
Wash your quilt on delicate cycle, cold or warm water. Pro tip: Use SC Johnson Shout Color Catcher sheets. Because the fabric is not washed prior to quilting, you don’t want your fabric to bleed in the wash. Throw in a few fabric sheets into the washing machine. Don’t forget to take the sheets out and throw away before you put quilt in the dryer.
Throw quilt into the dryer on low heat for 30 minutes. Remove from dryer and drape over a door or laundry line to finish drying by air. Enjoy your finished quilt!
Get the digital pattern.
Just download and print the pattern so you have it handy. Get your copy here.
More Easy Quilt Patterns You Might Like
Half Square Triangle Quilt Patterns
Beginner Quilting Supplies
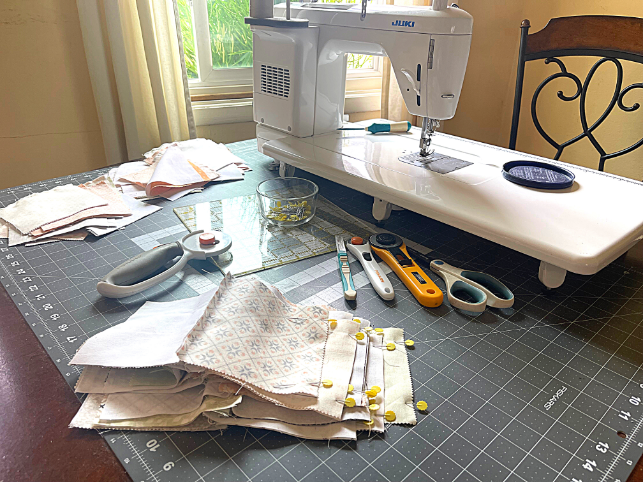
Here are some quilting tools and supplies I recommend. I make a small commission if you purchase through the links, this helps to support this free content. For more info, check out Supplies for Beginners (Best Tools To Start).
Rotary Mat Cutting Mat (Self-Healing Mat)
28 mm Rotary Cutter Replacement Blades
45 mm Rotary Cutter with Sharp Blade (start with this one)
45 mm Rotary Cutter Replacement Blades (start with this one)
60 mm Rotary Cutter Replacement Blades
4.5″ Square Ruler for half square triangles
12.5″ Square Ruler for blocks
SAVE THIS PIN FOR LATER!
This post contains ads and affiliate links, which means I make a small commission at no extra cost to you. While the ads are annoying, it helps keep this blog going. See my full disclosure here.
About Sew Nikki
If this is your first time stopping by, welcome! I’m Nikki, a maker obsessed with quilting, crochet, and all things fabric. Here, you’ll find easy-to-follow patterns, helpful tutorials, and plenty of inspiration for your next handmade project. Grab your fabric (or yarn), and let’s create something beautiful together!
Follow me on social media (Pinterest, Instagram, Facebook and Twitter) so you get notifications when I post new patterns and tutorials.
Want to learn how to crochet? Then check out this post, How to Learn How to Crochet – Guide for Beginners.


Nikki every quilt you create is a testament to how innovative your designs are.
I love the patterns, color combinations and stitching.
Nikki I pray for your continued success in your business. Love you sister
Thank you Neicey! Love you too.
I love the detail in your instructions. Thank you for all of this!
Thanks Denise!
Hi Nikki,
Hi Nikki! One can certainly tell how much you enjoy quilting & sharing your knowledge with others. Anyone learning to quilt for the fist time can certainly glean valuable knowledge on the easiest way to assemble a masterpiece & have fun doing it. Best of luck as you continue on with your blog. I’m excited to go back & check out your other projects as well!
Patti E
Thank you!
Oh my gosh Nikki, you’re very talented Each time you post another quilt I am inspired to learn and make one too!! Thanks for sharing and for the tutorial – I can’t wait to see your next piece,
Wishing you much success
Monica in SC
Thanks Monica!
Incredibly detailed step by step process. Extremely helpful for those trying to getting into quilting or looking for helpful tips to getting better!
Thanks Josh!
Nikki, you amaze me! From the time you borrowed my failing, seldom used sewing machine to start learning to sew/create, then buy a quality machine, and get to where you are now is so unbelievable! Your talent seems to be unending and your ability to explain/teach others clearly to learn is fascinating. Looking forward to what you create next!
It’s been quite the journey, thanks Jeanie.
Your quilt is so beautiful! I love the colors. It shouts cozy, with a hint of spring! Your detailed instructions are simple enough that anyone can follow and create this masterpiece. Great job and thanks for sharing.
Thanks Pam
Nikki’s work is amazing ! She’s always been very talented and has made many blankets for my children but her quilting skills are so impressive ! She does everything she does with love ❤️
Thanks Dee!
What a great tutorial! I’d love to sew a quilt one day. Unfortunately, my projects/mending pile is huge at the moment. But saved it for later.
Thank you!
Oh, this looks so beautiful! I love your photography and details as you share the whole project.
Thank you Charlene!
You make it look and sound so easy, but I know how much work goes into each quilt. Beautiful work!!
Thank you Helga!