Ohio Star Quilt Pattern (Large Modern Layout)
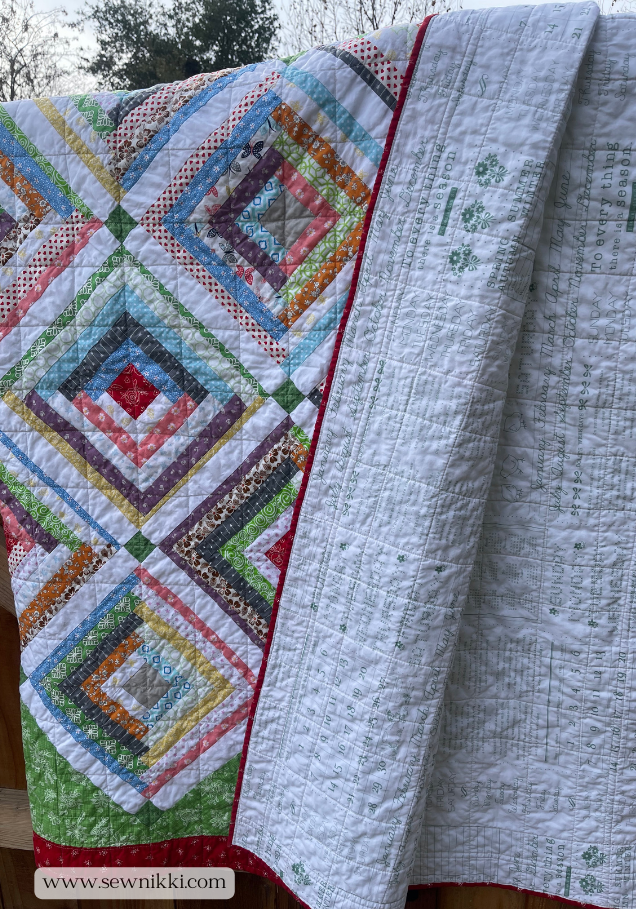
This Ohio Star Quilt Pattern uses oversized blocks set on point with bold strip triangles to create a modern 73” x 73” quilt top. Instead of repeating small 12” blocks across the entire quilt, this version gives each star room to breathe. The larger scale keeps the design clean, graphic, and far less busy. In this blog post you will find the free pattern, an ad-free digital pattern is available too.
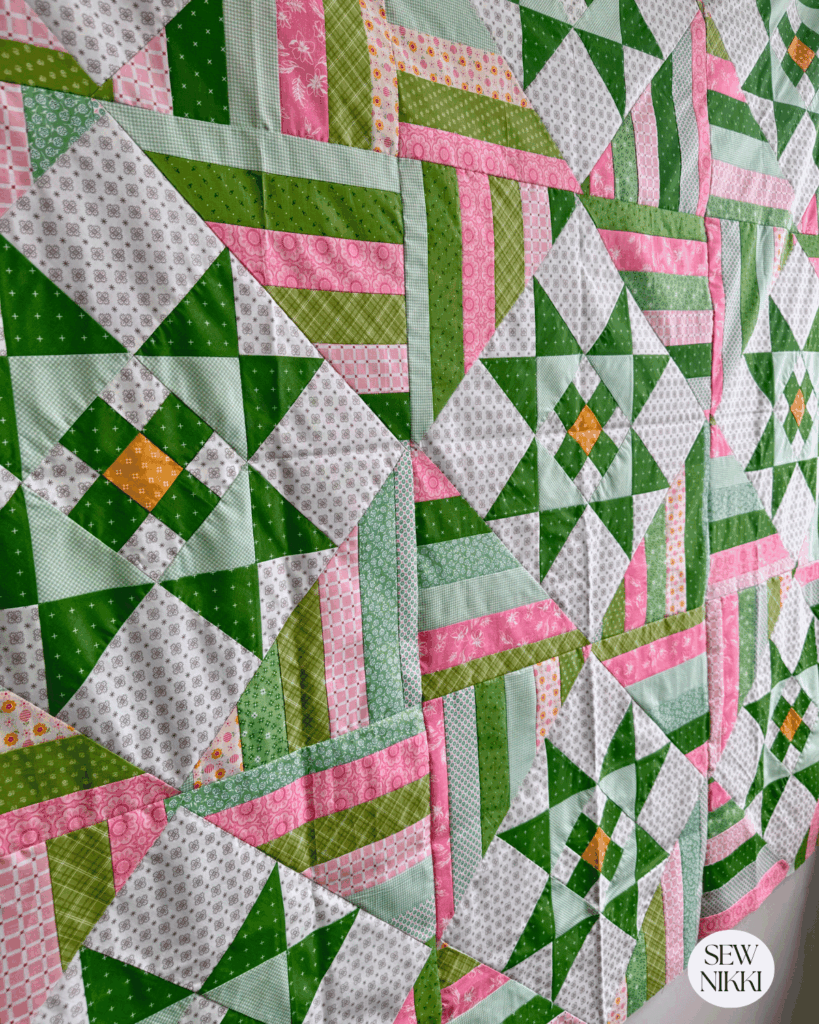
You’ll make 9 Ohio Star blocks that measure 17” x 17”, then add strip triangles to each corner. Once trimmed, each large block measures 24.5” x 24.5”, making final assembly simple and no stressful seam matching.
Ohio Star Block
The Ohio Star has been around since the early 1800s and really took off with Midwestern quilters. It’s one of those classic blocks built from simple triangle units that come together to make that bold eight-point star. Traditionally, it was a great way to show off scraps or highlight a favorite fabric. And honestly? That’s probably why it’s stuck around so long.
The structure is strong, the layout is balanced, and it’s easy to tweak the size or fabrics to make it feel totally current without losing the history. If you enjoy diving into quilt history, the archives at The Quilt Index are a great rabbit hole.
These blocks are so great because of how many different ways you can change the overall look of the block. It’s a nine patch block at the end of the day. Your Ohio Star quilt block basically has 3 main pieces (hourglass, squares and nine patch). It’s fun to change the center of the block to change up the look.
Each unit is easy to make, but there is a lot of opportunity for you to get turned around. Pay attention to what you are doing so you don’t cut anything the wrong size.
When you layout the block, please refer to my photos so nothing is placed the wrong way. The hourglass fabrics are the ones you need to watch.
Strip Block
I don’t like sewing strip sets together because mine always go wonky. My key tips is to sew two together, then sew another two together, then attach and repeat until all 7 strips are sewed together.
If you alternate the direction when you sew on at your machine it’s suppose to help and press after each strip but mine still went wonky. Can you tell? Me either, looks great to me. Plus you can straighten everything up when you trim to finished block size. Don’t stress this part, life is too short.
Now there are different block sizes for star block and strip block, please follow the pattern. I hope you enjoy this Ohio star pattern! These are gorgeous blocks.
MAKE SURE YOU CHECK THIS OUT!
Grab a copy of my free Quilt Planning Journal. It’s filled with graph paper and note pages to help you design at least 4 quilt or sewing projects! Pin in fabric swatches, photos of your finished quilts and enjoy your creative process!
Ohio Star Quilt Pattern
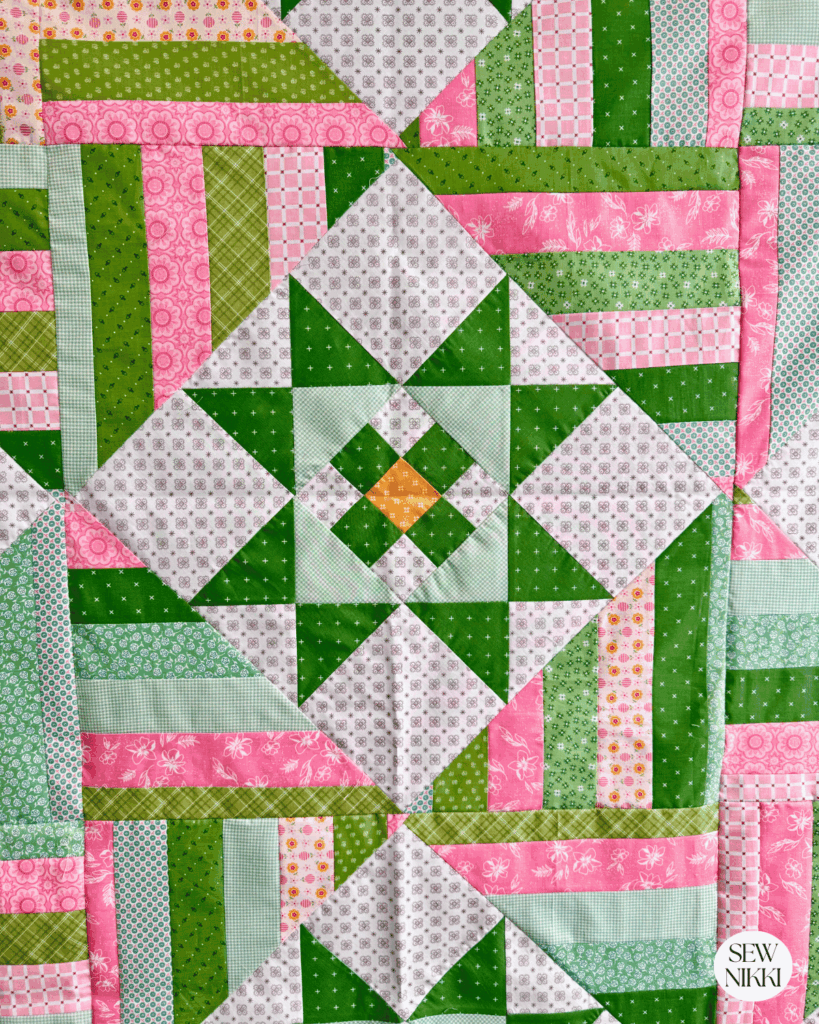
I’ve named this new Ohio star quilt pattern, Ohio Stars and Stripes. Featuring the beautiful Ohio Star block set on point with the center block being a cute nine patch unit. Finally, using setting triangles to turn the on point block into a square to it’s easy to assemble.

Note: These are not my favorite fabrics or colors. But I’m on a mission to use up what I have before shopping for more. Just trying to do the best I can with what I’ve got. When I’ve used most of my fabric stash, I will reward myself and buy new stuff. Can’t wait!
Skill Level
Intermediate skill levels or really confident beginner quilters. Must know how to make half square triangles, work with fabric yardage, read a quilt pattern and square up properly with rotary cutter and large cutting matt.
Materials List
Fabric
- Background Fabric
- Fabric Print A
- Fabric Print B
- Fabric Print C (center of nine patch)
- Fabric for Strip Blocks (2.5” strips)
Tools
- Rotary cutter
- Quilting ruler
- Cutting mat
- Sewing machine with 1/4″ quilting foot
- Iron and pressing surface
- Fabric marking tool or pencil will do
Ohio Star Block Pattern
You will make 9 total blocks.
Cutting for ONE Ohio Star Block
Background Fabric
- 4 – 6” squares
- 4 – 2.5” squares
- 2 – 7.25” square
(A) Print Fabric
- 4 – 2.5” squares
- 4 – 7.25” squares
(B) Print Fabric
- 2 – 7.25” square
(C) Print Fabric
- 1 – 2.5” square
Finished block size untrimmed is 17″ x 17″. You should not need to trim these before using in quilt top if you are sewing consistent and accurate seam allowances.
Cutting for ALL 9 Ohio Star Blocks
Background Fabric
- 36 – 6” squares
- 36 – 2.5” squares
- 18 – 7.25” squares
(A) Print Fabric
- 36 – 2.5” squares
- 36 – 7.25” squares
(B) Print Fabric
- 18 – 7.25” squares
(C) Print Fabric
- 9 – 2.5” squares
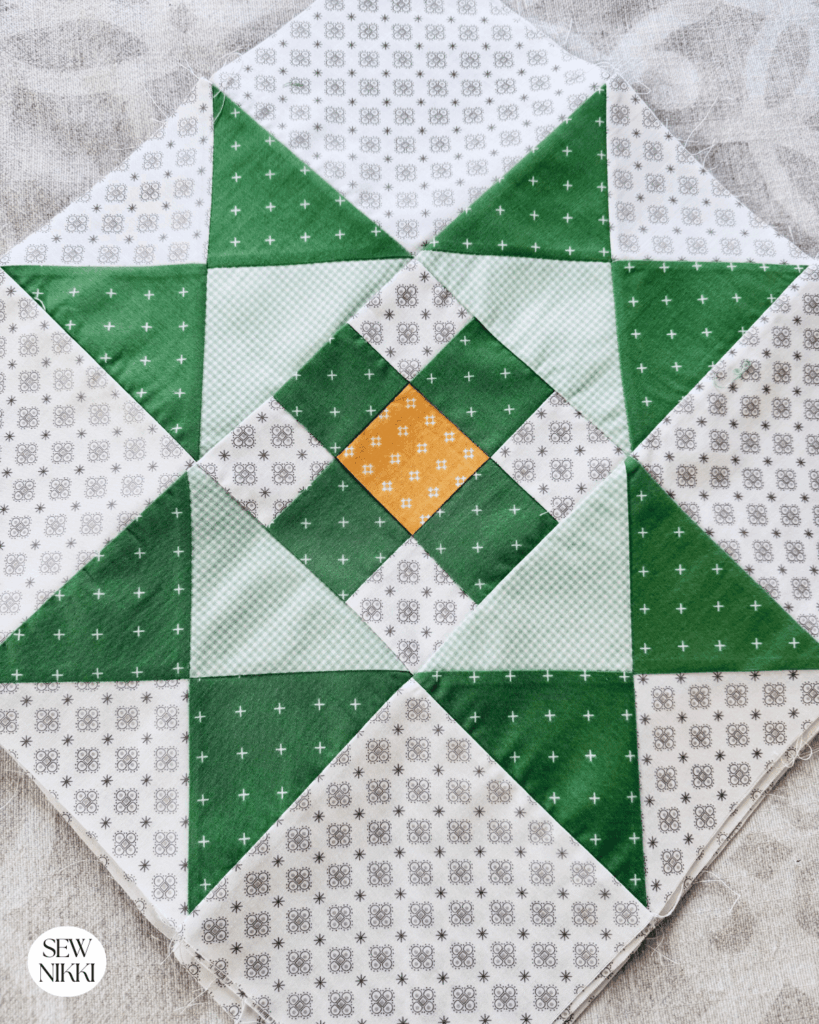
Make HST and Hourglass Units (Per Block)
Each block uses:
- 2 – 7.25” Background square
- 4 – 7.25” Print A squares (dark fabric)
- 2 – 7.25” Print B square (contrasting fabric)
Step 1: Make Half Square Triangles
Pair up the following:
- Make two with Background + Print A (dark fabric)
- Make two with Print A + Print B (contrasting fabric)
Draw a diagonal line. Sew 1/4” on both sides. Cut on the drawn line and press open with iron. You don’t need to trim.
Here is a link to my tutorial on how to make half square triangles should you need more help with this.
Step 2: Make Hourglass Units
Pair one HST from each set right sides together with seams nesting. The dark fabric from each piece (one make with background fabric and one made with contrasting fabric) should face each other. You can test to see if you are doing it correctly by pinching with your finger in the middle and opening one side before pinning or clipping in place.
Draw a diagonal line perpendicular to the first seam.
Sew 1/4” on both sides. Cut on the line again and press open.
Trim each hourglass unit to 6” x 6”.
Make 4 hourglass units per block.
If you’d like extra trimming accuracy tips, National Quilters Circle has great squaring tutorials.

Make the Nine Patch Center (Per Block)
Use the following to make a simple nine patch block:
- 4 – 2.5” Background squares
- 4 – 2.5” Print A squares (dark fabric)
- 1 – 2.5” Print C square (center)
Arrange in a 3 x 3 grid with Print C in the middle. Background square in each corner and dark fabric on both sides of center square.
Sew rows together. Press seams alternating directions.
Join rows.
Nine patch should measure 6” x 6”. Trim by lining up the center row with your cutting matt lines. It should be 2″ for center row. Trim 1/4″ from both sides then flip and repeat.
Assemble Ohio Star Block
Fabric placement in the hourglass blocks is key, make sure your color placement is correct before sewing. The contrasting fabric should touch the nine patch block.

Layout:
Top Row
- 6” Background
- Hourglass unit
- 6” Background
Middle Row
- Hourglass unit
- Nine patch center
- Hourglass unit
Bottom Row
- 6” Background
- Hourglass unit
- 6” Background
Rotate the hourglass units so the background fabric is always facing the edge of the quilt block. And the contrasting fabric is always touching the nine patch unit.
Sew rows together.
Press:
- Top row outward
- Middle row inward
- Bottom row outward
Sew rows together.
Block should measure 17” x 17” untrimmed.
Repeat until you have 9 blocks.
If you enjoy oversized traditional blocks, you might also like my Churn Dash Quilt Block pattern or my Big Stars Quilt Pattern.
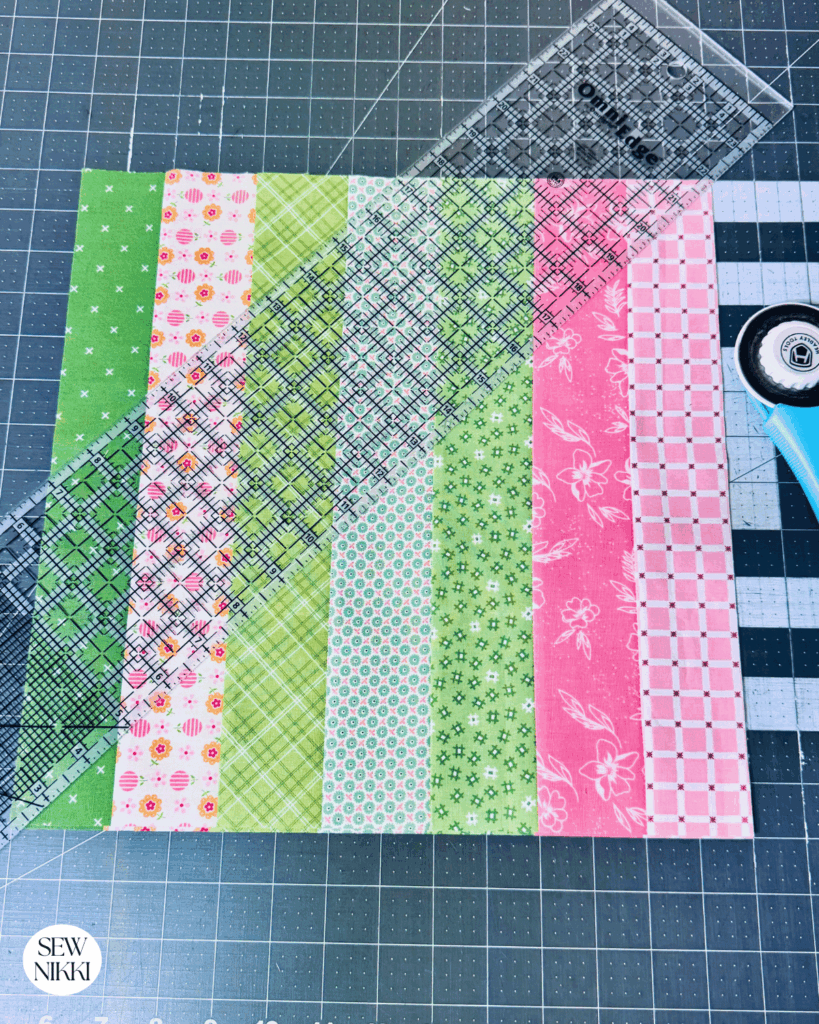
Make Strip Blocks (Setting Triangles)
These will square up your on point Ohio Star quilt blocks and make them square for easy quilt top assembly.

Step 1: Cut Strip Sets
Cut:
- 2.5” x Width of Fabric strips (approximately 44”)
Sew 7 strips together lengthwise. You can get two strips blocks from one strip set. Use the remaining strip sets on other sewing or quilt projects.
Press seams in one direction.
Subcut the sewn strip sets into:
- 18 – 14” x 14” strip blocks
Follow the same method we used for trimming the nine patch unit. The strips will be about 15″ wide so cut the length into two 14″ sections. Then rotate your strips block so they face up and down (vertically). Use the 10″ and 24″ lines on my large cutting matt. Center the block so you are trimming equal amounts off from each side. Repeat process for all strip blocks.
Step 2: Cut into Triangles
Cut each 14” x 14” block diagonally once.
You will now have:
- 36 strip triangles
Ohio Stars & Stripes Quilt Pattern
Layout Blocks and Triangles
Lay out the 9 Ohio Star blocks on point in three rows with three blocks each.
Then take your strip triangles and place them on all four sides of each Ohio Star block that has been turned on point. You don’t need to use matching strip triangles on each block. You can but you don’t have to. It depends if you are making a scrappy quilt or non scrappy quilt.

Laying it out this way helps me get the color distributed as evenly as possibly and helps avoid the same fabric touching each other from triangle to triangle.
Attach Triangles to Star Blocks
Attach one strip triangle to each corner of every block. To do this, lay the triangle on one side of the ohio star block with right sides facing each other. Line the tip of the triangle center to the center block square (the center of the nine patch unit. Don’t look at anything else but lining that up. The attach using 1/4″ seam allowance.
Attach opposite sides to Ohio Star block, press both with iron. Then attach the other two opposite sides. Centering the tip of the triangle to the center of the nine patch block. I attach the triangles differently depending on which side I’m attaching so I can see where I’m sewing.

Important:
- The strip triangles face different directions on each corner.
- This prevents seam matching when sewing blocks together.
- Cut all blocks diagonally in the same direction.
After attaching triangles, trim each large unit to:
24.5” x 24.5”

To trim:
- Fold the block in half.
- Trim 1/2” from the edge of the Ohio Star portion. You want to find the tip of your background fabric where it meets the strip triangle and trim from there.
- Then rotate the block to clean up the other side. Line the trimmed side to the edge of the cutting matt. Then just go to the 24.5″ line and trim using that, make sure your block is lined up horizontally on a line too.
- Fold the block in half the other direction and repeat the steps above.
Trimmed block should be 24.5″ x 24.5″. Repeat for all 9 blocks. Press well.

Assemble the Quilt Top
Now the easy part. Your Ohio Star block is on point but you are working with square blocks thanks to the stripe triangles. Just sew the blocks into rows, the sew rows together, nesting only at the seams where the blocks connect.
- 3 blocks per row
- 3 rows total
You can press your rows when done before you sew rows together or press quilt top when everything is sewn together. Your choice.
Finished quilt measures:
73” x 73”
Add borders if desired.
If you need help finishing your quilt, my Edge to Edge Quilting Designs tutorial and Quilt Binding Tips and Tricks post walk you through the next steps.
Get the digital pattern.
Get the instant download pattern here.
If You’re New Here
I’m really glad you found your way here.
If you’re new to quilting, then welcome. The learning curve is fast, and yes, you’ll hit challenges. But I’ve got you.
Here’s where to go next:
- Free Pattern Index – all my free patterns in one place
- Digital, ad-free patterns – clean, printable, and beginner-friendly
- Handmade goodies – because sometimes you just want it finished
- Learn to Quilt Page – every step of making and finishing a quilt
My blog is built for the home sewist and quilter who wants to do it all themselves. With a nice but basic sewing machine and realistic expectations.
ABOUT SEW NIKKI
If this is your first time stopping by, welcome! Your place for free crochet, sewing and quilt patterns for beginner to intermediate skill levels. Want a digital pattern? We have those too! Plus tutorials to walk you through how to make each item from start to finish.
This was my first time making the classic Ohio Star block using a nine-unit pattern. Nine patch blocks are fun and you can change them into amazing modern variations. I did struggle with what size to make the strip blocks. A tiny bit of trial and error, actually a lot of trial and error.
In my early years of quilting, all I ever made were 12″ classic quilt blocks. Why? Because that’s what traditional quilters do but after a while those small blocks just look a bit dated to me because of the block size. So for me, modern Ohio Star quilts needed a bigger block. I’m still working on what the perfect large size block is, leave a comment and let me know your favorite block size.
Follow me on social media (Pinterest, Instagram, Facebook and Twitter) so you get notifications when I post new patterns and tutorials.
Looking for your next quilt project? Then head on over to my free “Pattern Index”. It’s a page dedicated to all of my free patterns separated by categories for crochet, sewing and quilting.
If you prefer an ad-free printable version, head over to my shop and browse the Digital Patterns. These are instant digital downloads you print yourself.
This post contains ads and affiliate links, which means I make a small commission at no extra cost to you. While the ads may seem annoying, it helps keep this blog going. See my full disclosure here.


Oh my, what a lovely quilt! I dream of one day being able to make something as lovely! Thank you for sharing this!! 🙂
This is gorgeous as always! I love your patterns, can’t wait to try my hand at making them 😍
This is beautiful! It reminds me of the quilt my husband’s grandmother made for us when we were first married.
This is beautiful! It reminds me of the quilt my husband’s grandmother made for us when we were first married 🙂
I love this pattern! I used to the same one on barns up in Kentucky and Ohio when we lived in KY. The barn quilts were always so pretty and were actual quilt patterns.
This is a beautiful pattern and I also appreciate all the additional resource links you provided!!! Thank you!!!