Free Maple Leaf Quilt Block Pattern and Tutorial
If you’re looking for a classic quilt block that works in literally any season but shines extra bright in fall, the Maple Leaf quilt block is it. This block has been around forever, it’s quick to sew, and it’s one of those patterns that looks way more complicated than it actually is. Today I’m giving you a free Maple Leaf quilt block pattern with two sizes (6″ and 12″ blocks) plus step-by-step instructions that are perfect for beginners.

And if you want the printable version with cutting charts and layout diagrams, I have a digital download available in my shop as well.
A Little History Behind the Maple Leaf Quilt Block
The Maple Leaf quilt block dates back to the late 1800s and early 1900s, showing up in quilt magazines and household newspapers back when patterns were printed as small engravings. It’s considered a traditional patchwork block and has roots in both American and Canadian quilting history.
Many quilters used this block to represent change, nature, or the transition into fall. Others simply loved the design because it’s bold, graphic, and easy to make from leftover scraps. To this day, the Maple Leaf block stays popular because:
- It works in scrappy quilts
- It looks great in both warm and cool palettes
- It can be set straight, on point, or mixed into sampler quilts
- It’s a perfect block for beginners learning half-square triangles (HSTs)
- Perfect for Fall quilts or to celebrate nature
- Easy block for beginner quilters
Basically… it’s a classic for a reason.
MAKE SURE YOU CHECK THIS OUT!
After you read this post, make sure you also check out Learn How to Quilt for Absolute Beginners. It’s jam packed with information to make your first quilt. It also has links and resources that are so helpful when you’re first learning. There’s lots of free quilt patterns that are great for beginners and all skill levels too. So make sure you check this out, seriously don’t forget!
Make sure you grab a copy of my free Quilt Planning Journal. It’s filled with graph paper and note pages to help you design at least four quilt or sewing projects! Use it to jot down ideas, fabrics, patterns and inspiration all in one place. Or create your own patterns and share with others. Pin fabric swatches, photos of your finished quilts and enjoy your creative process!
Fabric Requirements
Below are the pieces you need for each finished block size. It’s nice to know how to make this classic maple leaf quilt block in two sizes depending on what project you are working on. Small projects like table runners and placemats would look best using the small maple leaf block. While the large maple leaf block would work nicely in a quilt. Or use a combination of the two sizes together for a great quilt.

6-Inch Maple Leaf Quilt Block
From Leaf Fabric (A):
- 3 squares – 2.5″ x 2.5″ (for leaf body)
- 2 squares – 3″ x 3″ (for HSTs)
- 1 strip – 1.25″ x 4″ (for stem)
From Background Fabric (B):
- 1 square – 2.5″ x 2.5″ (for background)
- 3 squares – 3″ x 3″ (for HSTs and stem unit)
12-Inch Maple Leaf Quilt Block
From Leaf Fabric (A):
- 3 squares – 4.5″ x 4.5″ (for leaf body)
- 2 squares – 5″ x 5″ (for HSTs)
- 1 strip – 1.5″ x 7″ (for stem)
From Background Fabric (B):
- 1 squares – 4.5″ x 4.5″ (for background)
- 3 squares – 5″ x 5″ (for HSTs and stem unit)
Free Maple Leaf Quilt Block Pattern
Whether you’re making the 6″ or 12″ version, the steps are exactly the same but the measurements are slightly different.

Step 1: Make Your Half Square Triangles (HSTs)
- Take two larger squares from A and B fabric and turn into four HSTs.
- Face one background fabric and one leaf fabric right side together.
- Draw a diagonal line on the back of the lighter fabric.
- Sew 1/4 inch seam allowance on each side of the drawn line.
- Cut on the line, open, and press to the darker side.
- Trim to:
- 2.5″ for the 6″ block
- 4.5″ for the 12″ block
If you want a refresher on making perfect HSTs, check out my tutorial on How to Make a Half Square Triangle for step-by-step HST tips.
Step 2: Sew the Stem Unit
The Maple Leaf block has its signature “stem,” let me show you how to make it.
- Cut the remaining larger background square in half diagonally to form two triangles.
- Lay the leaf fabric stem on the long side of one background triangle.
- Sew together using 1/4″ seam allowance then finger press it open.
- Sew the remaining background triangle onto the other side of the leaf fabric stem using 1/4″ seam allowance and finger press to open.
- Using a square ruler, trim the unit to 2.5″ x 2.5 for 6″ block or to 4.5″ x 4.5″ for the 12″ block.
- Use the diagonal line on the ruler and center it in the middle of the leaf fabric stem until it’s your desired size.

You now have a simple leaf stem unit. This sample block uses green fabric for the stem but if I make a quilt then I’ll probably make the stems with a brown fabric.

Step 3: Lay Out the Block
Arrange your pieces in a 3 x 3 grid as shown in the photo below:
Top row: Background square – HST – HST
Middle row: HST – leaf square – leaf square
Bottom row: HST – leaf square – stem unit
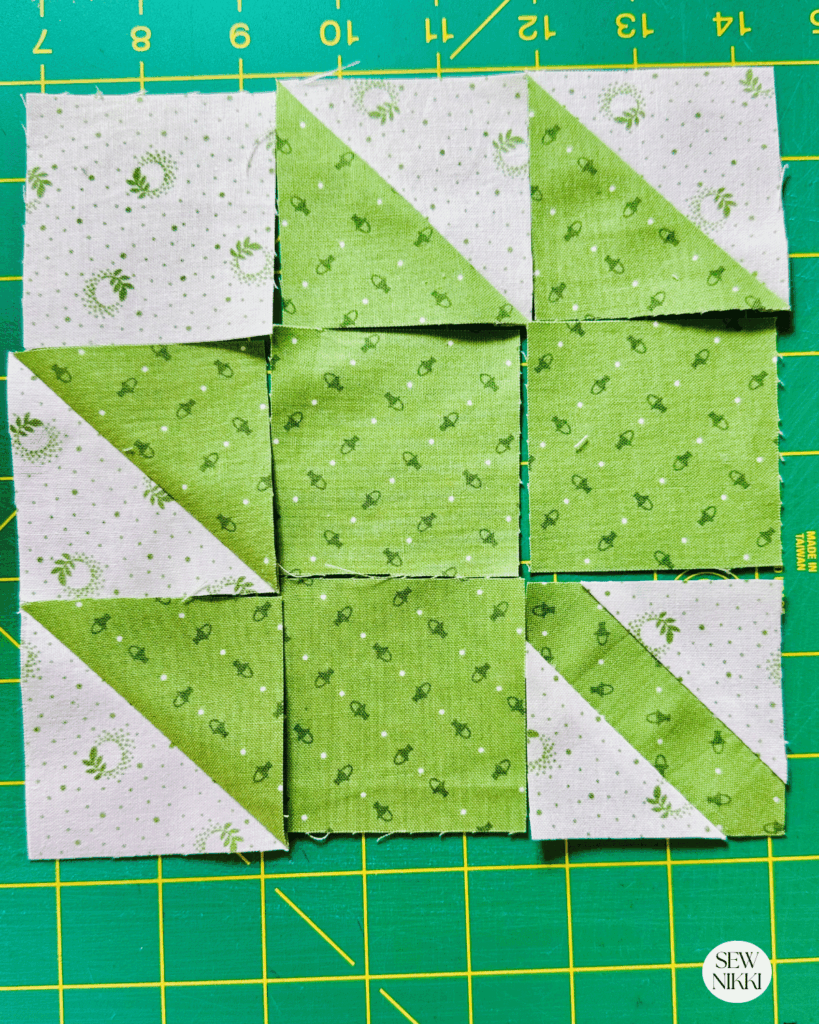
Double check that all HSTs are pointing in the correct direction. Refer to the photo below to make the leaf shape.
Step 4: Sew the Rows
Sew each row together using a 1/4 inch seam allowance.
Press your seams, either open or to one side. I press open from backside and then press the right side of block so my seams are all going the same direction.

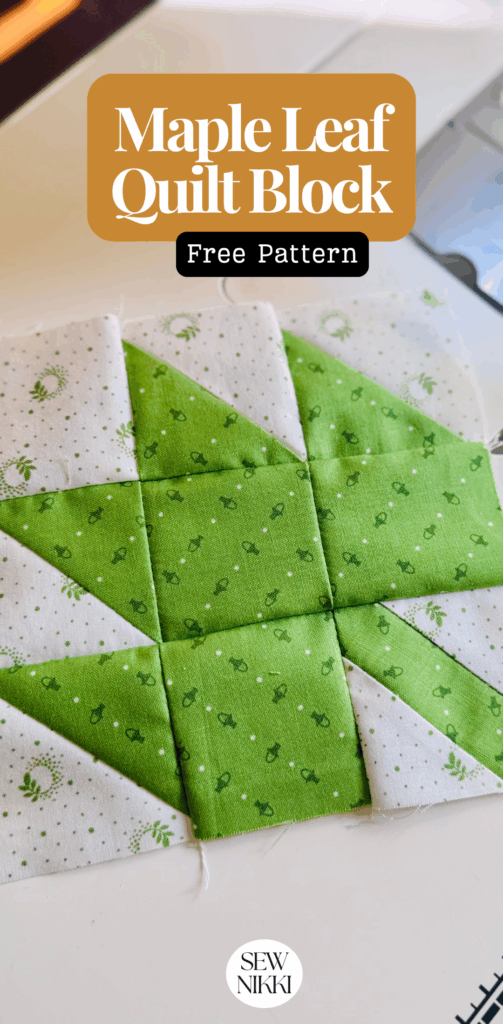
Step 5: Join the Rows
Sew the three rows together and give the block a final press.
You now have a perfect Maple Leaf quilt block!
Ideas for Using Your Maple Leaf Blocks
This block works in so many layouts. A few ideas:
- Make one block and turn it into a fall pillow
- Mix different warm toned maple leaves for a scrappy lap quilt
- Use deep greens for a winter-holiday vibe
- Try modern rainbow leaves for a bold wall hanging
If you want more beginner friendly quilt block tutorials, check out my free Churn Dash Quilt Block Pattern, another classic block that’s great for scrap busting.
Download the Printable Pattern
Get the instant download pattern here.
Recommended Resources
Here are a few extra quilting resources you may find helpful:
- How to choose the right sewing machine needle – Sewing Machines Plus
- A great guide to best pressing methods for quilters – We All Sew
- Beautiful examples of traditional quilt blocks – Quilter’s Cache
Save This Pin For Later!
If this is your first time here and you are new to quilting, start by checking out my Quilting 101 page. Then move onto the Quilting Tutorial page with full tutorials for each step in the quilt process. Finally, find a free quilt pattern or quilt project in The Pattern Index.
I’ve been wanting to make a maple leaf quilt pattern for some time now and just never got around to trying this classic block. I’m excited to do some Fall quilting and see how it comes out. The Maple Leaf quilt block is one of my absolute favorites because it has so much personality. Whether you’re making a fall quilt or adding a classic block to a sampler, this one stitches up fast, looks gorgeous in scraps, and gives you instant traditional-quilt vibes.
About Sew Nikki
Welcome to Sew Nikki. Your place for free crochet, sewing and quilt patterns for beginner to intermediate skill levels. Want a digital pattern? We have those too! Plus tutorials to walk you through how to make each item from start to finish.
Follow me on social media (Pinterest, Instagram, Facebook and Twitter) so you get notifications when I post new patterns and tutorials.
This post contains ads and affiliate links, which means I make a small commission at no extra cost to you. While the ads may seem annoying, it helps keep this blog going. See my full disclosure here.