Denim Quilt Pattern Using Old Jeans (Tic-Tac-Toe)
I’m literally obsessed with this new denim quilt pattern. Just a few pairs of old jeans and some scrap fabric. Super easy quilt blocks that even a beginner can do, yes you heard me correctly! Plus you can download a free pdf pattern. Not too shabby.

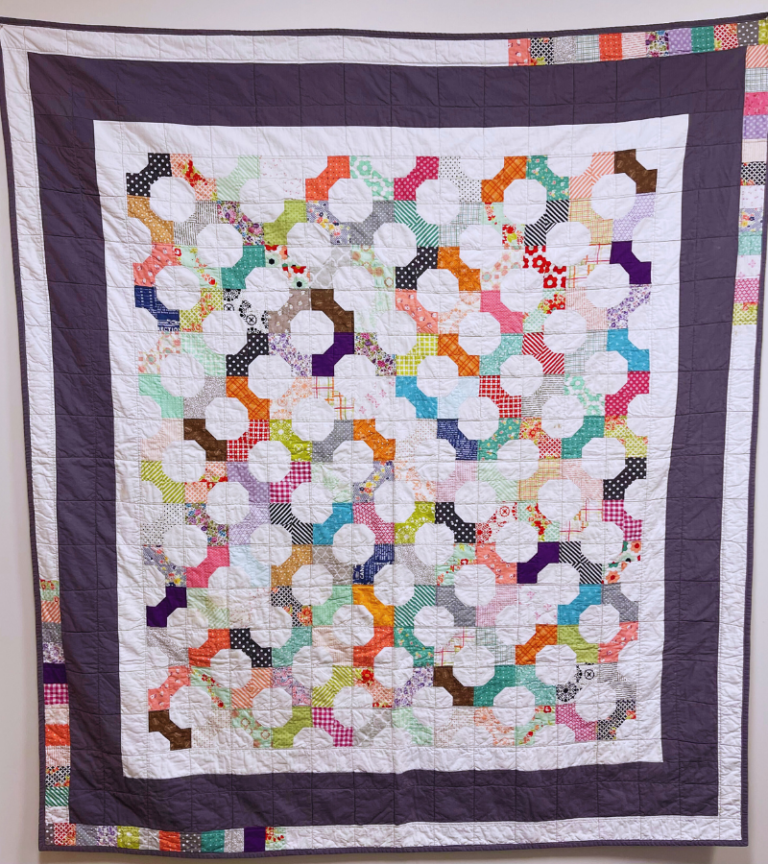
Repurpose old jeans with this new denim quilt pattern called Tic-Tac-Toe. Simple quilt block, easy construction and works up fast. This is such a cozy quilt and will probably be my new picnic blanket or beach blanket. You can make this quilt with any fabric combinations and a few pairs of adult size denim jeans. Easily adjustable to make it in lots of different sizes. Let me show you the simple steps to complete this lap size quilt. Finished quilt top measures 67″ x 67″.
This entire quilt was made in one weekend. It’s made with 10.5″ square blocks with a denim center square and denim cornerstones. Sewing up these blocks is super easy and works up fast once you get in the groove. It’s not a heavy quilt at all, just a regular quilt but with splashes of denim.
Old Denim Jeans
You may be wondering why I’m using jeans in a quilt. Well I made a handful of patchwork denim handbags and have all my donated blue jeans laying around my sewing room.
I had a lot of denim and have seen blue jean quilts on Pinterest last year so knew I could use denim in a quilt. But I also knew I didn’t want a ton of jeans because it’s hard on my sewing machine and didn’t want to have a lot of issues when machine quilting it.

Make sure you get a special sewing needle for denim. I used my regular stitch length but you can adjust it to a wider stitch if your denim sewing needle is struggling to bite through the fabric.
Using old blue jeans is a fun way to add charm to your quilt. Just ask your family for their old jeans or head over to your local thrift store and pick up a pair or two for this quilt project. The pair of jeans that are the best are ones that are a little worn and faded. This really makes the denim squares pop and gives it a vintage look. You will need at least 2 pairs of jeans for this project. If you don’t have that many, go to your local thrift shop to get your denim pieces.
Beginner Quilters
This is a simple quilt block that is so much fun and easy to make. It’s perfect for beginner’s. Just follow my tutorial and fabric measurements for quilt blocks. Always place the fabric right sides together when piecing this quilt. Once you are done you will have a beautiful large throw size quilt that you made yourself.
Your seam allowances for the entire quilt will be the standard 1/4″. Does a denim quilt need batting? Yes it does for this Tic-Tac-Toe quilt. Use your regular quilt batting for this quilt along with cotton fabrics and real denim jeans.
If you are a beginner quilter, please check out my tutorials that cover the entire quilting process from spray basting to how to sew binding on a quilt. These easy to follow tutorials provide all the info and photos you need to make your first quilt.
Washing The Fabric
Can I put this in a washing machine? Yes, don’t prewash your quilting fabrics before you make the quilt. Only wash the quilt after you have completed the entire quilt with binding. Then place it in the washing machine on gentle cycle and cold water. Make sure you use 2 or 3 Shout Color Catcher Sheets in the wash cycle to catch any fabrics that bleed.
Remove from washer, discard the color catcher sheets and throw the clean quilt into the dryer. Dry on medium to low heat with a few fabric softener sheets for about 30 minutes. Then remove the quilt and air dry until completely dried. You can hang your quilt over a clothes line or over a door in your home. Place a folded hand towel over the edge of the door so it does not distort your quilt shape.
Fabric Used in This Sample
All of these fabrics were bought in the discount racks (off the bolt, $3.89/yard) at my local fabric store. I always buy one yard in this section and used 3 main fabrics, 3 background fabrics, 1 fabric for the borders and 1 fabric for the sashing. Most of these are Lori Holt by Riley Blake Design fabrics from Bee Backgrounds, Bee Plaid and Farm Girl collections.

There is a gorgeous background fabric in off-white with light brown plus signs by Lisa Audit of Riley Blake Design called Blue Escape Coastal. It’s absolutely gorgeous! The two other off white background fabrics have little books and lightening bolts, I can’t remember where these were bought.
Denim Quilt Pattern – Instructions
Here are the step-by-step instructions and a quick version of what we will be doing to make this quilt. Finished size measures 67″ x 67″.
Materials Needed
Print Fabric
Background Fabric
Sashing and Binding Fabric
Denim Jeans for Blocks and Cornerstones
Backing Fabric
Batting
Quilting Notions (see recommended supplies at the end of the post)

Please note: To avoid having too much bulk with the denim cornerstones, you want to grab jeans that are thin. Avoid using heavy and thick denim jeans like Costco brand if possible because it does get bulky when using denim cornerstone. Lots of denim jeans now a days look like denim but they are stretchy synthetic blend of fibers. For best results using your sewing machine, look for women’s jeans from Target with some fading. These are real denim but thin.
Start by cutting your fabric and denim using the measurements below. When you cut up your old jeans, it’s easier if you have a pair of fabric scissors but use whatever you have to cut them. You will utilize the legs only. We won’t be using the back pockets for this quilt but use them to make heat proof denim potholders.
Fabric Cutting Measurement (For Quilt Top)
100 – 4″ x 4″ squares (each block needs 4). Around two yards of fabric.
25 – 4″ x 4″ denim squares (each block needs 1) & 36 – 3″ x 3″ denim cornerstones. Use 3 pairs of old jeans.
50 – 4.5″ x 4.5″ background squares cut in half diagonally (each block needs 2 squares cut) One yard of fabric.
25 – 5″ x 5″ background squares cut into four pieces diagonally (each block needs 1 square cut) One yard of fabric.
41 – 3″ x 10.5″ sashing strips (around one and a half yards)
Make Quilt Blocks
Here is what you need for a single quilt block. 1 denim square 4″ x 4″, 4 main fabric squares 4″ x 4″, 4 setting triangles (from your 4.5″ x 4.5″ background fabric cut in half), 4 setting corners (from your 5″ x 5″ square cut in half diagonally from both corners in the shape of an X).

Take the center denim square and add a main fabric square to both sides. Right side of fabric facing each other and using a 1/4″ seam allowance. Use the thin one sided fusible interfacing on your denim if it wiggles around too much while you are sewing. Mine didn’t need this but use it if needed.
Next, take the two remaining main fabric squares and add a setting triangle to both sides. Refer to my photo below for the direction your setting triangles need to face.

Now sew the rows together, nesting the seams and securing with a clover clip or flat head sewing pins if needed. I always secure with a sewing pin but if you prefer clips or don’t need to secure, that’s fine too.
Once the rows have been sewn together, press good with hot iron. Then add the setting corners to the end of each main fabric. You want to begin and end where the seams come together. Refer to my photo below.

Then press really good with hot iron when done. You will repeat these steps until you have 25 blocks made. To get the tic-tac-toe effect, you will need 3 main fabric colors or prints. My main fabrics were mustard, burnt orange and a deep red. I made 7 red blocks, 8 mustard blocks and 7 orange blocks in order to get the tic-tac-toe effect, just as the quilt names suggests. Thank mom and sis!

Sew Rows with Borders
Line up the quilt blocks using the photo below as a guide. Place one 3″ x 10.5″ border strip at the beginning, end and in between each block.

Pin the border strip (dark brown vertical strips shown above) to the quilt block, placing one pin at the beginning and the end. Then place one or two pins in the middle section so the fabrics won’t slip. Keep adding border strips until the row is done. Do one row at a time, then move on to the next until all rows are completed.
Sashing with Cornerstones
At this point, my quilt is laid out on the bed in rows with the border strips attached. Now it’s time to sew together the sashing strips with the denim cornerstones. Grab the remaining 3″ x 10.5″ border strips (light brown horizontal strips in photo above) and your stack of 3″ denim squares. Each row will have 6 cornerstones and 5 border strips. The row will begin and end with a cornerstone. Sew up one sashing strip at a time and lay out on bed with your quilt block rows. Make a total of 6 sashing strips with cornerstones.

Lay the strips at the very top, very bottom and in between each row. Then start attaching to the rows and joining sections together using 1/4 inch seam allowance until the quilt top is completed. Make sure you pin or clip where the seams meet. You can press with iron as you go. I waited until everything was sewn together and attached before ironing.

For more information on borders and sashing, check out How to Make Quilt With Sashing and Cornerstones.
Finishing Touches
After adding the borders, your quilt top is ready to be finished. It’s time to assemble the quilt sandwich and start quilting! Layer your quilt top, batting, and backing, then baste the layers together using quilt basting spray or pins.
When I’m ready to quilt, I will be machine quilting on my home sewing machine. If you are a new quilter and need to machine quilt with straight lines, check out these straight line machine quilting designs for ideas and inspiration. Diagonal straight line quilting is my go to pattern and instructions for beginners are also in the post above.
Don’t forget to grab your freebie!
Sign up for my newsletter to receive the full, printable pattern and get notifications when new patterns and tutorials release.
Denim Quilt Pattern – BEGINNER QUILTING SUPPLIES
Here are some quilting tools and supplies I recommend. I make a small commission if you purchase through the links, this helps to support this free content. For more info, check out Supplies for Beginners (Best Tools To Start).
Rotary Mat Cutting Mat (Self-Healing Mat)
28 mm Rotary Cutter Replacement Blades
45 mm Rotary Cutter with Sharp Blade (start with this one)
45 mm Rotary Cutter Replacement Blades (start with this one)
60 mm Rotary Cutter Replacement Blades
4.5″ Square Ruler for half square triangles
12.5″ Square Ruler for blocks
SAVE THIS PIN FOR LATER!

This post contains ads and affiliate links, which means I make a small commission at no extra cost to you. While the ads are annoying, it helps keep this blog going. See my full disclosure here.
If you liked this, you may like these:
Get the digital pattern.
Get the instant download pattern here.
ABOUT SEW NIKKI
Welcome to Sew Nikki. Your place for free crochet, sewing and quilt patterns for beginner to intermediate skill levels. Want a digital pattern? We have those too! Plus tutorials to walk you through how to make each item from start to finish.
Follow me on social media (Pinterest, Instagram, Facebook and Twitter) so you get notifications when I post new patterns and tutorials.
Want to learn how to crochet? Then check out this post, How to Learn How to Crochet – Guide for Beginners.


I love this denim quilt pattern Nikki! So cute!
I love quilts and I love this idea! I have a friend who weaves rugs on her grandmother’s old loom using old jeans.
I love the idea of repurposing old fabric like denim for a fun project like this beautiful quilt
I love the quilt pattern. Looks like it would be a fun project to do.