Free Scrappy Quilt Pattern – The Roundabout Quilt
Free scrappy quilt pattern made with a simple strip block, The Roundabout Quilt. Today I’m sharing my new quilt with all of you. It’s my latest free scrap quilt pattern made with strip quilt blocks. One of my favorite patterns and techniques because you use the Y seam to connect strip units around a center square. It’s fun to make, not stressful at all and the final product is a beautiful quilt that is made using leftover scrap fabric and yardage. Finished quilt measures 81″ x 81″.

Skill level is confident beginner and this quilt is a joy to make as long as you take breaks and work at your own pace. The more I rush my quilts, the less joy I have making them. This quilt took two weekends to complete. Let me share this easy pattern with you so you can make a new scrap quilt to add to your collection! Best part, free pattern and full tutorial.
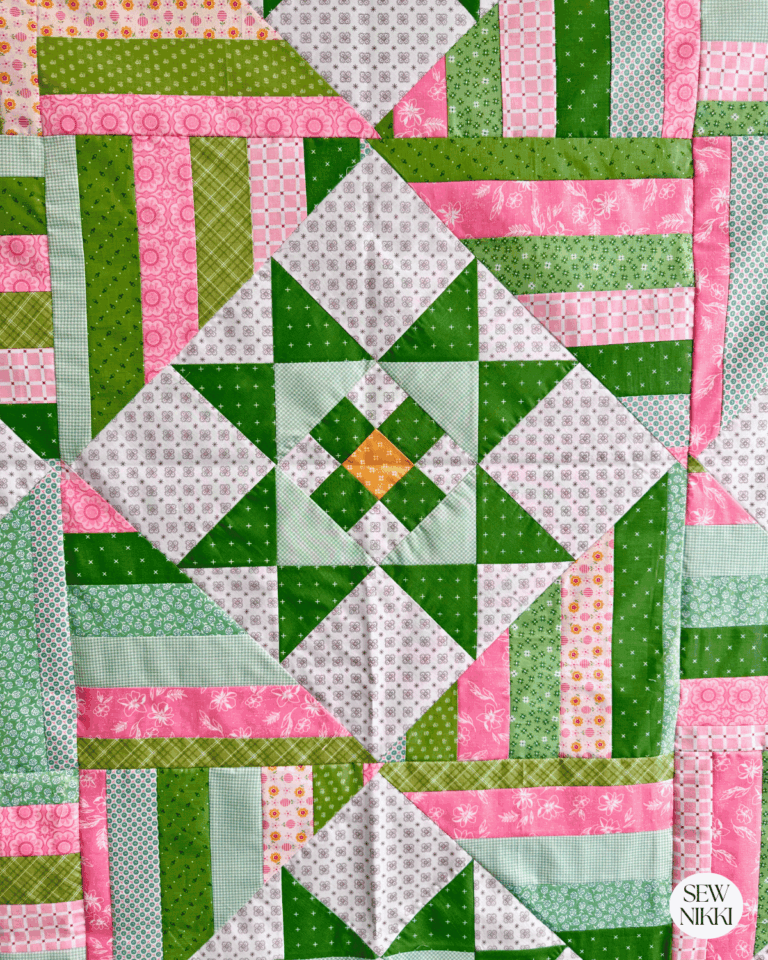
Each block is made using a center square and adding strip rectangles around all four sides to create a scrappy block. In this sample, I went with two color ways and four fabrics for each. My colors were pink and green with brown center squares for all. My scrap basket didn’t have enough brown squares using one print so there are two different prints for the brown centers. You will need leftover yardage to make your strips. Do dig into your scrap pile, look for leftover fabrics by the yard for the strips and your scrap stash for the center squares.
Quilt Design:
As you can see, this is a really simple quilt design. Sewing trimmed blocks together to make rows, sewing the rows together and adding a border completes this fun quilt top. Not all quilts need to be completed patchwork in order to be charming. Scrap quilting like this is economical and just down right enjoyable. I’m an overthinker and it’s hard for me to start projects because I make it TOO complicated when it doesn’t have to be. This easy block is fun, you get to use larger scraps due to the yardage needed for long strips and can use your favorite scraps for the center square. It’s a win-win. This perfect pattern can be altered to create different looks by turning the blocks on point, adding sashing, adding sashing and cornerstone, the list goes on and on.

This scrappy quilt pattern uses 11″ finished square blocks without sashing or cornerstones. To make the simple quilt block you will need one 3.5″ square and 4 strip blocks at 7.75″ in length. Strip blocks are made with 1.5″ inch strips by WOF, sewn together and cut into 7 3/4″ units. You can make a true scrappy version of this easy quilt block or alternative blocks like the sample, one pink block, one green block. Beginner quilters will find this a fun pattern, especially using the Y seam technique.
String quilts are fun because there isn’t a ton of cutting and the strips are easy to assemble. You can create lots of different looks for a finished scrappy quilt pattern based on this one scrappy quilt block. Try making it on point, with sashing, with sashing and cornerstone or sewn directly together with a simple border. The whole quilt will only take a weekend or two to make, that’s the good news! The fabric requirements were about a yard of each fabric used for strips and about 1.2 yard for the center squares. You could also use new fabric for the strips and go to your scrap bins for the little squares for the block’s center.
MAKE SURE YOU CHECK THESE OUT!
After you read this post, make sure you also check out Learn How to Quilt for Absolute Beginners. It’s jam packed with information to make your first quilt. It also has links and resources that are so helpful when you’re first learning. There’s lots of free quilt patterns that are great for beginners and all skill levels too. So make sure you check this out, seriously don’t forget!
Make sure you grab a copy of my free Quilt Planning Journal. It’s filled with graph paper and note pages to help you design at least 4 quilt or sewing projects! Use it to jot down ideas, fabrics, patterns and inspiration all in one place. Or create your own patterns and share with others. Pin in fabric swatches, photos of your finished quilts and enjoy your creative process!
Free Scrappy Quilt Pattern – The Roundabout Quilt
CUTTING CHART:
Center square: 36 – 3.5″ x 3.5″ squares
Strip units: 36 strip sets made by sewing four different 1.5″ x WOF fabric strips together and sub-cutting into 4.5″ x 7 3/4″ units. Each block needs four units or 144 for 36 blocks.
Border (optional) – I’ve included a double border. First border is natural muslin 4″ strips x WOF, second border is backing fabric 5.5″ strips by WOF, each cut to sizes of quilt sides. Finished free scrappy quilt pattern measures 81″ x 81″.

STEP 1: FABRIC SELECTION
Choose fabrics from the same color palette for the strip blocks. If you don’t have enough fabric for one color then do what I did and combine two different color blocks that complement each other and suit your style.

STEP 2: CUTTING FABRIC
Using a rotary cutter, cutting mat, and quilting ruler, cut the fabrics into strips. For the strip blocks, select four fabrics in the same color family and cut into 1.5″ x WOF strips. Select a different fabric for the 3.5″ center square. Cut the center squares 3.5″ square.
STEP 3: SEW STRIPS TOGETHER
Take two strips, wrong sides facing each other and sew along one side to connect using a 1/4 inch seam allowance. Repeat for the remaining two strips. Press with iron. Take back to sewing machine and connect those two strips together. Press open with iron when done.

Mix up the fabric strips so you have variety with the fabrics on the ends of the strip sets. This will give you variety when assembling the quilt blocks and give your quilt an added touch of charm.
STEP 4: SUB CUT SEWN STRIPS
Sub cut the strips into 7 3/4″ units. After you cut your first unit, use that as a cutting guide for the rest of the strip. Press with iron.

STEP 5: MAKE STRIP QUILT BLOCKS
Following the pictures below, lay out the block pieces with the center square in the middle. You will be attaching each strip along the side of the square using a Y seam which is so fun!

Start by attaching the square to the end of one strip. Only sew half way down the square to begin the Y seam.

Now attach the new strip unit, wrong sides of fabric facing each other, always using a 1/4 inch seam allowance.

Next, attach the third strip unit, turning the block as you work your way around it.

Then, attach the fourth and final strip unit.

The Y seam looks like this after all strip units are attached but before you close up the block (see photo below).

Now go back to the first side you started on, fold the fabric onto itself so right sides are facing each other. Pin in place, start where your last stitch ended and backstitch on your first stitch. Then complete by sewing all the way to the bottom using 1/4″ seam allowance. Press with iron and your block is done. Now repeat this for all 36 blocks.

STEP 6: MAKE & JOIN ROWS
Before you go any further, you need to square up each quilt block. Use a 12″ square quilting ruler and trim to 11″.

Now you can make the quilt top. This quilt has 6 rows with 6 blocks in each row. Each row has 3 pink blocks and 3 green blocks. Alternate so each row starts with the opposite color block.
Make your rows by sewing the blocks together, wrong sides facing each other, using a 1/4 inch seam allowance. Press each row with iron when done.

Next, sew the rows together. I like to sew two rows together, then sew the first two sections together and finish by attaching the final section.

Make sure you nest the seam where the blocks meet so that everything aligns correctly. Press with iron when done.

STEP 7: ADD BORDER
Last step is to add the quilt border to the sides first, then to the top and bottom. This quilt has a double border, the first border is natural muslin cut in 4″ strips.

The second border is the background fabric cut into 5.5″ strips.

Attach one border all the way around the quilt first. Then attach the second border the same way. Press with iron as you go.

STEP 7: LAYERING AND BACKING
Create a quilt sandwich by layering the quilt top, batting, and backing fabric. Pin the layers together and quilt as desired. This could be simple straight-line quilting, free-motion quilting, or any other design of your choice. For more info on basting, check out How to Baste a Quilt: Beginner Spray Basting Tutorial or How to Sandwich a Quilt Step-By-Step Tutorial. Want an interesting backing for your quilt, check out my post on simple pieced quilt backings here.
STEP 8: QUILTING
You can opt for straight line quilting, free motion quilting, or any other quilting design that inspires you. For more info, check out How to Machine Quilt With Walking Foot for Beginners or How to Sew a Quilt Together – Quilting for Beginners.
STEP 9: BINDING
Trim the excess batting and backing fabric. Attach the binding to the edges of the free scrappy quilt pattern using a sewing machine. Fold the binding over to the back and hand stitch in place. Make double fold binding using 2.5″ x WOF strips with Charcoal Grey fabric until it’s long enough to fit around entire quilt. Sew strips together to form one long continuous strip. For more info, check out How Wide to Cut Quilt Binding and Make Easy Strips and How to Join Quilt Binding Ends, Beginner Series
STEP 9: FINISHING TOUCHES
Give your quilt a final press and inspect for any loose threads. Your Roundabout Quilt free scrappy quilt pattern is done. Wash it in cold water, gentle cycle with a Shout Color Catcher Sheet to catch any colors that bleed in the wash and dry on low heat.
If You’re New Here
I’m really glad you found your way here.
If you’re new to quilting, then welcome. The learning curve is fast, and yes, you will face challenges. But I’ve got you. If I can do it, so can you!
Here’s where to go next:
- Learn to Quilt Page – every step of making and finishing a quilt
- Free Pattern Index – all my free patterns in one place
- Digital, ad-free patterns – clean, printable, and beginner-friendly
My blog is built for the home sewist and quilter who wants to make a quilt from start to finish all by themselves. Take a full tour of this blog so you know your way around. Subscribe to the newsletter so you don’t miss out on new patterns or tutorials. And follow me on Pinterest, Instagram and Facebook.
SAVE THIS PIN FOR LATER!

More Quilt Block Patterns
ABOUT SEW NIKKI
If this is your first time stopping by, welcome! Your place for free crochet, sewing and quilt patterns for beginner to intermediate skill levels. Want a digital pattern? We have those too! Plus tutorials to walk you through how to make each item from start to finish.
Follow me on social media (Pinterest, Instagram, Facebook and Twitter) so you get notifications when I post new patterns and tutorials.
Looking for your next quilt project? Then head on over to my free “Pattern Index”. It’s a page dedicated to all of my free patterns separated by categories for crochet, sewing and quilting.
If you prefer an ad-free printable version, head over to my shop and browse the Digital Patterns. These are instant digital downloads you print yourself.
This post contains ads and affiliate links, which means I make a small commission at no extra cost to you. See my full disclosure here..


Another cool pattern, Nikki, & I like the placement of the darker & lighter squares. Nice job!
So many good photos! It makes the process so much smoother! We have slowly been replacing our blankets with handmade quilts. They are beautiful, warm , and so much more meaningful. Great tutorial!
You always have such helpful tutorials, Nikki! Thank you for that!! And I love the color choices.
I’m a fellow scrappy quilter, and haven’t been seeing lately. You give me inspiration to get into my sewing room! I can’t wait to try your design!