Charm Square On Point Quilt Pattern & Tutorial
Today I’m sharing my charm square on point quilt pattern with you, every step including binding to complete it. On point quilt patterns are visually stunning and such a fun quilting design. On point is when traditional quilt blocks are rotated diagonally to create a whole new look and feel to your pattern. This style of quilt can seem intimidating and very hard to do, but with the right steps, it’s achievable for quilters of all skill levels. Here’s a step-by-step guide on how to make this free charm square on point quilt pattern.
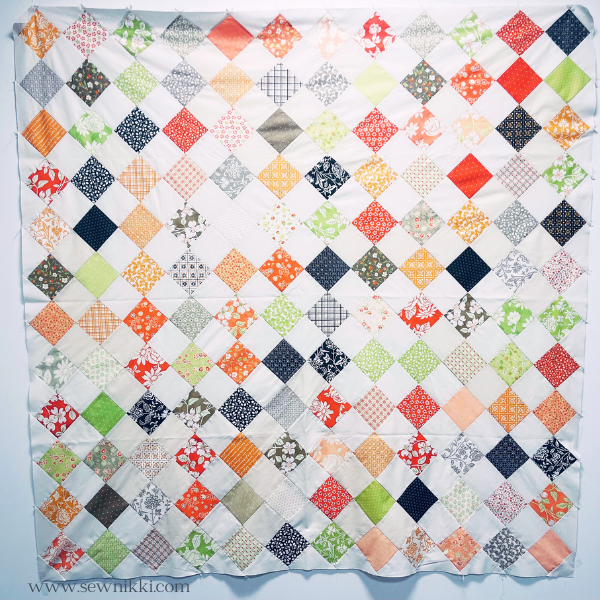
Are you ready to embark on a quilting journey that will not only challenge you but also yield a breathtaking quilt on point pattern with 12 points on each side? Well, grab your 4″ charm squares, and let’s get started on this charming quilt!
MAKE SURE YOU CHECK THESE OUT!
After you read this post, make sure you also check out Learn How to Quilt for Absolute Beginners. It’s jam packed with information to make your first quilt. It also has links and resources that are so helpful when you’re first learning. There’s lots of free quilt patterns that are great for beginners and all skill levels too. So make sure you check this out, seriously don’t forget!
Make sure you grab a copy of my free Quilt Planning Journal. It’s filled with graph paper and note pages to help you design at least 4 quilt or sewing projects! Use it to jot down ideas, fabrics, patterns and inspiration all in one place. Or create your own patterns and share with others. Pin in fabric swatches, photos of your finished quilts and enjoy your creative process!
Charm Square On Point Quilt Pattern – Cutting Instructions
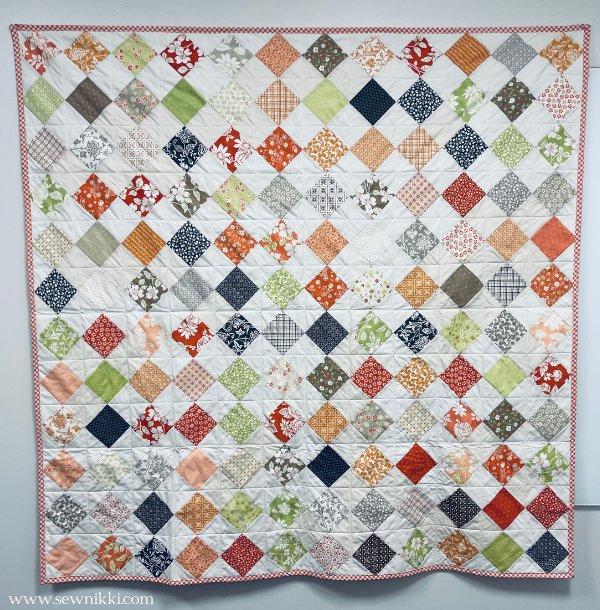
This patchwork charm square on point quilt is made with 4″ squares in print and background fabrics. Finished quilt measures 61 1/2″ x 61 1/2″, it’s the perfect size throw for an adult. Not too big, not too small. The fabric pictured in this on point quilt is from two layer cakes by Joanna Figueroa of Fig Tree Quilts Pumpkins & Blossoms and Strawberries & Rhubarb. Background fabric is a mix of Muslin Natural and Kona Bone 100% cotton. Backing main fabric is Bee Ginghams Kassidy Coral by Lori Holt of Riley Blake Designs and one 8″ strip of Muslin Natural fabric to give it some character. Binding fabric is Bee Ginghams (same as backing fabric). These colors work well for fall and winter holidays, she’s a real beauty.
Supplies You Will Need
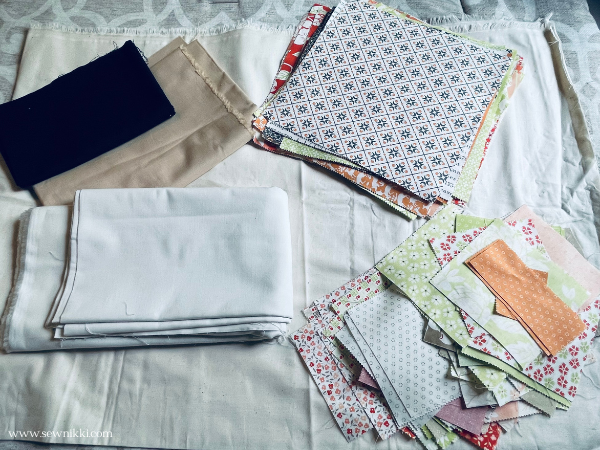
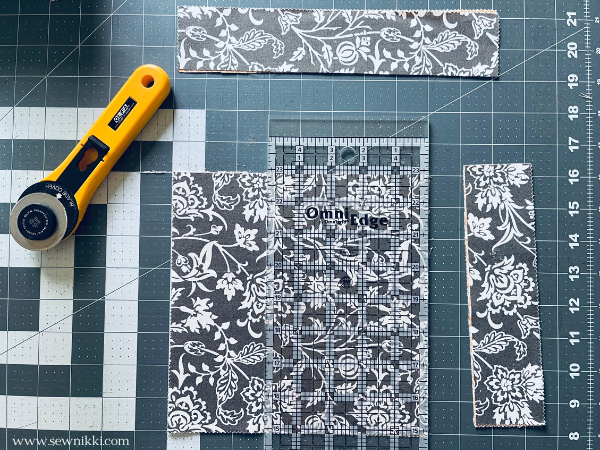
- Fabric: Choose a variety of fabrics for your squares. You will need 4 – 5″ charm pack prints and or 1 – 10″ layer cake. Trim to 4″ squares.
- Background Fabric: 2 yards of background fabric in standard width. This fabric will create the background for your quilt blocks, borders and will also be used for setting triangles.
- Sewing Machine: A standard sewing machine will work perfectly.
- Thread: Select a thread color that complements your fabric.
- Rotary Cutter and Mat: These tools are essential for precise cutting.
- Quilting Ruler: Make sure your ruler has clear measurements for accurate cuts.
- Iron and Ironing Board: Necessary for pressing seams.
- Quilt Batting: This provides warmth and thickness to your quilt.
- Backing and Binding Fabric: 5 yards of fabric for backing and binding in standard width.
CUTTING INSTRUCTIONS:
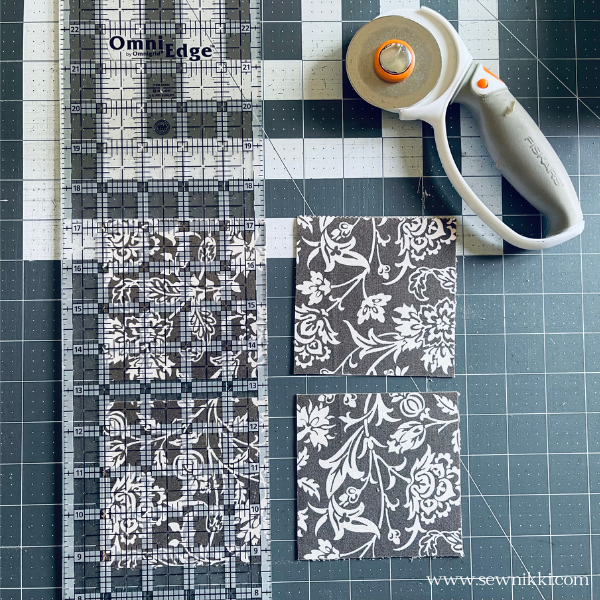
156 – 4″ x 4″ squares (print fabric)
121 – 4″ x 4″ squares (background fabric)
22 – 4 1/2″ x 4 1/2″ squares for setting triangles (background fabric)
2 – 5 1/2″ x 5 1/2″ square for setting corners (background fabric)
8 – 2 1/2″ x WOF strips for border (background fabric)
8 – 2 1/2″ x 2 1/2″ strips for binding (backing fabric)
4 1/2 yards standard WOF backing (backing fabric)

If you are new to quilting and want to know how to cut fabric for quilting then check out How to Cut Fabric For Quilting Easy and Accurate.
Finished charm square on point quilt measures 61 1/2″ x 61 1/2″.
Charm Square On Point Quilt – Free Pattern
Here are the steps for each row of the quilt. There are 23 rows, each quilt side has 12 print square points. First row and last row have one print charm square. The rows will increase up to the middle and then decrease to the final row.
Step 1: Sew Quilt Rows
When you sew a quilt row, a print square will always be the first and last square in the row with backgrounds in between. A background square will never start a row. The row list below tells you how many print and background squares are needed for each row. This is also the order you lay out the rows diagonally. Please refer to the quilt top above as a reference.
- One print square (R1)
- Two print squares, one background square (R2)
- Three print squares, two background squares (R3)
- Four print squares, three background squares (R4)
- Five print squares, four background squares (R5)
- Six print squares, five background squares (R6)
- Seven print squares, six background squares (R7)
- Eight print squares, seven background squares (R8)
- Nine print squares, eight background squares (R9)
- Ten print squares, nine background squares (R10)
- Eleven print squares, ten background squares (R11)
- Twelve print squares, eleven background squares (R12)
- Eleven print squares, ten background squares (R13)
- Ten print squares, nine background square (R14)
- Nine print squares, eight background squares (R15)
- Eight print squares, seven background squares (R16)
- Seven print squares, six background squares (R17)
- Six print squares, five background squares (R18)
- Five print squares, four background squares (R19)
- Four print squares, three background squares (R20)
- Three print squares, two background squares (R21)
- Two print squares, one background squares (R22)
- One print square (R23)


Step 2: Cut Setting Triangles
To create the On-Point effect, you’ll need setting triangles. Take the 22 – 4 1/2″ x 4 1/2″ background squares and cut them in half diagonally to create two triangles.
The setting triangles are large right-angled triangles that fill in the gaps around your quilt blocks when they are turned diagonally. Here’s how to cut them (see photo below).

Step 3: Arrange Your Rows and Setting Triangles
Lay out your rows and setting triangles in the desired pattern. As you position the rows diagonally, you’ll see the On-Point pattern starting to emerge. Lay out the rows in the order provided in the sewing instructions above. Rows should be laid out diagonally with a setting triangle at the beginning and end of each row.

Step 4: Sew Setting Triangles Onto Rows
Attach the setting triangles to each row (as shown below). Use a 1/4″ seam allowance.


Now join the rows together. Press rows before joining. Use straight pins where seams are nested to hold everything in place.
Step 5: Sew Setting Corners Onto Quilt
Last step is to cut the 2 – 5 1/2″ x 5 1/2″ squares for setting corners (background fabric) in half diagonally. Attach to all four corners with a 1/4″ seam allowance.

Square up the quilt top corners after you have attached the setting corners. Use square ruler if you have one (as shown below). Press with iron.

Step 6: Add Border (Optional)
To give your quilt a polished look and adjust its size if needed, you can add borders. Borders can be as simple or elaborate as you prefer. This quilt does not have a border to give it a modern look. For more information on borders and sashing, check out How to Make Quilt With Sashing and Cornerstones.
Step 7: Create the Quilt Sandwich
Layer your quilt top, batting, and backing fabric to create the quilt sandwich. Secure the layers with pins or basting spray.


Want more info on basting, check out How To Sandwich a Quilt Step-By-Step Tutorial.
Step 8: Time to Quilt – Machine Quilting Designs
Quilt with sewing machine and sew diagonal lines in both directions through the background squares. You could also stitch in the ditch, straight line stitch along the seam lines or free motion quilt.

For more information on machine quilting designs, check out How To Machine Quilt with Walking Foot For Beginners.
Step 9: Square Up Quilt
After you are done quilting, it’s time to square up your quilt and trim off the excess batting and backing fabric. Doesn’t matter which side you start on but do the top and bottom first, then sides. Or do sides first, then top and bottom. Use the seam line and the quilting ruler lines to trim the same amount off from all sides. For more info, check out How To Sew a Quilt Together – Quilting For Beginners.

When you trim, make sure that there is only fabric under your ruler. You don’t want batting left on your quilt top without fabric over it. Use your straight quilt ruler, rotary cutter and cutting mat to trim. Find a line on your ruler that you can line up to the sashing seam.
Step 10: Bind the Edges
Finish your quilt by binding the edges. This quilt has double fold binding. For the binding, take the 8 – 2 1 /2″ x WOF strips of background fabric. Sew strips together to form a long continuous binding strip that is long enough to fit around entire quilt plus 15 extra inches to join. For more info on binding, check out How Wide to Cut Quilt Binding & Make Easy Strips.

Attach the double fold binding to the raw edge of the quilt top (starting on back of quilt), join ends, flip and finish on front side, mitering the corners for a polished look.

For more information on how to attaching quilt binding, check out How to Join Quilt Binding Ends: Beginner Series or How to Bind a Quilt – Easy Single Fold Binding.
Step 11: Final Touches
Once your quilt is bound, trim any loose threads, and admire your beautiful Charm Square On-Point Quilt!
Get the digital pattern.
Get the instant download pattern from my shop here.
You may also enjoy trying my Log Cabin On Point Quilt.
QUILTING TIPS
Intermediate/Advanced Beginner
This project is perfect for intermediate to advanced beginners who want to make handmade gifts this holiday season but aren’t sure what to make. On point quilts are stunning and show off your advanced quilting skills. It’s also a one of a kind gift you can give to your friends or family members. You will impress them with this little beauty.
Tips for Sewing Setting Triangles
Sewing triangles onto a square piece of fabric can be challenging. If the tip of the triangle is at the top, flip the row over so the triangle fabric is on the bottom. Pin two rows together before joining on sewing machine with 1/4″ seam allowance. Take to sewing machine but flip your row so you are sewing on the back side. Place you needle in the down position just above where the fabrics meet, then begin sewing slowly. If you sew rows together as you normally would, you run the risk of the fabric getting eaten by your machine. This will help the tip of the setting triangle not get caught under the sewing plate.

Also, on point quilt patterns come together diagonally. Make sure the fabric isn’t dragging to the left of your sewing needle as this will cause problems when you try to sew straight.

Pin It for Later!
Save this post on Pinterest so you can find it easily when you’re ready to start your on point charm square quilt!

This post contains ads and affiliate links, which means I make a small commission at no extra cost to you. See my full disclosure here.
ABOUT SEW NIKKI
Welcome to Sew Nikki! Your place for free crochet, sewing and quilt patterns for beginner to intermediate skill levels. Want a digital pattern? We have those too! Plus tutorials to walk you through how to make each item from start to finish.
This quilt came out so good, the pictures do not do it justice! It’s the perfect size throw to cover you full as you snuggle on the couch with your dog or granddaughter and watch something on tv. Perfect for picnics, concerts or going to the beach. It’s up there in my top 3 quilts, you have to try quilting on point.
Trying this technique and finishing it does was a big confidence booster. Feel free to experiment with different color combinations and layouts to make the quilt truly yours. Hope you try it and share photos, make sure you tag me on Instagram.
Follow me on social media (Pinterest, Instagram, Facebook and Twitter) so you get notifications when I post new patterns and tutorials.
Want to learn how to crochet? Then check out this post, Learn How to Crochet.


Love your patterns together! It totally reminds me of one of my grandmother’s quilts.
Thank you, that makes me smile.
Absolutely love this pattern and your thorough guide!
Love this pattern. I was thinking about doing something like this as a quilt for my bed. Thanks for sharing!
Thanks Mariah, you should totally make one!
Thanks Jamie!
I love quilts where the squares are on point. So charming and cozy! Thank you for this expert quilt guide. We use quilts around our whole house and each one has a story and is made with loving hands. I hope this tradition never dies out!
thanks Rebekah!